Thursday, May 28, 2015

Wrap Bracelet at Bead and Button Show

I have been so busy working on these Braided Silk Bead Bracelets getting the kits ready, that I backed myself up against a wall for Bead & Button Show in Milwaukee, WI next week!

I've been working part time at Sarafina Art House in Elkton, MD and one of the women that I work with (the amazing Kyla) was kind enough to film and edit a video tutorial for me that I could put up on You Tube.


It's my first time doing a video tutorial, and I was a bit nervous - but it was a LOT of fun.
Just like teaching a class says Kyla - good advice!

I have yet to update my website, but did get the kits into my Etsy shop (boy - this business end sure is a lot of work!)

I've even got a hashtag so when people make a bracelet, they can post a pic of it with #MNSBeadedBracelet and it will show up.
I am mostly curious to see what art beads each person chooses to use as a closure bead!

And next Tuesday I will be arriving in Milwaukee, WI for the Bead & Button show.

Tuesday night, June 2 from 9:30-11:30pm there is a Moonlight Madness at the Hyatt Hotel where a bunch of vendors, including myself, will be selling a small amount of work - like a preview of what is to come for the main show June 5-7 (the show preview night is June 4) held in the Milwaukee Convention Center.

See what is going on through social media: #BeadandButtonShow
I can be found as: Marsha Neal Studio in booth #608 at the main show, along with Nikki of Thornburg Bead Studio.

My sister has been over this week helping me bag up some small special show bead mixes to go with the variety of silks that I will have with me at the show.
I am going to feature these bracelet kits as a make and take for people to do at the show.

I am figuring that there is going to be a mecca of handmade beads for people to buy and match up - make a bracelet in a few minutes, then wear it to show it off!

If you are going out there, make sure to swing by and say Hi!


I'm off to get into the studio to glaze more beads - one can never have too many beads for a huge show like this!

Tuesday, May 26, 2015

Feeling Uninspired?

by Sherri Stokey


Have you ever had one of those days (or weeks, even) when it feels like your creativity has left the building?  You've ground to a halt; come to an agonizing standstill.  Your muse is on vacation.  The idea fountain has run dry... I think we've all been there, but I'm here to help today with some ideas on how to find that spark again.  I find inspiration everywhere!  The wall decoration above is a good example.  I found it at a yard sale for $1 and besides the fact that I love it in all its kitchy glory, it gave me a little seed of an idea that turned into this micro macrame piece:

Micro macrame bracelet based on colors from 1970's kitchen decoration.

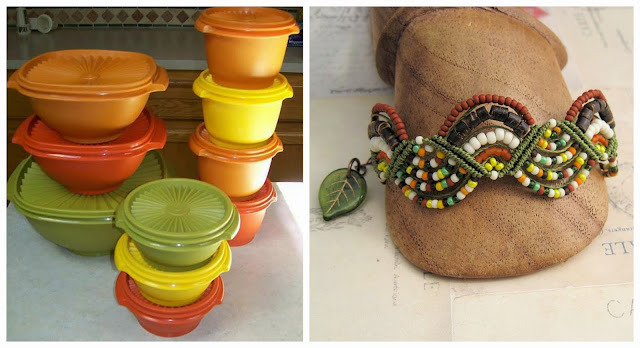
Fun, don't you think?  Flea markets and garage sales can be a treasure trove of pieces that may just transport you to another decade and change the way you look at things for a little while.  Anybody remember these Tupperware containers in avocado green and burnt orange (my mom is still using hers):

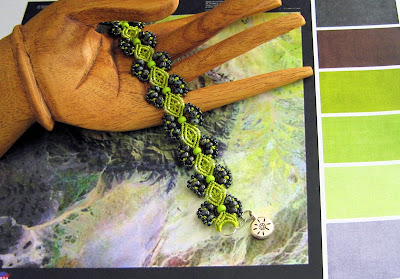
Beaded bracelet based on colors from old Tupperware!

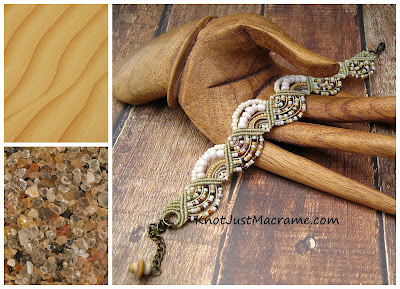
Try to change your mindset and look around you.  Common, everyday objects can provide you with ideas on colors and textures.  Even sand:

Sand dunes in macrame (bracelet).

And water:

Freeform macrame inspired by water.

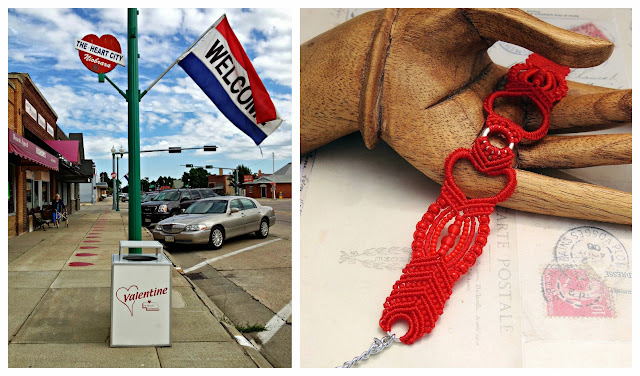
And street signs (this is from my hometown, Valentine, Nebraska, and yes, they really do stencil hearts on the sidewalks on Main Street):

Valentine inspired bracelet with hearts.

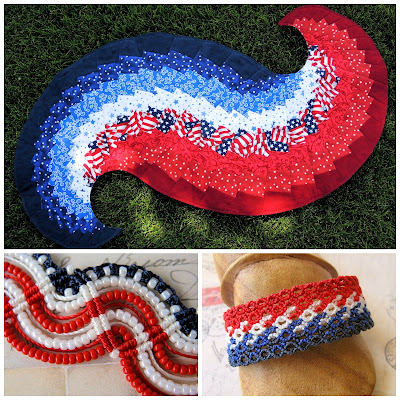
If you have a talented person in your family (or friends), maybe you can piggyback on their creativity to jump start your own.  My mom makes beautiful quilts, but maybe you know a painter or a weaver or a clothing designer?  These are a couple examples where I drew inspiration from Mom's work:

Patriotic quilted piece and macrame bracelets in red, white and blue.

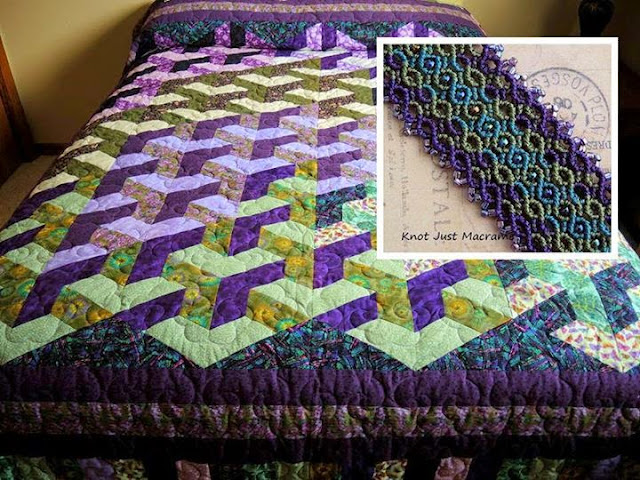
Quilt in purple and green colors inspired a macrame bracelet.

Are you getting excited yet?  Seeing some possibilities?  If none of those ideas appeal to you, you can always turn to color palettes pulled from photos.  

Blue and gold color palette and beaded micro macrame.
Color palette based on NASA photo and resulting macrame piece.

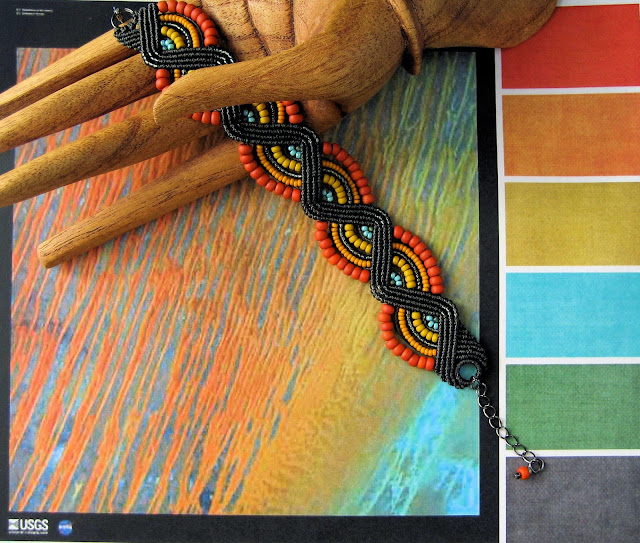
Try thinking of the photos a little differently, too.  Instead of just pulling a color palette, consider the shapes, textures and movement in the photo.  Is it something you can use?  Like these undulating lines:

Micro macrame bracelet based on USGS photo and color palette.

Or this texture:

Bead weaving spiral necklace inspired by lizard photo.

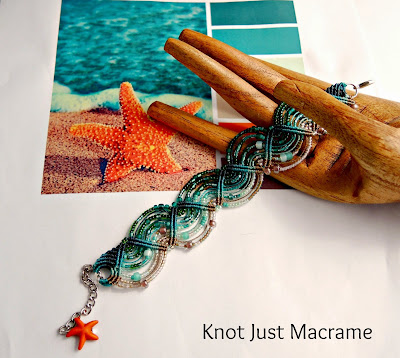
Or just pick up a feeling from the photograph and go from there.  In this next piece, I tried to capture the feel of the waves lapping up onto the sand; the foam; the colder, deeper water further out:

Micro macrame bracelet by Sherri Stokey of Knot Just Macrame.

One more place you can turn in a crisis and then I'll leave you to ponder.  One of my all time favorite color palettes is pulled from the raku finishes on some of the art beads I've collected (these are from Star Spirit Studio).

Beads, cord and art beads (pendants) in raku colors.

I think I could use these colors for years without getting bored (raku focal pieces below are from Star Spirit Studio, Spinning Star Studio and Elements Pottery and macrame work is by yours truly)!

Micro macrame bracelets and necklaces featuring art beads.

If you get to that point where you're uninspired, try taking a look around you again with fresh eyes.  Hopefully some of these ideas will help you.


Monday, May 25, 2015

Family Roots: Fiber Boot Camp

Carol Dekle-Foss
Hello everyone! I'm very excited to introduce you to my dear friend Sharareh, or Shery for short. I met her over a year ago in a metal smith class and instantly fell in love with her work. Her jewelry designs embrace her family traditions and culture yet have a unique modern feel. She incorporates different techniques in expressing her style and has created a niche for her designs. I thought of her immediately for our fiber boot camp because she utilizes a special Persian fabric in some of her work called Termeh.


For this boot camp I challenge you to look at your very own family traditions using textiles, see what inspires you and create something unique. Feel free to leave a comment here with a link to your design. I would love to see what you come up with!

I asked Shery to tell us a little more about herself and what inspires her. Shery's answer:

A beautiful hand woven Termeh bag with Zardozi embroidery,
passed down to Shery from her mom.
"All my life I have had a passion for making jewelry. Early in my life making jewelry for my friends became more than a hobby. I learned how things are made by repairing my friend's jewelry. It has been especially interesting growing up in Persia where history and culture intrigued me. How old things are, 200, 300 years in Persian antique shops. My grandmother had coins from an ancient empire. Since beginning my new life in the United States in 2007, my handcrafted jewelry has found a niche. I have been taking classes, most recently copper enameling, so we will see how I incorporate this with metal engraving that I've been experimenting with."

Thank you Shery for telling us more about yourself and revealing what inspires you!

Ready for a heavy dose of inspiration? Here are some more of Shery's beautiful designs.

Domed sterling silver charm with Termeh paisley

Sterling silver bracelet 
Etched paisleys with Termeh earrings
Shery made these earrings to represent her love for Iran.
The top pair are etched in Farsi, My love Iran

Beautiful sterling silver and rose quartz paisley necklace
with bezel set Australian pink opal

Gorgeous Sterling silver domed paisley ring
Etched brass domed earrings with intricate bead detail
Here is a You Tube video that Shery has provided for us so we can learn more about this amazing textile and it's origins. 


I've also pinned a few examples of Termeh, both machine and handwoven here on my Inspiring fibers Pinterest board.

Shery gave me this beautiful piece of Termeh a while back. I never used it for fear of not doing it justice. It measures about 4 inches square.


 With Shery's fabric, I took our fiber boot camp challenge and made this bracelet.

Brass, sterling silver and enameled flowers accent the intricately detailed Termeh fabric.


I hope this post has inspired and encouraged you to look at what textiles your family has held dear and create some unique designs that may someday become cherished family heirlooms.

Thank you Shery so much for sharing your beautiful creations and letting us know what inspires you! You can visit Shery's facebook page here to see more of her beautiful work.

I hope everyone has a wonderful Memorial day! Let's honor all those who have sacrificed serving in the Armed Forces. 

Thank you for reading!

Friday, May 22, 2015

Introducing Myself

by Sherri Stokey


Who is going to introduce the new person?  Nose goes!  Yes, that me with my finger on my nose (not in it - really).  Didn't you always dread that part of the class when they said, "Why don't you stand up and tell everybody a little bit about yourself?"  *Groan*  

I said I'd do it though, so here goes: My name is Sherri Stokey and I am a maker of micro macrame jewelry.  Ms. Staci Louise Smith (maker of really cool beads and jewelry) invited me to write a guest post a while back and instead of being properly appalled by my piece, they actually asked me back on a regular basis.  Go figure (#willwondersnevercease). 

 I am an obsessed jewelry maker with an emphasis on macrame and a curiosity about all other techniques.  I've dabbled a bit in bead weaving and I don't totally stink at it, but it's not my passion.  I tried playing with polymer clay, and that I do stink at.  I tried torch fire enameling and ended up with a slightly singed thumb, a bead permanently adhered to the rod and melted mini blinds.  Metal work resulted in more personal injuries (minor, but why push my luck).  

Somehow I always work my way back around to micro macrame knotting.  I like it and it's a good fit for me, too.  It doesn't require any power tools and I am not at great risk for putting my eye out with the scissors since it's a sedentary activity.  I usually use glue to end my pieces rather than flame, which is probably better for everyone involved.  Besides, the process of turning of turning a bit of cord and a handful of seed beads into something beautiful fascinates me me.  From this:


To this:


Or from this:


To this:


So that's what I do when I'm not sitting around with my finger on my nose trying to avoid whatever unpleasant activity is up for grabs.  

A few other facts about me:
I retired almost 6 years ago, but I work full time (and no, I'm not that old).
I have two (mostly) grown children and one absolutely adorable grandson.
I've been married for more of my life than I was single.
I'm allergic to beavers.
I can't swim and water terrifies me.
I've eaten turtle (tastes like chicken) and gator (tastes like mud).
My family has a "go plan" in case of a zombie apocalypse.

On that note, I'll return you to your regularly scheduled programming and I'll see you back here in a couple weeks!  


PS  If you're looking for me in the meantime, you can follow me at KnotJustMacrame.com or drop me a line on Facebook.


Thursday, May 21, 2015

How it is Made

by Staci L. Smith

My dear friend over at Handstampin Metal Mama posted this GREAT little insight into recycling scrap and making a pendant.  I just had to share it with you.

I just love seeing how things are made, with process shots.  

First of all, she uses Argentium Silver, and highly recommends it.


To recycle her scraps, she finds ways to melt and use them.  


And she turned these into a sweet little pendant!

Isn't that just GREAT?  And because it is so pure, you don't need solder, you can just fuse it together!  Virtually no fire-scale or anything.

You can find her work here on facebook

Handstampin Metal Mama
https://www.facebook.com/groups/metalmamashandstampin/photos/

Here are some of the wonderful things she does with her metal!


Thank you Metal Mama for sharing your process with us!


Tuesday, May 19, 2015

Just a Thought....by Karen McGovern

If you are at all keyed in to the online arts and crafts world, either as a creator or a collector, you know the epic, fit for the big screen story of the rise of Etsy.  Etsy, in a very short time, exploded online as the ultimate source for handmade crafts.  Artisans from around the WORLD became Etsy-ites, including myself, opening online shops to sell our handmade goods including fine art, jewelry, gourmet foods, textiles, pottery and SO MUCH MORE. For many of us who opened shops, Etsy gave us a wonderful platform to sell our stuff, and they MARKETED THE CRAP out of themselves.  Since launching in 2005, Etsy has become a household name, the go-to online source for endless shops filled with GUARANTEED HAND MADE ITEMS.  It was great—while it lasted.  Slowly but surely mass produced goods popped up in shops all over Etsy.  The hipster staff we all imagined running the ship could not, and would not police itself.  Founding shops discovered their goods, and ideas copied, sold for half price, and the site became a quagmire of garbage.  HUNDREDS OF THOUSANDS OF SHOPS. Those of us that jumped on the Etsy boat from the beginning were capsized under a wave of Chinese imports and resellers.  THAT WAS A GREAT METAPHOR!


Many, many founding artists jumped ship, myself included. There are chat rooms, blogs, forums and endless articles filled with angry artists voicing how betrayed we all feel and how DEEPLY DISAPPOINTED we are that Etsy sold out.  THEY SOLD OUT.  There are websites dedicated to the subject, like the over-the-top How Etsy Raped America. The millions and millions of dollars they make from all the shops; good, bad or indifferent, far outweigh any losses from artists who left Etsy because WE ACTUALLY HAVE ETHICS AND GIVE A DAMN ABOUT THE HANDMADE COMMUNITY. I suspended my Etsy shop well over a year ago, and have moved on to sell through Facebook and my own online website.


Notice I said I “suspended” my shop.  Did I close it?  No.  I wrote a huge, heartfelt message on my home page explaining why I thought Etsy was betraying its original artists and suspended all my listings.  Why didn’t I close my shop?  BECAUSE, THE SAD TRUTH IS I SHOP ON ETSY ALL THE TIME, and you have to be an active member to use the site. So, does that make me the biggest hypocrite of all time?  Maybe. I’ve been thinking a lot about this.

Not every great, original artist left Etsy when they went to the dark side.  If you are an artist with a big following, are well known, and have an active client base, you had no reason to leave Etsy.  The resellers and crap shops don't affect you.  The ruined small artists just starting out, artists that didn’t and don’t have a recognizable name, artists that aren’t blessed with a huge following.  There are MANY, MANY WONDERFUL artists on Etsy—some of my all-time favorite artists have successful shops there.  Some of my favorite suppliers sell on Etsy, and many sell ONLY ON ETSY.  So I shop there.  And, I’m considering re-opening my shop. WHAT? GASP? HAVE I LOST MY MIND? DO I NOT CARE ABOUT THE ETHICS ANYMORE?  Damn right I do.

Here’s what I am thinking.  Original artists who really want to make a living selling their ORIGINAL work need to take back Etsy. I will suggest a scenario here….Love My Art Jewelry is made up of a group of really talented and amazing artists. All of us struggle with the Etsy dilemma, and some have shops there and some have closed shops there. What if we all re-opened our shops, with a “Handmade Manifesto” of sorts on our homepages? What if we used the LMAJ blog and our personal blogs to support each other and other original artists that need Etsy as a selling platform?  Let’s face it, no other online retail portal has been able to get the same attention Etsy has. Whether you love or hate them, they are well known and HUGELY SUCCESSFUL. Even the recent bad press Etsy has gotten hasn’t done any real damage. Etsy, I believe, is here to stay. So, let’s USE IT and USE IT WISELY. Be vocal, say what you feel in your shop.  Call out the resellers. Name names and make a fuss. SELL YOUR WORK. Blog, post on Facebook, join forums and start your own handmade support groups online to direct traffic to Etsy shops that are run by independent artists creating and selling original handmade goods. What if other arts groups did this, over and over all over the WORLD? WHAT IF WE TAKE BACK THE SITE WE HELPED BUILD AND MAKE FAMOUS?!?


It’s just a thought, and I may change my mind….but I’d love to hear what you think.


Now, GO MAKE SOMETHING AMAZING!

Monday, May 18, 2015

How I Set a Tube Rivet

Written by Patti Vanderbloemen for Love My Art Jewelry

I had an idea to create a pair of hoop earrings from copper sheet..  I drew a rough sketch and cut out my shapes.  This is when I realized the music in my studio must have been too loud (or my singing was too loud) ...3 1/2" length does not an earring make..but it would make a pendant.


After a quick fold form and texture, I decided to add tube rivets to the top of the pendant.  I like a clean look to my metal, and tube rivets give me this look.  I only recently learned how to make these rivets.  While I am sure there are many tutorials or You-tube videos out there, I have made quite a few spinner rings, and I thought I would try the same basic technique to achieve the flare required.

DISCLAIMER:  After I began this blog post, I decided to research "How to Make a Tube Rivet" via Google.  After several hours spent on You-Tube and various other sites, I realized that there are specific tools for this technique - tools that I do not have.  So, the technique below is how I make tube rivets using tools I on hand. This includes wearing a face mask (breathing in pieces of metal shards while drilling holes in my sheet metal is not my cup of tea) and eye protection.

First, I drilled a hole in my sheet.  Now, the tubing used for the rivet (I used copper) should fit snugly through the hole in the pendant.  I do not have drill bits as large as my copper tubing (I probably do in the garage, but that would have required me to actually go up the steps from my studio to get to the garage....no way!)  I simply drilled a starter hole and used various sanding burs around the initial hole until the hole was big enough for the tubing.


As I got closer to the correct hole size, I switched to using a  round and half round needle file around the edges to enlarge the hole.


Success.

Next, insert the copper tubing through the hole until approximately 1.2 mm extends on the left side of the tubing (per the pic below) and make a mark with your sharpie approximately 1.2mm on the right side of the tubing.


The total length of this particular tube rivet is 2.4mm. The amount of tubing that will extend on either side of my pendant is roughly the thickness of my sharpie pen.


Cut the tubing with your saw.  This is the tube cutting jig that I have had for several years (link here). Now, I cannot use the jig as illustrated on the box or the website.  I mean really, hold the jig with your left hand and saw the tubing with my right hand while hoping the tubing does not slip. Ha! I unscrew the red handle and insert the jig in my vice.  This way, I have my hands free - one hand for the saw, and one hand to hold the tubing. 


Insert your cut tubing through the hole into the pendant, so that equal amounts of tubing are on either side of the hole (I apologize for the blurry picture!),


Now it needs to be flared.  Just like a spinner ring, I turned to my dapping mandrels (this is the set I have here).  Find a mandrel that is slightly larger than the tubing. Using a BRASS or other shop-type hammer (I NEVER use my good jeweler's hammers with my dapping tools or metal stamps - there is a potential for ruining the hammer face) gently tap once or twice - turn it over and gently tap once or twice again. Seriously - do not BANG but tap.  I have tried banging, and it only ruins the tubing!


The idea here is to start the flare on the tubing. The picture below is after 2 taps on each side of the tubing.  You will note it is not completely flared...yet.


Next, place the pendant on the steel bench block and use the ball peen side of your goldsmith hammer or an embossing hammer to gently tap the rivet flat. Again - one tap on one side, flip it over, and one tap on the other side.  Repeat as necessary. In this example, that's a good size tube rivet, so my embossing hammer is a bit it bigger than my goldsmith hammer, and it and fits this particular sized rivet perfectly.  


Ta da!  I actually find tube rivets easier to set than a wire rivet.


I have one more tip for you today.  I suffer from ocular rosacea and blepharitis - I have an awful time making tears so my eyes remain dry, burn, and sometimes, my vision is blurred.  When I take the time to finish a pendant, such as above, and I want to add a jump ring as a bail, I like to solder that jump ring closed. Well, sometimes I have a hard time seeing the seam that needs to be soldered.


I just mark the seam with my sharpie 


I pick solder my jump rings, so, once set up and hot enough, I know right where to place that tiny little ball of solder - and the sharpie mark burns away.
  

This method of cold connecting - still new to me - really yields a clean look.


I used some of Marsha's gorgeous silk in this necklace (link here), as well as a single artisan lampwork bead.

Just a few vintage resin beads on this one.


But the tube rivets are not only be used for function - but aesthetically as well.  For the earrings below, I soldered half of a sterling silver circle to a slightly larger half copper circle, and added 3 tube rivets.


My last example features both function and aesthetic.


This is actually a bracelet - the bangle portion is 6 gauge copper.


I hope you found information helpful - and if nothing else, encourages you to try new techniques with the tools you have on hand.  I would love to hear your tips, too!!