Friday, June 26, 2015

Maybe tomorrow....

Yesterday was my last day of school for 2014/2015. I have been a special education resource teacher for 31 years, 25 of those at Fabius-Pompey, a nice little rural district south of Syracuse, NY. It never fails.... I am working on paperwork (I HATE PAPERWORK) up until and including the last day. The problem.... well, it is the same problem that I have with everything that seems like a chore... procrastination.

I always get everything done that I need to and I tend to do my best under pressure. At 55, I am pretty sure that won't be changing anytime soon.  Procrastination MADE ME wait until this am to think about today's post. The truth is as I type this sentence, I still have no clue.

ughhh......

.......pressure is building

I think I have this.....

Yup - there is an "I'll do that later" list at home......

........I told the group was that I think it would be a good idea to have links to our individual FB pages. That was at least two weeks ago. In my defense, life has been a little on the crazy side (friends often look forward to my morning news reports on the latest family drama), so that has been put a few sticky notes down in the pile of things to do.

I do have a procrastination system. Notes to self (usually sticky), have notes all over desk, throw notes away as the work gets done, more new notes added, still have notes that have wrinkled edges and maybe some coffee stains on them (those are the ones that I try not to wish away), maybe rewrite those notes on a clean sticky note (maybe a new color will make me get it done), hold onto notes because I can do it tomorrow, time is running out, pressure, gather the dreaded notes with the most important on top and then.... finally, if it all goes as unplanned, things work out!

I haven't dreaded this task..... just haven't gotten it done.

In no particular order (If all went right, you should be able to click each picture- If not, give me a few minutes and I will have it fixed!!) -

Staci


Sherri


Mary Jane


Karen


Patti


Carol


Marsha


Barbara


And then there is ours. Yup.... this task of updating got somewhere lost in the fire of the year...... maybe this summer I will get on top of it!

We'll see.

MaryAnn (and Bill)


Of course I don't want to forget what we share as a group.

Love My Art Jewelry


I am now one step away from completing the task of making this a page. 

Maybe I will get on that tomorrow.

MaryAnn

Thursday, June 25, 2015

Sticker Labels

In my world of process and making, I always find that towards the end of a project, I am ready to move onto the next without officially "finishing". And with my beaded bracelet kits - I felt they needed to be able to stand alone and not require me to be there to explain to everyone exactly what they were, what the box contained, and what other colors it comes in.

So after looking up ideas for packaging via Pinterest and Google, I decided that Stickers were my best bet. I found a couple of companies that had awesome websites to upload your images and ideas, and that used actual people to design & proof your ideas, and get the printers going.
I like companies like that!

I chose Sticker Giant because they look like an awesome company, had great reviews, were in the US (for me that saves on time and shipping costs) - and I needed these in under a week!


My happy mess of a table to quick grab a pic of the rolls of stickers - I did a custom die cut bracelet pic for the front. And a 3x5" color selection and item content label for the back.


And as I ran out the door to a craft show this last weekend, a bit more of me felt professional and happy knowing that some people were going to grab up some of these and be able to bead, braid, and wear some new bracelets that they made themselves...

Designing is pretty cool sometimes.

Now for more ideas on making some stickers for Bead Fest Philly...
Artisan Bead Stickers could be really cool and fun for shoppers!

Tuesday, June 23, 2015

Tutorial Tuesday - TUBULAR! By Karen McGovern

I learnt sumthin' NEW! Don't you love that feeling when you master a technique you've been too chicken to actually try before???  That happened to me last week.  I've always loved the look of cross-pined jewelry designs, and have wanted to learn this technique FOREVER.  I have tried before--but never seriously and always with DISASTROUS results.  Burnt metal, ruined designs, etc. etc. etc. So I just gave up on it.

I have also loved designs using bent tubes as focals, bracelets, beads, etc. Again, never really thought I could do it myself given the limited tools I use (micro torch exclusively). I always figured this was beyond my skill set....NOT ANYMORE!! I'm going to describe what I learned here, not in step-by-step form, but more conversational. I didn't take step-by-step photos while I was working....so if you have a question, ASK IN THE COMMENTS SECTION and I'll get back to you--promise.

Last week I was digging around under my bench (also known as the Sucking Back Hole of all Small Findings and Tools) and I found this:


I completely forgot I had it. Purchased at Home Depot forever ago in a moment of, "Hey, I bet I could do something with that...".  At the same time I had just received a nice box from Rio Grande full of different gauge sterling silver wire (I splurged...sigh). Sitting with the copper tube in my lap and the wire in the box I decided to TEACH MYSELF CROSS-PINNING AND TUBE BENDING, DAMMIT! BTW, this copper tubing is found with refrigerator repair stuff....just ask the guy/gal wearing an orange apron....

Ganoksin is a wonderful resource for all things jewelry related. Tons of videos, tutorials, tips and so much more.  Their Facebook page is a rabbit hole of inspiration! They had a video on tube bending that I watched with one eye, learning just enough to run back out to the studio to give it a try.  The key is ANNEALING the metal really, really well. That is where I always figured I would fail because I only use a hand held micro torch--a Jumbo Max Flame to be exact. I went for it anyway. In my first attempt I wanted to make a bracelet that would be half tube, half gems. I figured I'd need around 4 inches of finished tube for the design. Copper, as we all know, is a nice, soft metal so I figured I could handle working with this in tube form. You need to cut more tube than you will need in order to get a nice bend with no crimps.  I lot more. I cut over 8 inches of tube using my handy-dandy pipe cutter from Home Depot.  Cut the pipe like butter in a few rotations. Then I laid the pipe out (it was already a bit curved from the way it was packaged so--bonus) on a solder block and went at it with my torch till it glowed red. It heated nicely, easily and faster than I thought it would. Probably helped that my garage studio was 94.5 degrees that day. Florida in the summer....yea? I CAREFULLY quenched the tube, then using my hands and a rubber mallet, centered it and shaped it around a bracelet mandrel to get the curve I wanted. Even fully annealed the metal was stiff, but totally manageable, and I got the curve I wanted no problem and NO KINKS.  You hang on to the ends of the tube then make the curve. The waste will be on either end of the centered curve. I made cut marks with a Sharpie, then back in the pipe cutter it went. VOILA! You can also use a jeweler's saw to cut the tube...whatever works for you.

After cleaning the ends and buffing with a polishing cloth to see what I had, I wanted to try to add cross-pins in sterling silver. I laid the tube on my steel bench block, marked where I wanted the pins then CAREFULLY cross drilled using my FlexShaft and a 1/16th drill bit. NOTE: Do your very, very best to drill straight through the tube so your pins end up nice and even. A drill press would be awesome here, but I don't have one. I then cleaned the holes with a needle file and was ready to add the silver. I used 18 gauge sterling silver wire. I drilled six holes, so I cut six 4 inch lengths and balled one end on each piece using the micro torch. I placed the tube in the jaws of a third hand, inserted the wires so the CUT ends dangled below, then trimmed to what I thought would be the appropriate length to allow for a nice ball to form close to the tube. This is a tricky bit--you may end up having to cut more wire and trying a couple times here. If the wire is too long the ball of sterling will drip right off the wire when it gets too big, and if the wire is too short, you won't get a ball to form at all. Anyway, when you have the right length, simply direct the flame of the torch to the tip of the wire and as the ball forms follow it up to the tube. I ended up cutting 9 wires--2 failures in the seven.  NOT BAD FOR A FIRST TIME!!! Wire gauge is, of course, a big factor here. The finer the wire the easier it will ball in the flame of a torch. BUT THE TAKE AWAY MESSAGE IS THAT IT WORKED!!! CAREFULLY remove from the third hand (HOTHOTHOT) and quench, then into the pickle pot it went.

I cleaned, polished and oxidized the tube with liver of sulfur, then sprayed it with ProtectaClear. I love this look! 

Here it is. I also soldered a dot of sterling to the very center for accent.


Since then I took the bend further and  made a standard 8 inch bangle (will definitely make more) and a 6 inch focal for a neck piece. I see cuffs, more bangles/bracelets and many more necklaces in the future....


I made another necklace...these make lovely sets, don't you think???

I'm so glad I got over my fear and gave this a try. There are so many sources for information and inspiration online--there really is no reason not to try new stuff, right??? As long as you have the equipment and the desire, I say GO FOR IT. You will be surprised--I promise.

Now, GO MAKE SOMETHING AMAZING!

Monday, June 22, 2015

Fiber Boot Camp Wrap Up

by Staci Louise Smith

Well I think the wrap up is long overdue, but we had a nice little Boot Camp about fiber, and different ways to add it to your creations. 

Here are a few more inspirational ways to use fiber in pieces before I take you through our boot camp posts once more (that way if you missed any you can go back and check them out, I know I had a busy spring and even missed a bunch of these posts!!!!)


 Patti stepped out of her comfort zone for the challenge and totally rocked the fiber by adding it to her metal work.  I love the pop of color it adds, and how it softens it just a bit.


Sherri did a guest post and ended up becoming our newest member.  Not only does she work primarily in fiber doing micro macrame, but her colors and patterns are just inspirational.


Marsha has been selling hand painted silks as long as I can remember.   Well, she did a post on her new kits.  Talk about making the use of fiber in jewelry easy, these are just great.  She even has a video tutorial on how to make them so its super easy to follow!!!!


Carol shared about family roots and fiber: her friend Sherry uses fiber in a very unique way, and made some really personal pieces of jewelry with fiber here


Karen shared some of her past work in fibers- some VERY fun and fluffy pieces.....just love her style

This was a great post on fiber inspiration and some of her past work that includes fiber as well,  done by Carol


I shared some examples of how I use fiber in my work, and then did a little tutorial on how you can use it that way too


amd how to care for your silk and fiber

and here I tried out waxed linen again, and used some inspiration from a friend to make dangles part of the design


Marsha and Maire both did posts on weaving fibers on loom and cards......


and I love how Maire related it to childs play, because didn't we all have some sort of loom or make some sort of friendship bracelet on a cardboard loom of some sort when we were young!

.blogspot.com/2015/04/what-we-share-with-childs-play.html

We really hope you enjoyed the Boot Camp on Fiber and maybe learned something new, or were encouraged to try out some sort of fiber.  Thank you as always for following along!  Remember you can follow us on facebook too, and see what each of us are up to when we are not blogging for LMAJ.
Hope to see you on there!

Friday, June 19, 2015

Fabulous Buttons

by Sherri Stokey

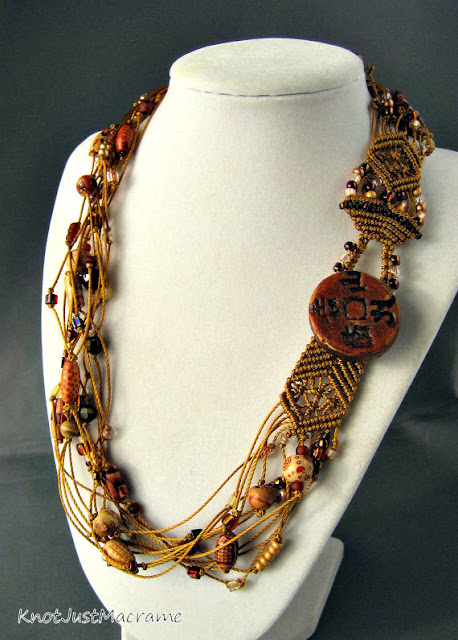
Micro macrame necklace with polymer clay button.

 I often use buttons in my jewelry.  In pieces like this multiple strand macrame necklace, the button (by Shelley Graham Turner) functions as both a closure and focal piece.  If you're putting this much emphasis on a button, you want it to be fabulous!  Handmade buttons like the ones below can add that special touch.

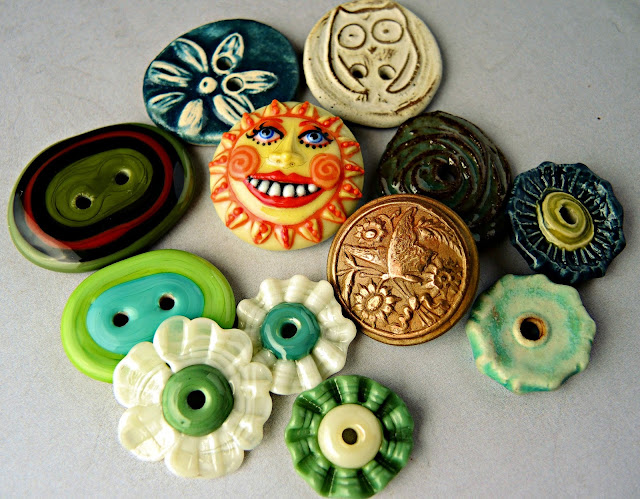
Assorted art buttons.
Porcelain sun button: Joan Miller, Two hole ceramic flower and owl buttons: Beadfreaky
Single hole ceramics: Marsha Neal, Metal clay butterfly button: Lesley Watt
Glass flowers: Jodie Marshall, Two hole glass buttons: Chris Haussler

If you don't happen to have a stash of art buttons on hand, don't despair!  You can do some enhancement and you don't have to be crazy talented.  Really!  Break out your paints or patinas or gilders paste - whatever you have on hand - and get busy.  

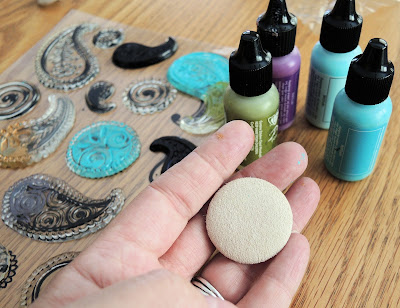
Stamps, Vintaj patinas and a plain button.

See that plain button in my hand?  It's covered in a very bland fabric.  I found a couple of them.  Very ho-hum.  I took some stamps and paint and added color and design in just a couple of minutes.

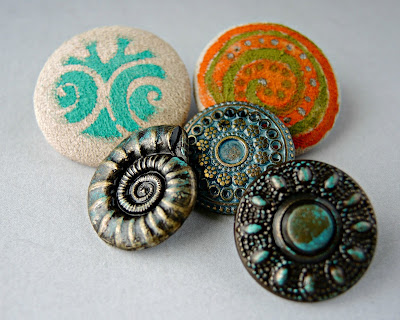
Altered buttons.

The fabric buttons are the two larger ones in the back  The others are some metal buttons I found that had great shapes and textures but no color.  A little Vintaj patina took care of that.  It actually took me longer to find my patinas than it did to do either of these little projects.  

If you're a little more adventurous, you might try some of the different paint products out there.  I had a ball playing with iron paint and rust activator.  Just look how this plain plastic button is transformed:

Rusted button.

 Yes, I rusted the die, too.  I actually rusted a Barrel O' Monkeys monkey and all sorts of other stuff because it was just so darned much fun to play with, but I digress.  

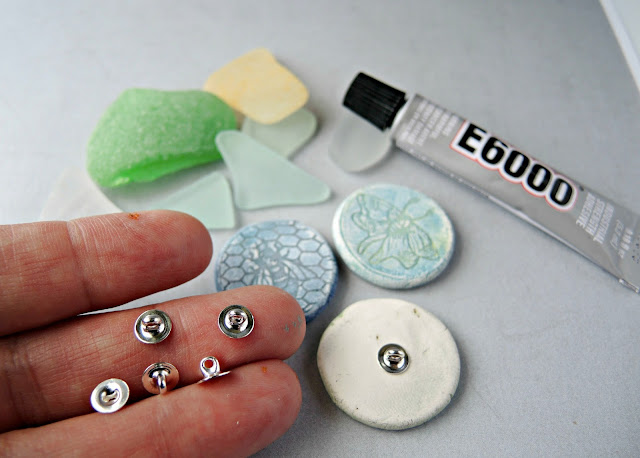
I have one more super easy trick for you, if you want to make your own buttons:  glue on shanks.

Glue on button shanks.

These super handy little guys are just the ticket for turning almost any small item with a flat back into a button.  Wouldn't a sea glass button be nice?  Or one of the cabochons you have laying around?  Use a good adhesive like E6000 and go crazy!

My point in all of this is that you don't have to settle for boring run-of-the-mill buttons; in fact, you shouldn't settle.

In jewelry design, the difference between a so-so piece and a spectacular piece can be just one or two little details.  Details like that special button, whether you get it from an artist or make your own.


Thursday, June 18, 2015

Iced Enamels with Polymer

by Staci Louise Smith

Karen McGovern did a post on playing with the new Iced Enamels by Susan Lenhart Kazmer.  They are a cold "enamel" system, using some sort of embossing powders with resin to seal them.

Of course, I thought right away, how can I use them on polymer?

Though I really did plan to use them on metal as well.  

I could not wait for them to arrive.  Of course I tried them on polymer clay before metal, of COURSE I did.  Though I did metal as a quick second.

First I followed the instructions, Susan has a nice little video here, but I didn't like the look of the globbed on "enamel".  I wanted a crusty look, both on my metal and polymer.  Something more gritty.

Here is the "globbing" or applying a thick full layer of power on polymer (on the area's I wanted anyhow)

Here is what my first tries on metal looked, like


I mean, I don't NOT like it, but I was not thrilled

So, I kept playing......

For this black polymer donut, I used the German silver and I really bubbled nicely, and gave me a sort of raku'ish look I liked.  However, it just wiped off the polymer, so I used resin to seal it on.  I only put the resin over the "enamel" and a tiny bit over the edges, because I wanted the matte look of my black to remain.  I like it a lot, and now it doesn't come off.


So then I tried to over my already based coat painted polymer, and then put my crackle layer over top. (the donut has stripey circles painted on in the faux 'namel and the pink bead has one stripe at the top)


LOVE these.  Love them so much.  It is exactly what I was going for.  

The crackle layer was enough to seal it on (plus of course the actual sealer I use on top of that).  I didn't need to use any resin on these at all and they are soooo cool.  I love the texture it adds to the pieces.


My painting and crackle tutorial is available here for purchase.  Though it does not include how to use the iced enamels, it does tell you how to layer paints, alcohol inks and use a great crackle that works wonderful with polymer and doesn't take forever to achieve a great aged look.

Another polymer artist, Tammy at Paisley Lizard,  was playing with them as well.  Here is a link to her post. 

http://www.paisleylizard.com/2015/06/using-iced-enamels-with-polymer-clay/
 I loved that she mixed the powder in with the translucent.  Though it may not have given her the look she was going for, it sure did make some pretty beads.  Since I just bought a bunch of translucent to play with, this is on my list to try.  I have mixed other things into translucent and loved how it looked, but the iced enamels were pretty awesome too!  Instead of having to add color and something with particles, like chalks and mica, it is all in one for you!!!

I ended up making some metal pieces I liked as well with the Iced Enamels.  I liked them very much, but they needed the resin to really seal them well.  However, it was soooooo shiny, it not only didn't look like enamel, it was just distracting.


So I sprayed them with some matte sealer....and that made them funky, and matte, and turned the clear resin milky looking in spots.


So I think next time I will use a satin finish over the resin, so its not so shiny.  Anyhow, I don't hate them, and I am having a blast!

I can definitely see me using these........which is nice, because I can sometimes jump into things and then not end up finding a use for them in my work!

Anyone else use these?  What are your thoughts?  Your results?  Feel free to share your pictures of what you did with Iced Enamels on our Facebook feed in the comments.


Wednesday, June 17, 2015

Clever way to make jump rings

Carol Dekle-Foss
I recently came across this tutorial on how to make jump rings by the extremely talented Joy Kruse. I call her technique the jump ring making hack! Very clever. Joy has mad jewelry skills!  If you haven't ran into her designs yet, here is some of her recent work. 


Her work is AMazing. Joy also teaches, so if you live near Wisconsin I would definitely check out one of her classes. I wish I could! Here is her teaching schedule.

I was very interested in trying Joy's technique, so I did a bit of research on the coil holder and ended up buying Kevin's 12 inch Koil Cutter base over at Potter's USA. He also sells a Koil Cutter Kit. I'm kicking myself for not getting that instead. He offers the arbor and blade separately, so I may purchase those later to have on hand

Okay, to try Joy's technique, I first made a copper coil using my drill. 

I then annealed and pickled the coil like she suggested, which really helped the cutting process go faster.

Joy recommends using cut off wheels, like these at Home Depot. I didn't have any, so to cut my jump rings, I used the above diamond cut off wheel that I had on hand.  


All in all, I would call it a success! It took getting used to but I was able to cut quite a few jump rings using Joy's technique.

I love being able to make tons of jump rings, and have started a little jump ring container with various metals and sizes. 

DISCLAIMER: If you are just learning the flex shaft or if you feel more comfortable with the blade guide, I would get the whole kit. Also, it might be a good idea to first try out the arbor and blade to get the hang of the process. Please use all safety precautions when using flex shaft, put hair up, no hanging jewelry, and don't forget to wear safety goggles! 

Thank you so much Joy for letting me share your clever technique! 

I wanted to add that we have officially opened our ceramic shop! To celebrate we are offering 20% off through the June 19th. 

Thank you for reading!