Showing posts with label Marsha Neal Studio. Show all posts

Thursday, September 3, 2015

Artist Beads and Earrings - Learning the Jewelry Basics

Sometimes in life, things work out in ways that you feel pretty fortunate.
Like having the opportunity to spend a good portion of my 30's making beads and traveling around the U.S. to sell them (before the internet took over).
Marsha Neal Studio and Thornburg Bead Studio Artist Bead Earrings
While traveling, meeting SO many wonderful bead makers, jewelry designers, jewelry hobbyists (which a lot of those people had serious jobs, and dabbling with jewelry making was their relaxation and they did not want it to be another job).

 Growing up I never dreamed of making beads or jewelry, but I always dabbled.
Here is a bad photo of a back shelf where I have all of my beads purchased at big craft stores, as I grew up. There are also some beads in there from when I first discovered the bead shows in my area. I quite remember getting sold "silver" beads, but the silver plating coming off over time, then the vendor - the next time the show came around - denied that they were his beads (he had more of the exact bead strand on the table - what a jerk taking advantage of a new beader!)


We all have to start dabbling somewhere. Sometimes the easy and cheap is the way we go.
And that is great when you are experimenting, or can use the product in ways that are very creative.
But your work goes to the next level (in my opinion) when you start to really understand your materials, and can start to design with them to have a great look, a good wearable feel - if that is your goal, and will hold up over time with intended wear.


I work part time at a wool shop and art house in Elkton, MD called Sarafina Art House.
It has been a blessing for me to have a job outside of the house around inspiring people and creative energy. We all bring a little something extra to the table creatively, and when it comes to classes, I tend to lean to the basic jewelry side of things.

The above photo is a quick shot of some of the materials I am going to bring with me to a series of classes I am going to teach in October "Earrings in an Hour". I am going to go over some of the basics of jewelry making: tools, supplies, techniques, design and inspirations. Each person is going to be able to make up to two pairs of earrings that night to take home, and I am going to be doing this for three weeks straight - with two different designs each week!


I really wanted to help people understand some different things about materials so they can start to find their creative way with jewelry making.

What are some fun tips you would share if you were teaching a beginners wire working class?
I may print some of these off with your name of course and let them read them in their take home.

PS - I have a ton of things in my head already, so asking for "tips" is just to make sure I don't forget anything important - which can happen frequently once you get comfortable with your wire work.

Thursday, June 25, 2015

Sticker Labels

In my world of process and making, I always find that towards the end of a project, I am ready to move onto the next without officially "finishing". And with my beaded bracelet kits - I felt they needed to be able to stand alone and not require me to be there to explain to everyone exactly what they were, what the box contained, and what other colors it comes in.

So after looking up ideas for packaging via Pinterest and Google, I decided that Stickers were my best bet. I found a couple of companies that had awesome websites to upload your images and ideas, and that used actual people to design & proof your ideas, and get the printers going.
I like companies like that!

I chose Sticker Giant because they look like an awesome company, had great reviews, were in the US (for me that saves on time and shipping costs) - and I needed these in under a week!


My happy mess of a table to quick grab a pic of the rolls of stickers - I did a custom die cut bracelet pic for the front. And a 3x5" color selection and item content label for the back.


And as I ran out the door to a craft show this last weekend, a bit more of me felt professional and happy knowing that some people were going to grab up some of these and be able to bead, braid, and wear some new bracelets that they made themselves...

Designing is pretty cool sometimes.

Now for more ideas on making some stickers for Bead Fest Philly...
Artisan Bead Stickers could be really cool and fun for shoppers!

Monday, March 30, 2015

Boot Camp: Fiber in Jewelry

by Staci Louise Smith

Well, we are finally going to get some boot camps in again!  Boot camp is a time when we, as a group, concentrate on one area of jewelry making or design.  We bring you ideas, tips, resource links and tutorials to help you try out a new area of jewelry making.

This one is on fiber in jewelry or fiber jewelry.
You can see a Boot Camp post the 2nd and 4th Monday of both April and May, as well as scattered through the month on personal posts.  

I first fell in love with fiber for jewelry way back when I was making mainly sea glass jewelry.  I went to a bead show and found Marsha Neal's silks.  I was smitten.  I ended up coming home and ordering from her online.  I was hooked on the variety of colors.  


I have never stopped loving fiber in my jewelry.

I thoroughly enjoy the softness fiber can add to a piece- it adds a softness and contrast against the hard beads.  

We will be sharing lots of ways to use fiber in your jewelry, as well as showing you some of our favorite places to buy it!  Fiber in jewelry is not limited to cording!  That is just what I have always been drawn to.  

We cannot wait to have you join us as we explore this medium.

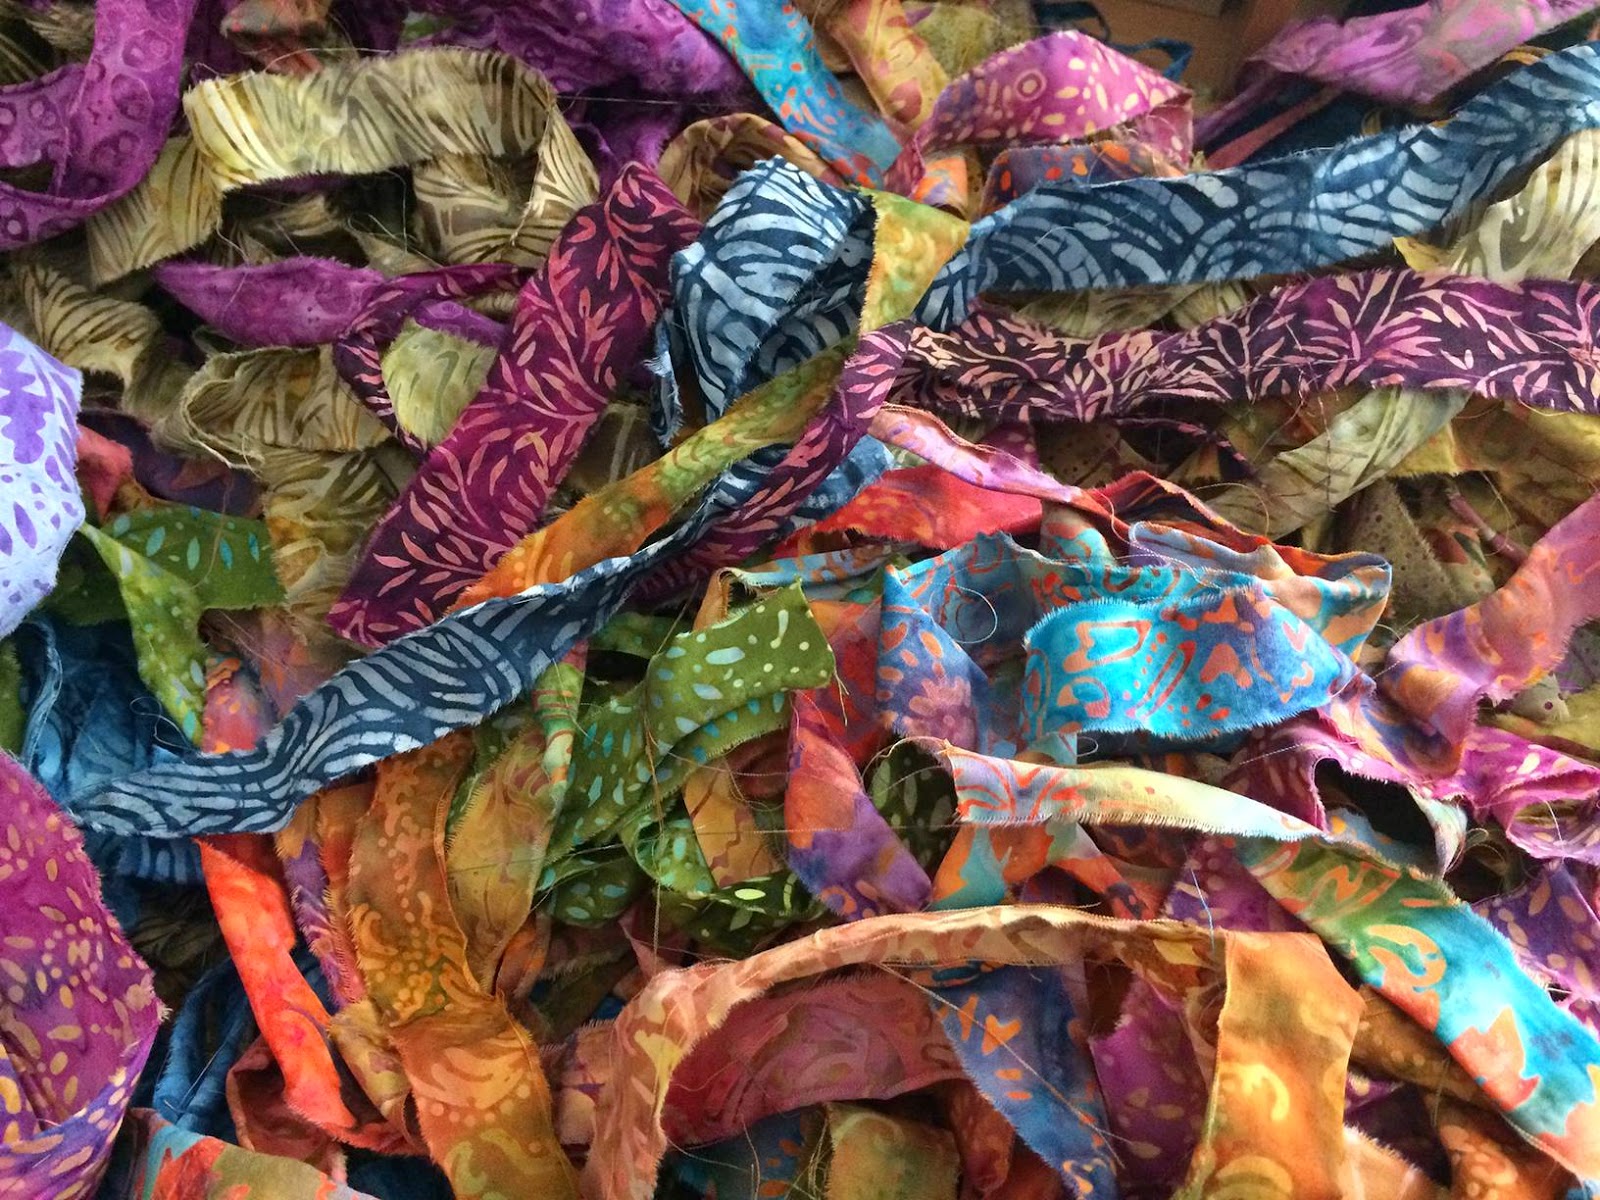
Here are some teasers of my favorite fabric cording to start you off drooling, or in case you want to get some so you have it to try out as we go along!
I love the rustic look of recycled sari silks.  This is my favorite go to shop

Marsha had me at hello- and I am still a fan


And recently, Karen Totten has decided to use BATIK FABRIC to use as cording.  My first batch is on the way.  I have always loved batik fabric- to wear, to drool over, anything......so I am uber excited to use it for some jewelry.  Stay tuned...


I leave you with some more recent necklaces I have used fiber in......


I started a Fiber in Jewelry Board on Pinterest- you can check out lots of great artists using fiber in many ways in jewelry.

https://www.pinterest.com/stacilouise/fiber-in-jewelry/

Hopefully it brings you some inspiration!
Enjoy!

Wednesday, March 4, 2015

We are All Made to Create

Carol Dekle-Foss
To my fellow creative souls,

Do you ever beat yourself up and think that you are not talented enough? 

Or that you don't have what it takes to make beautiful art?

Do you compare your work to that of others and feel yours doesn't measure up?

I'm guilty of this from time to time. If I'm feeling down and depressed, I think why am I creating? Who do I think I am? There is so much talent out there, let others be the creators. 


But then, I step into my studio and just create. I quit judging myself and just have fun.

So what I want to say is this, lets forget about what others are doing and be patient with ourselves. Everyone has to start at the beginning. Sometimes it takes years to hone a craft, and when we are learning, we should only compare our work to OUR OWN. When we practice and experiment we develop a stronger sense of our creative self, and our craft becomes a part of who we are.


Last month, my creative journey took me down a new path. Ceramics! I blame MaryAnn for my love of ceramic beads, I just can't resist her little wood-fired gems!

It took me awhile to figure out the basics, and I am especially grateful for all the talented ladies over at the Beads of Clay Blog. Our very own Marsha did a post here where she shows how she loads her kiln with bead trees. I was quite impressed with how she made all those beads fit so nice and organized. Thank you Marsha for sharing!

Here is my very first kiln opening!

There was squealing involved. I was shocked that none of the beads fell off or that there wasn't drips of glaze everywhere.


My loot. All these pieces were just experiments, and I have a lot to learn about clay and glazes. But that's ok, this is the fun part, the learning and honing of a craft. I have to be patient with this process, and take my time.


 My favorite piece.This little guy has been SANDBLASTED. Who would have thought you could sandblast bisque? Not me. But I experimented and this little odd thing evolved. It's sure ugly, but nonetheless, my favorite piece. I plan to expand on this and maybe even sandblast after glazing. My head is spinning with creative ideas!

We are each on our own creative journey. We should focus on crushing our own limitations, so we can develop into the creative person we were meant to be. 

Thank you for reading!

Tuesday, February 26, 2013

Nichrome Wire In Ceramic Beads

Nichrome Wire and It's Use In Ceramic Bead Making.
Experiments with Cone 5 glaze firings using 
Porcelain and Stoneware clay.
What is Nichrome Wire?
There is a lot of information out there on the web about it, so I'll avoid the boring details. 
I will mention that it is an Alloy. 
It contains nickel and chrome.
It is commercially available in various gauges and lengths and can withstand high temperatures,
which is it why ceramic and fused glass artists that use kilns like using it.

Three major things that I often hear about Nichrome in the jewelry world (and my answers):
1. It's Nickel - a lot of people are allergic.
*Yes - Nickel. Design smart and use it where it will not contact the skin directly*

2. It's not pretty. I like things shiny.
*The firing process oxidizes the metal, which looks green or dull. Sometimes it can be taken off with a green scrubby (see below). Think about how you clean rust off of steel wire used by glass bead makers.*

3. It can be brittle.
*Yes. Depending on the gauge of wire, how hot the kiln firing was, and how much the wire was "work hardened" after the firing may make the wire more susceptible to becoming brittle. Try not to over work it. The larger the wire, the more brittle it seems to become (Thanks Elaine Ray for our conversation about that).*

So here is my process of making 
Porcelain and Stoneware Ceramic Headpins 
with 24 ga Nichrome Wire:
 Measure and cut wire ahead of time.
Insert wire into wet clay.

 After clay is dry, bisque fire to Cone 04 (@1900 degrees F)

Glaze ceramic part, wipe off any glaze that remains on wire.
I like to suspend my beads.
This means figuring out the weight of the work and how much that ga wire can hold without slumping during the firing.
I've been doing this for 10+ years.

After a successful Cone 5 (@2230 Degrees F) Glaze firing,
I can easily bend the 24 ga Nichrome wire to "straight". 

I then use a green scrubbie to clean the wire.
This is where you need to be careful to not overwork the wire as this action of cleaning and straightening is work hardening the wire.

 I am able to make a quick simple wire wrapped bale with the 24 ga Nichrome wire with my normal tools (just like steel wire though, you might want to not use your "really good" tools).

Nichrome wire in my kiln.
The elements which are in the element holders of my L&L Kiln.
The Thermocouple
(green rod sticking out of the kiln wall at 1 o'clock).
The bead tree "rods" that come standard with these
Roselli Bead Racks.
The hooks I make with the 17 ga Kemper Hi Temp Wire to suspend my work.
And now - the 24 ga (and 22 ga) for making Ceramic Head Pins.

Some of the nichrome gets dark green,
while some stays just dull.
I keep noticing this and want to see why.
Maybe it is the ratio of nickel to chrome?

And then the after thought, which probably entered my mind at some point while making these:
Will they ship easily?
Did I waste wire by making them too long?

And as a bead maker there are questions:
1. How long of a wire do jewelry makers prefer? 2" or 3"or 5"?
I guess that depends on the project.

2. Do you prefer to receive your head pins ready to use?
Or should I not take extra time to clean them for you first?
Extra steps means extra time for either of us.
That of course is reflected in the price.
Either yours or mine.
I would tend to think in general people would want to receive them clean,
or at least somewhat clean with the oxidized green scale almost removed and ready to use.


And as a jewelry designer...
Well there are SO many things you could do!
Check out this post on what my "go to" jewelry designer friend Jenny Davies-Reazor quick whipped up for me with some of my head pins (we were discussing ways to "hide" the nichrome for issues #1, 2, and 3 above).

I'm going to experiment further and will post more next month here on LMAJ.
Hope to have lots more examples on use too...

4/23/15 Source update:
For those of you looking for nichrome wire there are a few good places to look.
I have ordered Kemper High Temp wire from my local ceramic supplier in the past.
I now order in larger quantities from Jacobs Online (the Nichrome 60).

Hope this helps!

Saturday, January 19, 2013

New Member Intro: Marsha of Marsha Neal Studio

I was honored to be asked to become a regular blog posting member here on  LMAJ.
I am formally Marsha Minutella, but most people know me as Marsha of Marsha Neal Studio (Neal being my maiden name).
Marsha of Marsha Neal Studio
I started to work with clay in college in 1997 as an elective class while perusing my BS degree in Entomology (Insects), concentrating in Wildlife Conservation. I ended up adding a minor in ceramics to that undergrad degree, then immediately continued my studies and received my MA in Ceramics at the University of Delaware in 2001. By 2002 I started making pendants, and by 2004, picked up a few shows and quit my day job to travel around the country to sell my work.

Marsha Neal Studio Bead Show Tray
 I stopped traveling to sell my items at shows back in 2007 because my husband and I wanted to focus on having kids: Chloe, now 5 and Riley, now 3 (you mean you have to be present to be pregnant. Oh!). 
And I was reaching a burn out stage with traveling to over 30 shows a year, traveling time, and making pendants production style when I was home.
I now sell directly through my shop on Etsy.com and my website.

My body of work for the last 10 years has been porcelain and stoneware pendants, beads, cabochons, buttons, and donuts.
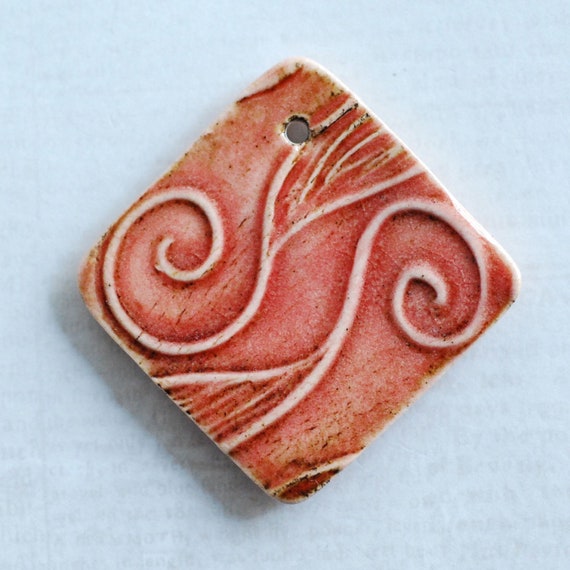
Marsha Neal Studio Spiral Waves Pendant
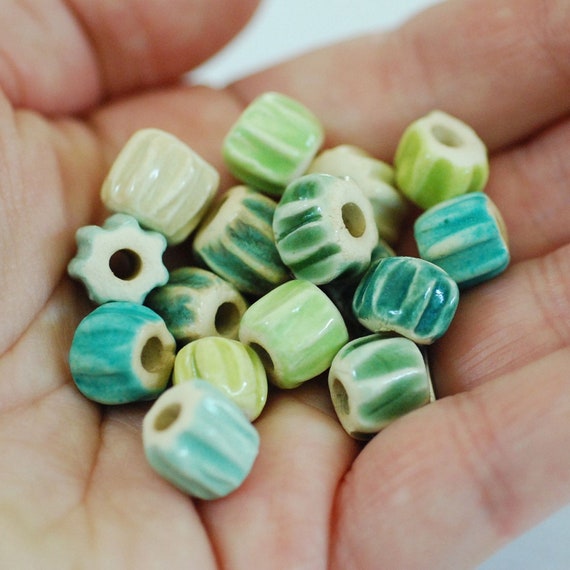
Marsha Neal Studio Handmade Chevron Inspired Beads
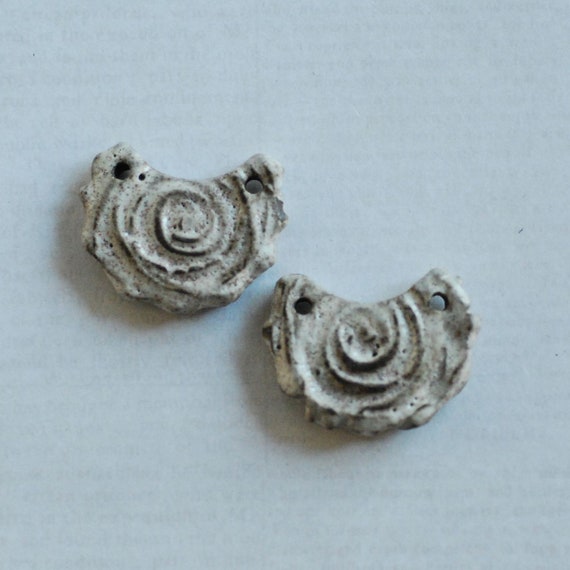
Marsha Neal Studio Chocolate Clay Crescent Pendants in Speckled White Glaze
Below are some of my pieces after the initial bisque firing, which is to harden the ceramic clay and make it more durable for the glaze firing (top left), and what the glaze firing looks like before (top right) and after (bottom left). I'm a bit obsessed with colors and textures - just so you know...
Marsha Neal Studio Handmade Ceramic Pendants and Beads
After I stopped traveling for bead shows, I sold all of my excess bead show inventory that was not my own work and these hand painted silks, to my friend Darlene (D7Studio) so she could continue to sell at shows here in the north east US - she does carry a line of my items with her.
Marsha Neal Studio offers Silk Painting Is Fun: Hand Painted Silks
I was just too attached to this line of hand painted silk ribbons (painted by Ute of Silk Painting Is Fun) that I picked up in January of 2005. They just are so much fun to design with, are of very high quality, and I love sitting and pulling different color palettes for people to buy and work with - as it can be overwhelming to pick out individual colors at times.

I definitely consider myself more of a bead maker than a jewelry designer.
But I also feel that it is extremely important to understand how your work may be used to create something that is easy for the jewelry designer to work with. I strive for interesting, high quality work.

As a child I would sit for hours and make macrame friendship bracelets, and later learned how to use tigers tail with crimps to make beaded bracelets and necklaces.
I still remember how exciting that was (and I still have all my materials from then!)
My little Chloe - age 3
As a mother, I love to spend time watching my kids figure out things and be creative and explore the world around them - even if it is watching my 3 year old figure out how to get those yummy snacks off that high pantry shelf by moving the kitchen chair over and then climbing... He is a high energy kid for sure!

My inspiration for my clay work comes from textures, designs, patterns, and colors from the world around me - both natural and man-made.
Marsha Neal Studio Zentangle Inspired Sketchbook Drawing
I love to draw and doodle with a gel roller pen on smooth sketch paper (amazed with Zentangle and quite fond of having a way to finally communicate verbally about doodling).
I carve my own designs into clay, which I bisque fire then use as a texture plate.
You could say that I print with clay.
Marsha Neal Studio Hibiscus Flower Texture Plate (Printing with clay)
I get colors by applying glaze (a glaze is glass: silica that is held in suspension with colorants, fluxes, binders, and such, by mixing dry materials in a specific formula with water to a brush-able state. Then after drying, firing it into a kiln to it's mature stage - which for my work is around 2230 degrees F).

So I guess that is a good intro about me for now.
If you want to see a bit more of what I am working on in my studio (like these small sculptures below), check out my Marsha Neal Studio Blog, and keep an eye out here for some posts of things that I'm going to be working on for LMAJ.
New Terrarium Sculptures from Marsha Neal Studio
PS ~ I post on my Marsha Neal Studio FaceBook page frequently as I keep my iPhone on me and usually have my Hipstamatic app at the ready to grab a studio shot, and post to FB when I take a break from working.

I look forward to expanding my jewelry making expertise here with you all!
Thanks for having me...