Wednesday, July 29, 2015

Confessions from the Oven

by Staci Louise Smith

Well, I am in full on, all day all night, prep for Bead Fest.  Right now it is polymer clay on my work table.

I am really feeling the panic for sure.  
(though I do have these all made, which is a start)


However, this post is not about my panic, or the hundreds and hundreds of beads that still need to be made and painted, or the class I still need to assemble kits for and prepare.  Nope, this is about something else.

My polymer clay oven.

A few years ago, I got myself a convection oven for firing polymer clay.  I got an oven thermometer to check the temperature and used it here and there, on and off to ensure it was cooking properly.  It heated nice and even and worked like a charm, for years.  But something changed.

To check the cure,  I usually try to break a couple beads to make sure they cured right.  That is the ultimate test.   
Well, I had a batch that broke.  So I popped the oven thermometer I had inside, and it was reading differently then last time.  I had been using a cheap dial thermometer from the store.

Claire Maunsell shared with us in a class I recently took, that she used a meat thermometer (thank you for that Claire!!)- which allowed her to constantly monitor the temp of the oven throughout the process, and you can even set an alarm to go off when it hits a certain temp so you don't overbake.  
(you can take Claire's class here at Craftcast)

Well, I bought one.  

I put both thermometers in the oven, within an inch of each other, and one read really low according to the temp on the oven and the other read high- well, not high the whole time, it had some crazy spikes.  ????  AAAND, it was taking twice as long as before to reach temperature.  So all day I messed around. 

(here is my set up) The oven, with pizza stone on top (now) and the two thermometers I am using inside the oven (which are on top of the oven in the picture).  The dial one is a cheap one, and I plan to invest in a better more acurate one of them as well.  The digital is on the counter to the right of the photo with the probe that goes inside the oven sitting next to the dial thermometer.


 At first, I thought perhaps my oven was getting old, and maybe I am wearing it out (which I still think is part of the problem) from reviews online, none seem to have a long life.  

But in the course of re-firing the beads that weren't totally cured, and messing around with temperature and time, I found a few things out.  

1.  Placing a pizza stone (some use ceramic tiles) on top really helped the temperature to stay stable.

2.  I have to set the oven above my target temp for preheat and allow up to 20 minutes (I keep my clay in there the whole time though) and then reset it for an hour.

3.  I cannot have 3 shelves in there like I was doing, it was messing up the temperature too much.  I can only do two.

4.  Because ovens get older and things change, you need to constantly monitor the temps- with TWO thermometers.  (who would have thought that not only your oven could be so off, but two thermometers could read so differently)

It was a long stressful day, but I got it figured out, and my pieces are once again rock hard and fully cured.

As I was really frustrated with this, I contacted Ginger Allman of the Blue Bottle Tree to find I am not alone, that there really is a good deal of playing around to figure out your oven, or in my case, re-figure it out after it starts to get old.

(Ginger is awesome and you can find all kinds of polymer information here http://thebluebottletree.com/)

  No one really talks about it, but you need to find your own ovens sweet spot (my cure temp ended up being somewhere between what the two thermometers were reading- who KNOWS what that actually is).  I had to let go of the numbers and target temps, and do some good old trial and error to get it back to firing correctly.  (I also think my oven is on its way out, and I just hope it holds out until after Beadfest)

I think between my ovens over use, age and that most times I was only using two shelves, and came to the conclusion that maybe one reason it was firing better before, because the other pizza stone was on top insulating it, and there was more air flow inside.

At the end of the day, a good cure gives you strong beads.  You can usually feel when they are not cured right.  Bake to the correct temp (not always the correct setting on your oven) AND for longer then directions say.

Here are some resources about baking and ovens that I though had some great info.  This video, shared in the beginning about her old toaster oven and how she rigged it with tiles to make it work better.

Ginger always has great info and did a 3 part series on baking polymer

Here is a blog with some thermometer recommendations


Anyhow- I really hope my crazy day can help head off some baking issues.  I highly recommend two thermometers- even with a convection oven, because the efficiency can change over time.


Friday, July 24, 2015

In the Wild

by Staci Louise Smith

I am really blessed to live near two awesome caves (that are open to the public, there are more around here then that) in Eastern PA.  

We have Lost River Caverns and Crystal Cave.  I have visited both throughout my life, but it had been a long time since I had been to Crystal Cave.  

Crystal Cave is located in Kutztown PA.  So my parents and the kids and I went out to spend the day exploring it all over again ( we had all been there before except my two youngest).  

I fell in love all over again.  I brave cave tours, because the rock lover in me is stronger then the claustrophobic little person in me!

Anyhow, I love the entire site of Crystal Cave......they haven't changed a thing.  It is outdated, but I love it, because its a piece of small town history.  It was the first cave in PA to be made open to the public, and everyone from around here knows the story.  

So, without further ado, here are some pictures from my day.

The Family (my parents and kids)


CRYSTALS IN THE WILD

Also known as Arragonite

You may be used to seeing it like this though


or in bead form like this


There was so much texture and variety in the stone.  My first love in jewelry making was a love of stones.  :sigh:  I felt so energized this afternoon.  Being surrounded by stones "in the wild' was just so inspiring.


The only downside was that the tour went pretty fast, because it was crowded.  I wish we would have had a bit more time for pictures at each spot.  I didn't get to fully take everything in.  Maybe next time........

I am not one to buy kitchy souvenirs, but I did want to get something to remember today.  So I thought these were just perfect.  They had a whole bin of these narrow little geodes, 


and what I saw when I looked at them...............was caves.  So,we each got one, and this is mine.  The kids already ran off with their treasures.

Anyhow, I know we are way off topic of jewelry and all, but I thought my day around rocks was close enough.....I know it made me want to play with stones and rocks and crystals!

The kids ended the trip panning for gems.  Such a cute set up, and I must say, its fun.  We were all digging through the gravel!


I am so ready now, to make some nice, organic beads!  Inspiration has set in......and I am antsy to get into that clay!

And that is the great little cave not even an hour from me. 

Someday I will get to Larray Caverns.  someday..........

How about you guys?  Any awesome caves that you live near?  Or want to share that we must visit?  I know I am not the only rock hound in this group!  Please feel free to share in the comments- your stories and favorite places to visit.

Thursday, July 23, 2015

Total Procrastination Photos: Flowers and Food

This is a short and sweet (albeit yummy!) post from Marsha today.

These are some pics I took this morning as I was trying to get my brain focused (no luck - not really...)


I was contemplating the new Periscope App and what are the benefits of it vs the short term life of it (who knows?) and do I really need to be spending time on it when I have such issues with what is already on my plate?
Basically it is for "Exploring the world in real time through someone else's eyes".
Do I do that much that is interesting?
I am not thrilled with trying to use it as a platform where a blog post or You Tube video may work (I think those people are a bit off with the whole vibe of this).
I only have an attention span of a number of seconds before a video annoys me.

Well - as I fiddle, you can catch up with me on there via: Marsha Neal Studio
If you are on there, add your name in the comments and let me know what you think of it.

And now for the "Yummy":

This Grilled Corn, Avocado and Tomato Salad was made for a bunch of us by my friend Kim for our last beading hang out night.
She found the recipe through FaceBook, and shared it (I did too).
I swear that it is the best thing I have ever tasted!

I searched Pinterest for the recipe too (I like to pin my recipes so I have one place to go for them!)

What are some of your favorite recipes for summer weather?

Tuesday, July 21, 2015

Tutorial Tuesday – In Focus, Using Optic Lenses in Jewelry Design by Karen McGovern

Howdy all! I almost missed this post. I fell into a black hole….decided to binge watch the first two seasons of True Blood! Guilty pleasure admission—when that show came out I fell in love with it, but didn’t catch the first two seasons. Read all the books, hilarious! So, basically, I’ve been doing nothing but lying in bed with super-sized bags of assorted snack products shouting at the TV. Eric getting his hair highlighted while torturing Lafayette in the basement?!?!? LOLS for days. Endless episodes featuring Sam Merlotte’s bare butt? YES, PLEASE. Haven’t gotten to Alcide yet—OMG. Anyhoooo…..


Before my vampire binge, last week I finished a pendant design that I’d been imagining for a while. A tribute to Frida Kahlo (who would have loved True Blood, I bet). I got the idea when I heard about all the love letters that had come to light written by Frida to Diego Rivera, her lover, partner and sometimes adversary. I wanted to feature a bit of one of her love letters in a pendant, and decided to use an optic lens to do so. Optic lenses are great to work with, and have been around the jewelry world for a long time now. Wildly popular and readily available in reproductions by several jewelry finding lines. I started collecting them a couple years ago and am lucky enough to have actual vintage and antique lenses, many dating to the late 1800s and early 1900s. Found these beauties at antique fairs. True vintage lenses are not as easy to find these days, but you can find them if you dig deep enough on the Internet.

AMOR. My tribute to Frida Kahlo and Diego Rivera

So, today I’ll show you how to easily create a pendant to hold a memory (letter, photo, favorite page from a book, dried flowers, insect wings—whatever) using an optic lens, copper, bits of this and that, and micro screws. All cold connected, no soldering involved.

Vintage lens I grabbed from an antique show.

First, lay your optic lens on a sheet of 24 gauge copper and trace a shape around it for the pendant base. I like shield shapes, they fit the optic lens nicely and allow the “handle” of the lens to become an attachment point to the base at the bottom. Allow enough room around the lens to add other items you will use as attachment points for the lens and as embellishments for the design itself. I used layers of brass flowers, enamel copper and assorted beads for the Kahlo design referencing the elaborate floral designs she often wore in her hair. You need at least three strong attachment points for the lens to hold it firmly and permanently in place on the copper. Cut or saw out the copper, sand the edges smooth, then lay out your design roughly so you can mark where your attachment points will be. I usually create a nice, larger embellishment right on the top of the lens that will also be the point where I attach a pendant bail…we’ll talk about that later. Anything with a hole big enough to accept a micro screw can be used as embellishments and attachments for the lens. Brass flowers and leaves are great here, end caps you flare or flatten, buttons, discs--the possibilities are endless. Choose items that play a part in the overall design or memory you want to create!


Once you have the design laid out to your liking, mark where you need to punch or drill holes for the micro screws using a fine line Sharpie. Punch or drill the holes and clean the holes with a needle file. At this point you can texture the copper if you like, etch a design on the back for added interest, patina, whatever you like. Seal any colored metal with clear acrylic specific for metals.

Now the fun part—putting it all together. If using an image or papers under the optic lens, cut them to size and glue them in place on the copper using something like Modge Podge, which is a glue/sealer designed specifically for papers. You can coat and seal the papers first with Modge Podge if you want to—I just glued the paper in place for the Kahlo design (printed the text off of an image of an actual letter she wrote that I downloaded from the mighty InterWebs). I also glued a butterfly wing fragment on top of the letter, then topped it with the lens. Once you have all the goodies in place under the lens, begin adding your embellishments to hold it in place using micro screws. The handle of the optic lens usually comes with a hole in it already.  I began here, adding a brass rose with a silver bead. I inserted the screw front to back through the design, attaching the nut on the back just finger tight. I wait until all embellishments and screws are in place before a final super-tightening in case I have to tweak or remove/add something. Layers are fun here. I especially like the enamel copper discs I used on top, courtesy of MaryAnn Carroll, layered with the brass flowers. To attach a bail, you can create one from a length of rolled copper, aluminum or silver (with a hole punched or drilled on the end), or use a pre-made bail or attachment that works in size and design. The silver hoop you see on the Kahlo pendant is actually the hoop from a toggle clasp set. A super easy bail is simply to take a length of 12 or 14 gauge copper, hammer and flare the ends, drill holes in each end, double it over on itself and thread on the micro screw. If you don’t want a centered bail, drill or punch two holes on the top “corners” of the pendant as attach points for jump rings and chain. Whatever you like!

For this pendant I am going for a bird motif. Will drill
a hole in each wing tip to attach jump rings, and will
drill a hole through the center to attach to the copper back
plate, overlapping the lens for stability.
Once everything is in place and to your liking, tighten the nuts on the micro screws as tight as you can. Be careful tightening the screws that hold elements directly on the glass of the lens, you don’t want to crack it! Just make sure the lens is held firmly in place, cannot move side to side, etc.  Then, snip the excess screw material from the back, file the end of the screw and add a dab of strong metal glue to hold the nut in place. I used Gorilla Glue, and also flared the end of the screw whenever possible by placing the pendant face down on a bench block and hammering the end of the screw flush with the nut. This may or may not work depending on your embellishments and placement. You don’t want to hammer anywhere near the glass of the lens!!!

You can add more details outside of the attachment points to continue the story of your design. For Frida, I added two silver skulls below the lens to represent Frida and Diego, together for all eternity. I also drilled a hole below the lens handle rose attachment so I could suspend an anatomical heart charm (real love) and a sterling silver cast hummingbird skull (hummingbirds represent spirits and love).


I’ve made several optic lens designs over the years. This one is a favorite, along with a pendant I made using a photograph of my Grandfather holding my Dad when he was a baby. These mean a lot to me, they both tell a true story that has meaning and beauty to me.

My Grandfather holding my father.

Some of the other designs I have made are representations of a short story or poem I wrote, or imaginings inspired by the tin types I also collect. There are so many designs you can create here!!! I love jewelry that tells a story, and optic lenses are perfect for focusing attention (see what I did there???) on an amazing bit of memory, real or imagined.


So, do you have a story to tell? Create it in a jewelry design and send us a picture! We’d love to share with you….Now, GO MAKE SOMETHING AMAZING!

Monday, July 20, 2015

Color Play

by Sherri Stokey


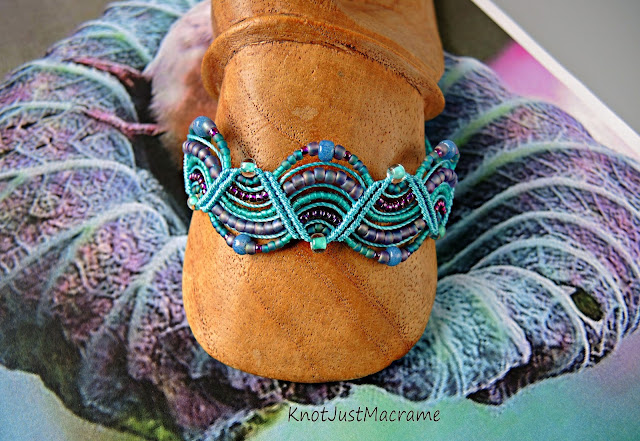
Have you noticed how many gorgeous pictures go scrolling by daily in your social media feeds?  Those photographs can be great color inspiration for design.  I loved the jewel tones in this one and pulled out beads and cord in aqua, lavender, orchid and slate blue, then started a design using the aqua cord and a mixture of beads.  (If you're trying this and are having difficulty pulling colors from the photos, there are some great sites online to help you with that like Kuhler and Color Palette FX.) 


Then I switched out the cord for orchid, but used all of the same beads.  It looks very different, don't you think?  


 Not only is the overall look different, but the individual beads even appear to be different colors.  That, of course, led to trying one more version with slate blue cord.


All of these pieces were inspired by that one photo and there are still many variations to be explored.  I could introduce a bit of the green into the mix or concentrate more on the pink tones.  I also see a ribbed texture and some webbing that would be fun textures to try to mimic.


Where have you been finding your inspiration lately?


Friday, July 17, 2015

My First Book Review - Handcrafted Metal Findings


Please grab a cup/goblet of something wonderful, as this will be a long post!

As a mostly self-taught artist, I seek out both inspiration and how-to techniques from You-Tube videos, books and magazines.  I maintain subscriptions to 3 jewelry-related magazines (Art Jewelry, Lapidary Jewelry Artist, and Step by Step Wire), but I have my share of how-to books! (I also hoard cook books)!  A couple of weeks ago, I received my long-awaited copy of Handcrafted Metal Findings, by Denise Peck and Jane Dickerson.  (You can order your copy here on Amazon or  here on Interweave Press, where an e-book download is also available now).  This book is a follow-up to their first book, Handcrafted Wire Findings (which I LOVE and refer to often)!


For the past couple of years, I have personally shied away from using any purchased findings (when I can) in my designs.  This includes ear wires, clasps, jump rings, connectors, components, chains (sometimes I make my own), and of course, artisan beads.  I have even made my fair share of hollow copper and sterling beads, just to keep my pieces "handmade" as much as possible.  This book arrived on my door step at a good time....I needed a kick in the creative pants, so to speak.

There are 30 techniques/components included in this book from Denise, Jane, and some of my favorite all-star artists, including:  Cindy Wimmer, Cassie Donlen, Kerry Bogert, and Keirsten Giles. I managed to eek out a few projects using some of the techniques illustrated throughout the book. But before I get to the projects, I wanted to point out some of the other benefits within this book.
  • There is an Essential Techniques section.  Let's face it - every book/magazine has basic instructions "i.e., how to make a wrapped loop".  This section includes much more than that - it is very detailed, in my opinion, and will come in handy for those who have not utilized any of the techniques included in these designs.
  • Some - NOT ALL - of the designs include a bit of soldering - but it is stressed that only a butane torch is required for any of those designs.  I ONLY use a butane torch in my work, as I am not too keen on the idea of storing gas tanks in my basement studio. A section related to soldering safety is included within the book.
  • There is also a Metal Glossary included in this book.  I remember the first time I read the term "hard metal"....I thought, isn't all metal hard??  No..it's not!  This section is helpful if you have not worked with wire/metal.
  • The all-important Tools Glossary is also helpful with clear pictures of the tools.  I want to point out that if you don't have the tool mentioned - there are alternatives!  For example, if a technique or design mentions "stamping", and you do not have stamps to add a desired texture, use something else on hand, such as your hammer.
  • There is a page with templates for a few of the designs made from sheet.  I found the template to be particularly helpful in one of the designs, shown below.
Lastly, I want to mention that all of the opinions of this book stated here today are mine and mine alone.  I was not paid and have not received anything from the publisher/authors or anyone else related to the production of this book. 

Onward!~

The first technique I tried involved making these teeny tiny charms, by Denise Peck.  I think they give just the design element needed to make these earrings unique. Very simple to make - and the charms are textured to catch the light.  These would also be sweet if made in copper.  And the texture you apply - be it from a metal stamp or a hammer - truly makes these "one of a kind" to the design.


Next, I tried a connector link created by Cindy Wimmer.  Cindy will always be the Queen of Wire in my book.  Now, I will not lie to you - this design was a bit challenging for me, as I could not "master the technique" on the first go around.   But I was determined, as I really love the look of the connector link. I do not know where Cindy comes up with her beautiful designs, but I am glad she does! Anyway, here are my first attempts at creating her rosette link.

My first attempts were downright horrible!  Always practice with cheap wire (copper)!
I made the rosettes in copper, then made a couple of fold formed leaves in silver.  I even added a few of those teeny tiny sterling charms to the bottom.


I have a love/hate relationship making "action jewelry" - you know...movable parts that never stay put when you go to snap the photo....


I have been an admirer of Keirsten Giles' designs for a long time.  In fact, I could probably pick her work out of a crowd anywhere.  The earrings below feature Keirsten's Poppy Bead Caps.  I love these bead caps - I even used a coin to add texture to the metal (a technique shared by Keirsten).  I could very easily have added tiny little gems or beads to the bottom of the donut with waxed linen or cording, but I wanted to keep these simple to match the necklace.

Lovely artisan donut ruffle-shaped lampwork beads by Susan Kennedy


Inspired by Staci and the LMAJ Fiber Boot Camp, I used some gorgeous blue silk from Marsha Neal. The necklace features quite a few techniques offered in the book:  the twisted wire wrapped bail (Cindy Wimmer), the Poppy Bead Cap and Textured Tube (Keirsten Giles)


My favorite part of this necklace - if I had to choose a favorite - features a technique inspired by Denise Peck - the end cap to connect the silk to the chain.


Denise's design illustrates how to use strip wire to make this end cap.  But, I have a TON of copper tubing on hand, so I saved myself a soldering step and used that instead.  I topped the end cap with a tiny textured copper bead and called it "done".  I LOVE the clean look of this connector with the silk!


The last necklace features a design by Jane Dickerson for a bezel bail made from copper sheet (there is another bail design in the book that I want to try, as well).  Jane's example utilized a large donut-shaped gemstone. I had to scrounge in my stash to find a donut!  I had already used the only donut shaped beads on hand for the design above!  I find donut gemstones to be utterly gorgeous, but I have been dumb-founded to figure out a creative way to use them.


Let me tell you - that donut is not large - 7/8" round (22mm).  Jane's sample project features a donut bead that is approximately twice that size - 1.6" (40.5mm).  But a few alterations to the template (yes....math is involved), and I am pleased!!!

I did not want to use a commercial chain, so I wrapped up a few links.  Several hours later.....yes...hours...and I was done!


Even the back has texture - love it!


There are many more techniques that I am itching to try - ear wires (including studs!), head pins, bead connectors, toggle clasps,  more bead caps - and I am excited to get going!

Many thanks to Denise Peck, Jane Dickerson and the contributing designers for yet another book on my bench (it has not made it to the book shelf YET) that already has many pages dog-eared for future reference!

Thanks for stopping by today!!


Written by Patti Vanderbloemen for Love My Art Jewelry