Showing posts with label mixed media jewelry. Show all posts

Tuesday, November 24, 2015

Holiday Hysteria and How to Come out Alive - By Karen McGovern


Happy Holidays! Whatever.

Yes, I know Thanksgiving is this Thursday. BUT, I only realized that on this past Sunday. That sound you heard around 1:00 EST wasn't a cat being boiled alive--it was me screaming because my husband pointed out that T-day is THIS FREAKING THURSDAY. I swear, I had no idea. I knew, somewhere in the back of my mind, that the holiday was near-ish, but THIS THURSDAY? Naw.....Seriously? I DIDN'T EVEN MAKE A HAND-TURKEY THIS YEAR! Sigh....


This gives you an idea of just how out of touch I am with the calendar. And how I end up in a mad scramble to fulfill social, work and family obligations during the holidays.

Like many of us artist-types, this time of year is usually one of two things--a happy time of blissful creativity or a total black hole of whatever the complete opposite of inspiration is...Anti-inspiriation? That's me this year. I find that whenever I feel like I HAVE to make art, I can't. I feel totally tapped out and have no muse whispering great ideas in my ear. It's like my brain RESENTS feeling obligated to pump out work because of a season or holiday. Maybe my muse is secretly the Grinch, I have no idea. Holidays are tough--I haven't been in the studio for over 2 weeks now, even though I have custom stuff waiting to finish and a couple galleries asking for holiday work. BLAAAAHHHHHH. I need an elf (preferably an adorable guy elf that bears a REMARKABLE resemblance to Colin Farrell (that ACCENT!)) to come kick me in the ass or something....maybe if I drown in enough peppermint mochas from Starbucks (with an extra shot of espresso because, holidays) I'll get in the spirit. Wish me luck...

He's so DREAMY...

BUT, I have some go-to ideas that I will share with you now that still let your friends and family know that you are an artist in real life and want to give a lovely gift that reflects that, yet won't kill you to create while trying to keep a smile on your face that doesn't make you look like a frustrated serial killer. 

My best, bestest, BESTEST friend during the holidays are the plastic (or glass if you are feeling super fancy) clear round ornaments sold at Michaels and just about every other store selling holiday ornament stuff. These babies are PERFECT FOR SOOOOOO MANY THINGS!! So, here are three things you can do this year using clear ornaments that are easy, fun, and totally gift-worthy even for your picky, judgmental Aunt Sarah.


1. Jewelry inside the ornament. Pop the aluminum top off the appropriately sized ornament, add a loop of wire through the holes already in the top and hang a dainty pair of earrings or a pretty little bracelet (that YOU MADE) from the hoop, then slip it all back inside the ornament. Create a pretty tag to add to the top and hang on the tree. VIOLA! You just ROCKED CHRISTMAS.


2. Print some cherished family photos, loosely curl them till they fit inside the ornament. Pop the aluminum top off, place the rolled up photo inside, then open the photo using a chopstick. Old black and white photos are amazing displayed this way, perfect for the family member who just got married, had a baby, got a new dog, cat, monkey, lion...whatever. Add a tag, hang on the tree. YOU ARE THE COOLEST FAMILY MEMBER IN THE ROOM.


3. Get totally FANCY, ECO AND STUFF by creating tiny terrariums using these ornaments. It's actually VERY EASY. Stuff some moss (available at any garden center) in the ornament, then add tiny air plants or succulents. Click the link for a detailed how-to on creating terrarium ornaments. I love this idea sooo much. Craftsy, but not boring, and beautiful. Add the tag, hang on the tree and GET USED TO SAYING "YOU'RE WELCOME" OVER AND OVER AGAIN.

Is this cool OR WHAT?????

If that doesn't float your boat and you want to make something a bit more time consuming but very cool and fun, make ornaments using your scrap wire and sheet. This is great for using up bits of mixed metals and wire. Stamp or etch the date, cold connect or solder, go crazy. Look at your  pile of wire and scrap sheet like puzzle pieces and create some super-cool ornaments ala Picasso, or Dali. Cut a simple shape from scrap sheet (star, round, heart) then cold connect bits of this and that using micro screws or rivets. I love the star and heart shown here. The heart is made from two layers acrylic sheet (available at Home Depot) with music sheet sandwiched inside, then riveted together. EASY AND SO LOVELY! I can imagine doing this with my favorite poem or holiday text. Make something personal!!!! Dream catcher-style ornaments are also especially beautiful and fun to make. Use mid gauge wire (14 to 16) to create the hoop, use finer wire (20 to 22) to create the spiderweb inside (wrap it and go nuts, there is no "wrong" way to do this), then dangle chain, beads, feathers and whatnot below. The nice thing about this idea is that the finished design can be kept out and displayed any time, not just the holidays--AND you used up scraps in a great way!


Do you have fun, go-to craft/gift ideas for the holdiays? DO SHARE!!! I hope  you all have a peaceful, joyous holiday season and spend an embarrassing amount of time hugging your friends, family, pets and total strangers. It's good for the soul.....

Now, GO MAKE SOMETHING AMAZING!

Tuesday, October 20, 2015

Fabulous Fordite - Working with Unusual Materials by Karen McGovern

A couple months ago, the lovely Patti Vanderbloemen gifted me an amazing, weird hunk of Fordite. What is Fordite you ask??? Let me explain: 

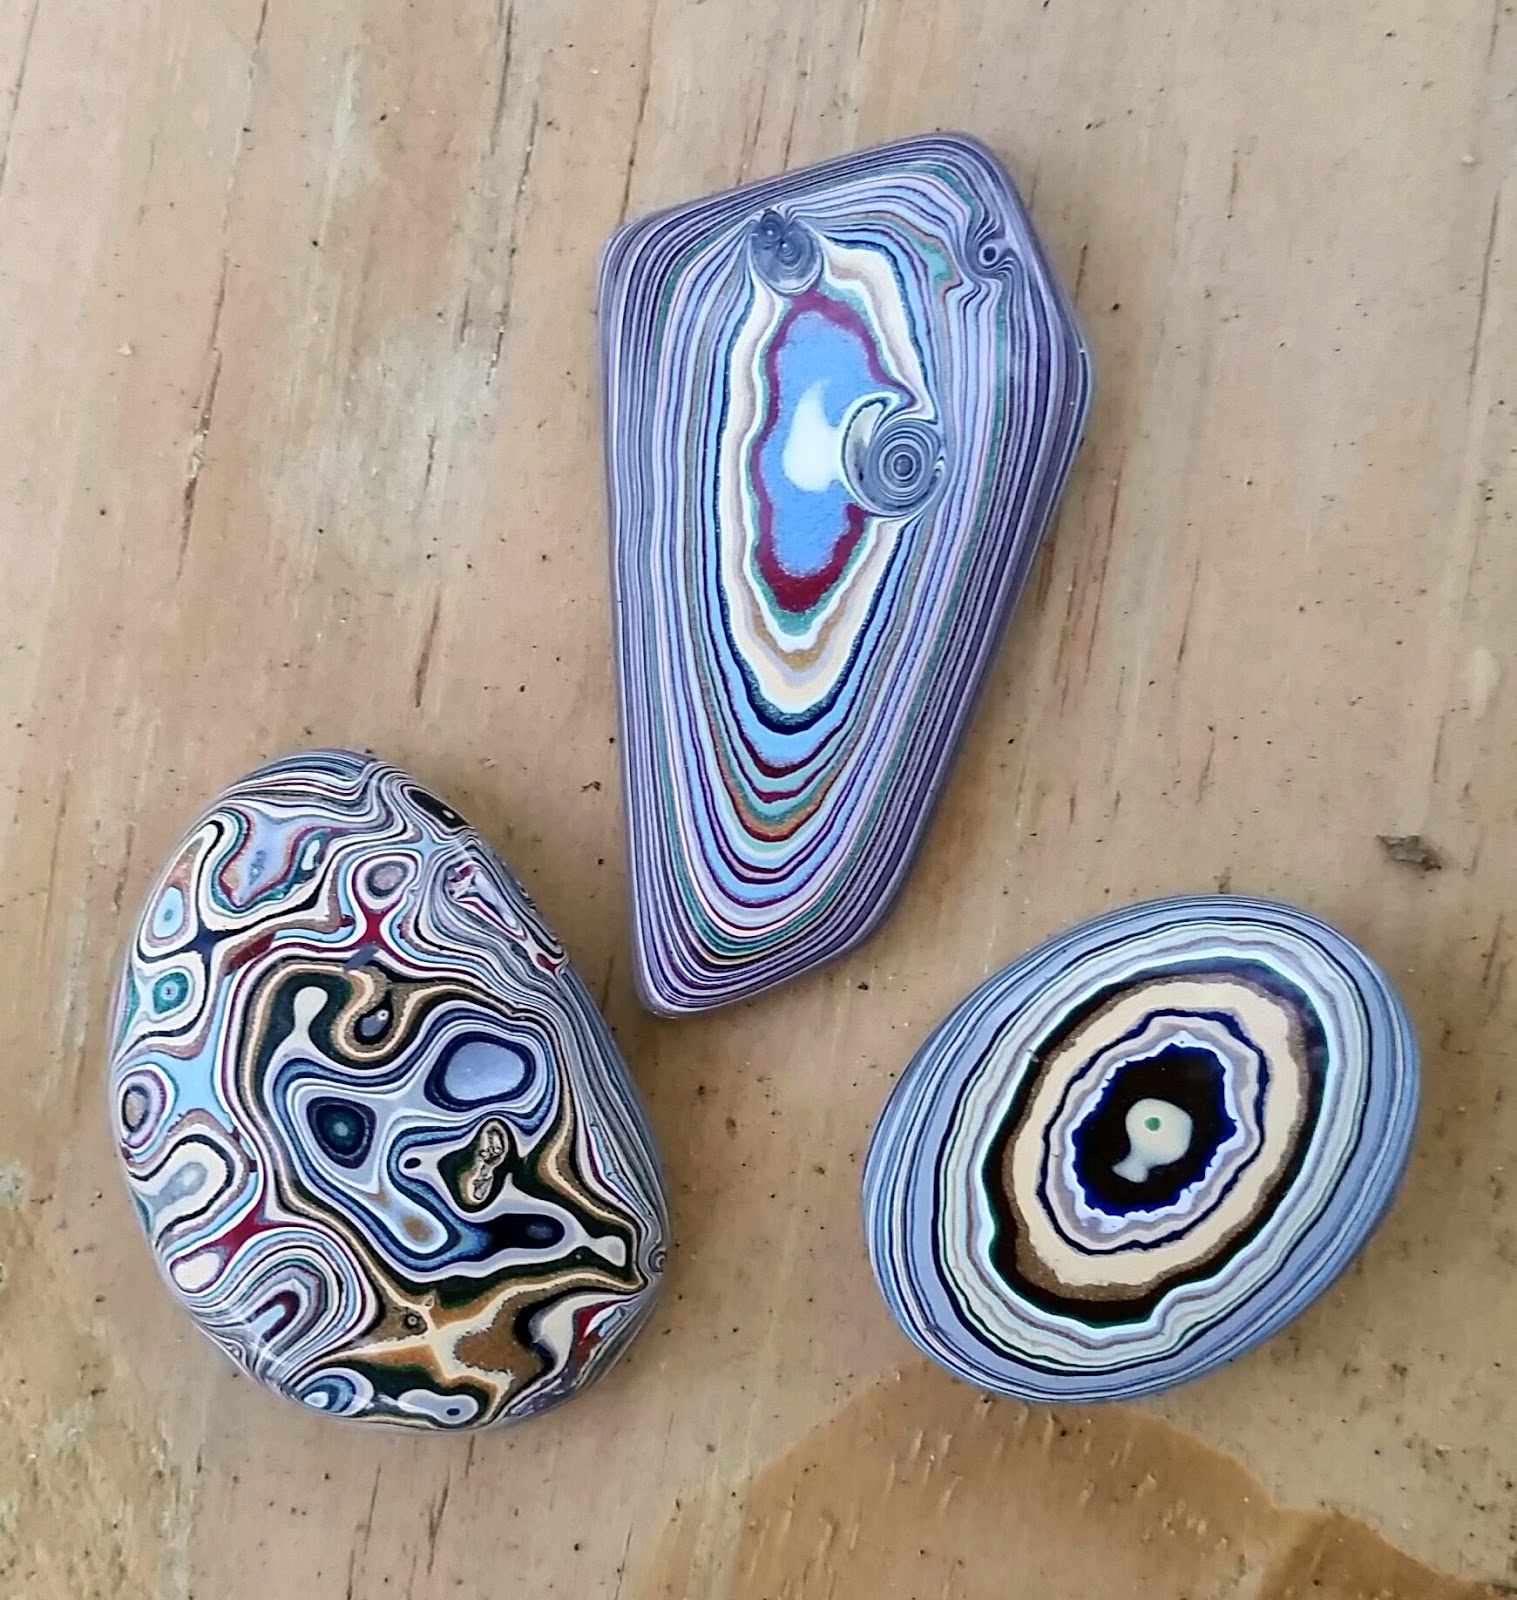
Fordite is paint. Layers and layers of automotive paint. True Fordite is found at...you guessed it...Ford plants. It is the overspray that builds up when cars are painted in the factory. Imagine, hundreds--THOUSANDS--of cars getting painted weekly in Ford factories. The spray booths end up with a ton of overspray over time. This stuff is broken off in hunks and was, until fairly recently, thrown away. Then us artists got our hands on it. A rough hunk of Fordite can be cut and polished like rock. Beautiful, striated, colorful rock made of PAINT!

A rough hunk of Fordite. See the layers of paint??? Cool!
I had heard of Fordite and seen it used in jewelry, but had never actually purchased or come in contact with any myself--until Patti sent me a nugget! The moment I held it, I was hooked. It's so COOL! I created the pendant you see here--I loved the unusual shape of the nugget--the paint is so reflective and bright! I love the stuff. Since then I have lurked online, hoping to score more Fordite cabs, and finally hit the jackpot last week. I purchased some amazing Fordite from lapidary artist Bob Caveglia (look him up on Facebook--he has some great rocks and stuff!!!). I just got it and am itching to create with it. I immediately made the ring you see here. Every piece is different, and sometimes it's hard to decide which side of the cab to use. Both sides of each cab are so beautiful and different. 

Pendant made using Fordite from Patti, a ring made using Fordite from Bob Caveglia.
Three more cabs I purchased from Bob, waiting for me to play....

David Vance Horste is another lapidary artist whose work I drool over greatly admire. He has an Etsy shop--be prepared to give him all your money. His stuff is AMAZING, and he also cuts and polishes Fordite, and was kind enough to give me some very useful info that I will share here. Evidently, vintage Fordite is in high demand and brings top dollar, whereas contemporary Fordite isn't quite as expensive. Personally, I couldn't care less--the Fordite Bob and David cut is gorgeous and I don't care how old it is. In the paragraphs below; David discusses Fordite and rainbow cal silica (another material I am totally unfamiliar with), which are sometimes confused. According to David:

"There STILL is Fordite and there still is overspray. I started selling Fordite on eBay in 2000 and the story has changed since then. There still IS over spray but there is a LOT less of it, and the older stuff does tend to be better. The spray booth doesn't have to be closed, they break this stuff off and throw it away during regular maintenance. Very few people can actually tell contemporary Fordite from vintage and it generally doesn't make much difference, although hardness, polish, and sparkle matter no matter what the age. 

As for rainbow cal silica, I remember when the folks at Colbaugh Processing first started selling it and at first they tried to tell folks it was natural. Then I started hearing that it came from the settling bond of a Mexican tile manufacturer. I'm pretty convinced that the folks at Colbaugh who sell it also make it. They run the Kingman mine in Arizona and stabilize lots of turquoise in addition to making lots of reconstituted stuff in a variety of colors. Their rough rainbow cal-silica has gotten a lot more uniform and linear over the years and the rough is in brick form now. When I first saw it the rough was at least in layers that evoked some natural formations. So my vote for rainbow cal silica is that it's intentionally made from reconstituted rocks whereas Fordite is accidentally made from paint overspray."

A rough hunk of rainbow cal silica. Definitely manufactured.
David also works with bowlerite--cabs cut from BOWLING BALLS. Yes, definitely set aside a couple hours to look at his stuff. Your welcome.

I love working with new materials and love artists that think outside the conventional jewelry box bringing us unusual materials to use! To the first artist that cut a hunk of Fordite into a cab--THANK YOU!

Do you love working with unusual materials? If so, please share what you've created. I think it's great to venture outside your comfort zone, experiment, and play with new toys. It's how we expand and grow as artists!!! Show me your toys!

Now, go make something AMAZING!

Tuesday, July 21, 2015

Tutorial Tuesday – In Focus, Using Optic Lenses in Jewelry Design by Karen McGovern

Howdy all! I almost missed this post. I fell into a black hole….decided to binge watch the first two seasons of True Blood! Guilty pleasure admission—when that show came out I fell in love with it, but didn’t catch the first two seasons. Read all the books, hilarious! So, basically, I’ve been doing nothing but lying in bed with super-sized bags of assorted snack products shouting at the TV. Eric getting his hair highlighted while torturing Lafayette in the basement?!?!? LOLS for days. Endless episodes featuring Sam Merlotte’s bare butt? YES, PLEASE. Haven’t gotten to Alcide yet—OMG. Anyhoooo…..


Before my vampire binge, last week I finished a pendant design that I’d been imagining for a while. A tribute to Frida Kahlo (who would have loved True Blood, I bet). I got the idea when I heard about all the love letters that had come to light written by Frida to Diego Rivera, her lover, partner and sometimes adversary. I wanted to feature a bit of one of her love letters in a pendant, and decided to use an optic lens to do so. Optic lenses are great to work with, and have been around the jewelry world for a long time now. Wildly popular and readily available in reproductions by several jewelry finding lines. I started collecting them a couple years ago and am lucky enough to have actual vintage and antique lenses, many dating to the late 1800s and early 1900s. Found these beauties at antique fairs. True vintage lenses are not as easy to find these days, but you can find them if you dig deep enough on the Internet.

AMOR. My tribute to Frida Kahlo and Diego Rivera

So, today I’ll show you how to easily create a pendant to hold a memory (letter, photo, favorite page from a book, dried flowers, insect wings—whatever) using an optic lens, copper, bits of this and that, and micro screws. All cold connected, no soldering involved.

Vintage lens I grabbed from an antique show.

First, lay your optic lens on a sheet of 24 gauge copper and trace a shape around it for the pendant base. I like shield shapes, they fit the optic lens nicely and allow the “handle” of the lens to become an attachment point to the base at the bottom. Allow enough room around the lens to add other items you will use as attachment points for the lens and as embellishments for the design itself. I used layers of brass flowers, enamel copper and assorted beads for the Kahlo design referencing the elaborate floral designs she often wore in her hair. You need at least three strong attachment points for the lens to hold it firmly and permanently in place on the copper. Cut or saw out the copper, sand the edges smooth, then lay out your design roughly so you can mark where your attachment points will be. I usually create a nice, larger embellishment right on the top of the lens that will also be the point where I attach a pendant bail…we’ll talk about that later. Anything with a hole big enough to accept a micro screw can be used as embellishments and attachments for the lens. Brass flowers and leaves are great here, end caps you flare or flatten, buttons, discs--the possibilities are endless. Choose items that play a part in the overall design or memory you want to create!


Once you have the design laid out to your liking, mark where you need to punch or drill holes for the micro screws using a fine line Sharpie. Punch or drill the holes and clean the holes with a needle file. At this point you can texture the copper if you like, etch a design on the back for added interest, patina, whatever you like. Seal any colored metal with clear acrylic specific for metals.

Now the fun part—putting it all together. If using an image or papers under the optic lens, cut them to size and glue them in place on the copper using something like Modge Podge, which is a glue/sealer designed specifically for papers. You can coat and seal the papers first with Modge Podge if you want to—I just glued the paper in place for the Kahlo design (printed the text off of an image of an actual letter she wrote that I downloaded from the mighty InterWebs). I also glued a butterfly wing fragment on top of the letter, then topped it with the lens. Once you have all the goodies in place under the lens, begin adding your embellishments to hold it in place using micro screws. The handle of the optic lens usually comes with a hole in it already.  I began here, adding a brass rose with a silver bead. I inserted the screw front to back through the design, attaching the nut on the back just finger tight. I wait until all embellishments and screws are in place before a final super-tightening in case I have to tweak or remove/add something. Layers are fun here. I especially like the enamel copper discs I used on top, courtesy of MaryAnn Carroll, layered with the brass flowers. To attach a bail, you can create one from a length of rolled copper, aluminum or silver (with a hole punched or drilled on the end), or use a pre-made bail or attachment that works in size and design. The silver hoop you see on the Kahlo pendant is actually the hoop from a toggle clasp set. A super easy bail is simply to take a length of 12 or 14 gauge copper, hammer and flare the ends, drill holes in each end, double it over on itself and thread on the micro screw. If you don’t want a centered bail, drill or punch two holes on the top “corners” of the pendant as attach points for jump rings and chain. Whatever you like!

For this pendant I am going for a bird motif. Will drill
a hole in each wing tip to attach jump rings, and will
drill a hole through the center to attach to the copper back
plate, overlapping the lens for stability.
Once everything is in place and to your liking, tighten the nuts on the micro screws as tight as you can. Be careful tightening the screws that hold elements directly on the glass of the lens, you don’t want to crack it! Just make sure the lens is held firmly in place, cannot move side to side, etc.  Then, snip the excess screw material from the back, file the end of the screw and add a dab of strong metal glue to hold the nut in place. I used Gorilla Glue, and also flared the end of the screw whenever possible by placing the pendant face down on a bench block and hammering the end of the screw flush with the nut. This may or may not work depending on your embellishments and placement. You don’t want to hammer anywhere near the glass of the lens!!!

You can add more details outside of the attachment points to continue the story of your design. For Frida, I added two silver skulls below the lens to represent Frida and Diego, together for all eternity. I also drilled a hole below the lens handle rose attachment so I could suspend an anatomical heart charm (real love) and a sterling silver cast hummingbird skull (hummingbirds represent spirits and love).


I’ve made several optic lens designs over the years. This one is a favorite, along with a pendant I made using a photograph of my Grandfather holding my Dad when he was a baby. These mean a lot to me, they both tell a true story that has meaning and beauty to me.

My Grandfather holding my father.

Some of the other designs I have made are representations of a short story or poem I wrote, or imaginings inspired by the tin types I also collect. There are so many designs you can create here!!! I love jewelry that tells a story, and optic lenses are perfect for focusing attention (see what I did there???) on an amazing bit of memory, real or imagined.


So, do you have a story to tell? Create it in a jewelry design and send us a picture! We’d love to share with you….Now, GO MAKE SOMETHING AMAZING!

Monday, April 20, 2015

Fibers Galore! By Karen McGovern

Howdy all!  This post is going to be a bit short and sweet.  As some of you know, I am a conservation biologist in "real life", working with the Rare Species Conservatory Foundation. It is our breeding season and my life is full of baby parrots, antelope and primates.  At the moment I am hand feeding an orphaned pygmy marmoset, the world's smallest true monkey.  Hang on to your seats, this guy is STUPIDLY ADORABLE and will have you making baby noises at your computer monitor.  Meet Chispa (Spanish for "Spark").  He was born on Easter.  His mom didn't survive the birth, so we are raising him.  He's about the size of a tiny mouse.  I have to feed him every three to four hours around the clock.  He's killing me!  ANYHOOOO....

Bow down to the adorable-ness that is a baby pygmy marmoset!!!

This month the artists of LMAJ are all playing with fibers and discussing how to use fibers and textiles in jewelry designs. I have fooled around with fibers, I especially love working with silk yarns and multi-strand yarns.  Susan Lenart Kazmer inspired me initially, I love her take on long....REALLY LONG pendant designs that incorporate a mix of metals, textiles and so much more. One of the first truly epic fiber mix pendants I created incorporated a glass tube holding the skull of a tiny songbird.  I used a mix of silk ribbons and yarns knotted below the pendant hanging about 8 inches in total length below  the tube. I like to weave and tie other elements in with the fibers--beads, charms, etc. I've experimented with this look over the years and come back to it again and again.  

Some early fiber designs from around 2008 incorporating bone, silk moth cocoons, silk yarns and fibers.  CRAZY!!!

Most recently I created a couple fiber designs for Nunn Design as part of their Innovation Team. I used a Nunn channel bead wrapped in silk multi-strand yarns tied with a knot to create this crazy pendant.  I added some beads, a coyote tooth and some wire to really make it tribal.  I like these over-the-top pendants strung simply on leather or rubber cord. 


Next I made this woolly bangle using a furry silk yarn and simple macrame techniques.  The bangle is a simple copper wire design.  I wove the silk around the bangle in a basic macrame stitch, tied off the end and added a series of multi-stone dangles for a gypsy feel. This is a super fun bangle to wear, it's so FURRY and comfy on the wrist!


Using fabrics and fibers in jewelry design is fun and you are only limited by your imagination!  The cuff shown here was created by another favorite artist of mine, Richard Salley.  I love the explosion of fabric from the central element in the cuff....what a great POP of color and texture!!!


So, my advice to you--if you are considering working with fabrics and fibers--is to think outside the box. Start wrapping and knotting and see where the fibers lead you!  I've got an idea for a stitched pendant that I am itching to try....If it works I will share next Tuesday for my Tuesday Tutorial post. In the meantime, raid the fabric and yarn store and go make something AMAZING!!

Tuesday, March 24, 2015

Tutorial Tuesday! Pipe Bezels by Karen McGovern

As a jewelry designer, I try to set my standards quite high---I want my clients and collectors to be assured that when they purchase from me, they are getting the best quality.  That's why I only buy my copper plumbing pipe from reputable hardware stores.  Wait...what?

Yes, today we will be working with one of my favorite things...copper pipe from the hardware store! This quick and easy tutorial is a great way to begin working with solder and a great way to experiment making bezels in differing depths. There are so many things you can do with copper pipe bezels!!!

What you'll need:


Copper pipe from Home Depot, Lowes, etc.  The pipe comes in different diameters, so pick up a variety. You can usually find short lengths, or ask if they will cut lengths to your specifications.

Pipe Cutter. You can buy this in the same section  you find the pipe.

Copper Sheet - Etsy, Rio Grande, Cool Tools

Easy Solder Paste - Cool Tools

Micro Torch - Amazon, WalMart, Etsy

Metal Shears - Rio Grande

Sandpaper/Sanding Sponges - Hardware Stores

Flat and Needle Files - Etsy, Hardware Stores, Rio Grande

Fine Line Sharpie

Liver of Sulfur or Patina of your choice - Cool Tools

What You'll Do:

First, begin writing a tutorial about making bezels using copper pipe and HAVE YOUR COMPUTER EAT ALL THE IMAGES YOU TOOK FOR IT THE DAY YOU WANT TO POST IT.  Oh, wait...that's not for you to do, THAT'S WHAT HAPPENED TO ME. CRAPCRAPCRAPCRAPCRAP. 

So, this tutorial may or may not have pictures that make sense.  I will do my best to describe the process.  SORRY, FOLKS!

First, decide how deep you want your bezel to be and mark a cut line on your pipe using a fine line Sharpie.  


Place the pipe in the cutter, lining the cutting disc up with your mark and tighten the cutter enough to hold the pipe in place but still allow you to rotate the cutter around the pipe. Tighten the cutter after each rotation until the pipe is cut through.  Viola! You have your bezel wall.


Clean the cut pipe by sanding edges smooth, file away any excess metal, etc.  At this point you can texture the sides by hammering on a ring mandrel if you wish. You can also texture the lip of the bezel as I did using a hammer.

**PICTURE THAT NO LONGER EXISTS**

Place the pipe bezel on a sheet of copper and trace around the bezel leaving a bit of extra room for ease in soldering.  At this point you can get creative, depending on what you plan to make here.  You can cut a free form shape for a pendant, or just create a simple bezel cup for a ring.  Go NUTS!

Dab 2mm dots of Easy Solder paste on the bottom of the bezel then set on the copper sheet.  Place on a solder block and heat with a micro torch, moving the flame around the bezel and bezel plate until the metal begins to glow red and the solder flows.  

**NEXT PICTURE THAT NO LONGER EXISTS***

Note:  Cool Tools has great videos and tutorials on their site that show how to use their solder pastes.  I love solder paste--it has flux in it so you save a step and it holds pieces together sort of like glue for quick soldering.  If you have not tried it go for it!  I also show more about this in and earlier tutorial for LMAJ here.

Quench and pickle.  

*****NOTE ABOUT PICKLE*****I ran out of commercial pickle powder (which I get from Cool Tools) when I was making this tutorial.  (Do you get the idea this tutorial was doomed from the start?  Computer ate all the photos, ran out of pickle...If your computer starts to smoke while you read this, RUN!) Anyway, I made vinegar/salt pickle for the first time and it worked LIKE A CHARM (take THAT stupid tutorial).  One cup white distilled vinegar, one heavy teaspoon coarse salt, heated in a clean crock pot.  Smelled a bit, but firescale will literally float off whatever you pickle in a remarkably short time!  Keep your pickle clean and separate.  By that I mean use one pot for copper, one for brass and one for sterling.  If you don't have a line of labeled pickle pots, be sure to make a clean, fresh batch for each metal you pickle.  If you combine metals in the same pickle you will plate your metals with copper.  Brass and silver will turn pink and require a lot of cleaning and sanding to get the copper deposit off.  SCIENCE!!!

Back to the tutorial that is trying to kill me....

At this point, simply clean and finish your bezel.  If making a ring, invert on a solder block and solder on a ring blank (which you can make from pipe, by the way!!!).  If making a pendant, drill or punch holes for split rings or solder on a bail.  The possibilities are endless! You can make an open back bezel using copper washers (Home Depot). There are just so many options with this easy design. Patina if you wish, and then fill the bezel with WHATEVER YOU WANT.  These bezels are great for resin work, mixed media, riveting, you name it.  Another note: Yes, there will be a line of silver at the base of your bezel where it meets the copper back plate.  If you patina with liver of sulfur that should blend away nicely.  If you are really bothered by the silver line, patina, then color with a deep brown sharpie marker.  Seriously.  This will blend with the copper and works quite well.  I cover the silver, blend with my finger and let dry. Then I seal with clear coat, wax, whatever.  Sharpies are magic.....

Trimmed and sanded bezel.  I haven't used any patina yet....

TIP:  You don't have to leave the bezel round.  I cut larger diameter pipe, then bend and shape the bezel free-form depending on what I want to make.  For the ring below I shaped the cut pipe to an oval-ish shape, soldered on a back plate, cut and trimmed, and then used more pipe for the ring shank.  The pearl is in a commercial silver bezel I soldered to the side.  I resin set abalone veneer inside the bezel.  As you can see, I'm into abalone these days....THERE ARE SO MANY WAYS TO USE PIPE BEZELS!!  


The image below is the direction I am going with the bezel I made for this tutorial.  It fits a sea urchin shell perfectly, and I plan to rivet or micro-screw the pearl in the middle, through the bezel back and abalone shell which will hold the bezel on the abalone shell. The urchin will be resin set inside the bezel....it will hopefully be a pretty  cool pendant by the time I am done.  


So, what will YOU make with your pipe bezels???  Show us!!! Now, go make something AMAZING!

Tuesday, January 20, 2015

Hello! Is This Thing ON?? By Karen McGovern

Welcome to 2015!  Feels like I’ve been away for a year instead of a month.  Thank you to my LMAJ peeps for covering for me this past month.  You are the BEST. I hope all our readers and artists had a wonderful holiday season and are striding into 2015 with purpose and sky-high expectations!


For me, entering into 2015 has been sort of weird.  I took some time off from all things jewelry related since early December.  I made a promise to myself that I was going to begin 2015 with reduced stress, more focus and some restructuring of priorities both personally and professionally. I don’t do “resolutions”, because I believe the entire concept is flawed and sets you up for inevitable failure.   Resolutions suck, in my opinion.  I promised myself to simply make a few changes immediately that would more or less guarantee a tangible, real change in my life.  Simple?  Not even close.

First off, I am practicing my ability to say “no”.  As you all may know, I am a conservation biologist with the Rare Species Conservatory Foundation, www.rarespecies.org.  This is my “real life” and it is 24/7.  I live on 30+acres filled with critters demanding my attention from dawn till dusk and beyond.  It is my passion.  I live it and love it.  Jewelry design and art have always been an outlet for me, a blessed outlet, one that lets me express myself creatively and balance my world in a way that is beyond therapeutic.  BUT, it is not my first priority. It’s high on the list, but not my first and never will be.  I am lucky to be able to create by choice.  My artwork does not pay the bills (Hell, the most I hope for is to cover the cost) but it is another way for me to tell my story, to share my love of wildlife and wild places to the world through art. The past couple years have been very productive for me artistically.  I made new connections, was picked up by new galleries and was published in several print and online magazines and blogs.  All really good stuff.  REALLY GOOD STUFF FOR WHICH I AM GRATEFUL.  I also found that I was juggling my time in what became a very frantic way.  Trying to “sneak” in a few moments here, an hour there, to fill and order or meet a deadline.  And, in the end, my work suffered for it, both on the “farm” and in the studio.  So, I put on my big girl panties and made some tough decisions. 

The first and most difficult was my decision to leave the Nunn Design Innovation Team, www.nunndesign.com.  I have been a part of Becky Nunn’s team for a couple years now, and it has been BEYOND WONDERFUL.  Becky is a fantastic artist, business woman and friend.  I have had so much fun working with her and it is because of Becky that I have been published AT ALL. I can’t say enough good things about her product line—seriously—if you haven’t looked at if DO IT NOW.  So, why leave such a fantastic gig you ask?  Simply put, because I began to feel like I was totally taking advantage of the opportunity, and not in a good way.  I didn’t have the time to really commit to the projects I promised and was “dialing it in” at best.  Becky deserved more and so did I.  The work I was creating was…..BLAH.  I lost the creative spark, buried under other commitments, stress and simply not having enough time to work properly.  When I looked at the body of work created for her, I saw a dramatic decline.  I think it really hit me how oblivious I was to what I was doing when I organized the magazines I had collected that published my work through Nunn.  Sitting on the floor next to my bookcase I realized that I HAD NEVER EVEN LOOKED AT THE MAGAZINES BEYOND THE PAGE I WAS FEATURED ON.  WTH???  I was so lucky to be included amongst some of the most talented art jewelry designers out there and hadn’t even taken the time to LOOK AT THE ENTIRE PUBLICATION.  I felt so embarrassed and ashamed.  So I said, “NO” when asked to participate in 2015.  Becky is such a lovely person.  We talked about it and she was more than supportive and understanding.  I hope we get to meet in REAL LIFE someday—I owe her a HUGE HUG and a kiss on the mouth! So that was my first NO of 2015. 

One of my personal favorite designs created for Nunn.  My etched
copper sugar skull with Nunn brass componants, twig connectors,
rosary chain, charm and clasp.  I LOVE NUNN DESIGN!!!

Also, as 2014 drew to a close, I began to assess the galleries I am affiliated with and withdrew from all but three.  Again, I was flinging work wherever I could as opposed to finding “homes” within galleries.  I really believe that creating a more intimate connection with galleries showing my work is extremely important.  I realized that a few of the galleries and shops carrying my work I had nearly abandoned anyways.  No new work going in, no work going out either.  So, as 2015 arrived, I said NO, gathered it all and moved on.  I now have three homes representing my work and I feel completely comfortable in each.  And I have good, open relationships with the gallery owners as well—absolutely vital for me.  I also now have a box of old designs just waiting to be torn apart and reworked, which is something I really love doing. Nothing like resurrecting a piece—giving it a brand new life! 

These few decisions immediately affected me in a positive way, even though the decisions themselves were very difficult.  I feel like I can “breathe” now.  The pressures have lessened and I am at peace with the choices I've made. I am ready for 2015.

All that being said, getting back into the studio has been very difficult so far.  My brain was focusing on so many scattered things, I feel like my artsy brain is in some kind of deep hibernation and DOES NOT WANT TO COME OUT, THANKYOUVERYMUCH. I’ve shared my frustrations with my LMAJ family, and they all have had similar experiences hauling themselves out of HOLIDAY HEAD and into 2015.  Got to knock the rust off ASAP, people! With that in mind, after a disastrous day of burning perfectly good silver bezel wire into oblivion, I decided to stop.  I walked away.  You can’t force this stuff, we all know it.  I made a plan. Instead of beating myself over the head and feeling miserable about everything, I am going to take another route.  I have decided to begin 2015 by teaching myself something completely new and to challenge myself whenever I can.  Four things came to mind immediately. 

First, I want to learn how to make pins and brooches from scratch.  I’ve been wanting to do this FOREVER.  Stick pins, sweater pins, hat pins—artisan pins!  I have so much inspiration for this—Lorena Angulo’s book, Behind the Brooch is a wonder.  Linda Larson is another artist I drool over, her brooches and pins are amazing.  You can spend the rest of your life on Pinterest using the search terms “art jewelry brooches”.


Next, hinges.  Hinges have defeated me in the past, but I want to master this.  I love making lockets and boxes, now I am going to make hinged tops and doors and hinged cuffs ala Richard Salley (what a masterful artist he is!!!).  I WILL DO THIS.

The top two images are of the first ever locket I made a few years ago,
the others are RICHARD SALLEY GREATNESS!

Third, enamel.  Staci Louise sold me a box full of beautiful enameling supplies and I AM GOING TO LEARN THIS SKILL!  No worries, MaryAnn Carroll, I still need your gorgeous discs (in fact, I can't live without them...).  I am going to try to apply this technique to pendants, bangles and pins.  I have Barbara Lewis’s fantastic book, Torch-Fired Enamel Jewelry, and I plan to use it.


Finally, I am going to teach more.  I have taught a few simple classes in cold connecting, and I want to do more.  Teaching is very intimidating to me, but so rewarding!  I learn just as much as my students, each and every time, and am constantly amazed with what we discover and create as a group.  This goes for more tutorials on the LMAJ blog as well.  At least one a month, Folks, so be READY!!!  Staci, I know we talked about a Southern Bead Retreat, we need to pick up on that conversation!!!

Spectacular ladies from my Party Hat Ring class....LOVE!!!!

If I have to call anything I am contemplating a “resolution”, I certainly will not fall into the ridiculous annual traps we all seem destined for.  I am NOT JOINING A GYM!  I am NOT GOING TO GIVE UP SUGAR! I will NOT BE LEARNING A FORGIEN LANGUAGE! I will focus on being kinder to myself and others, I will be buying more art from artists I love and want to support, and I will give more of my art away because that is one of the best highs you can give yourself and someone else. I am going to spend 2015 rediscovering my artistic voice.  I feel that I have strayed from the origins of my desire to create jewelry.  I have always loved creating designs that tell a story.  Sometimes over the top art installations that may or may not be worn and sometimes simple, wearable designs.  All with a written story or poem behind them.  This is what started my journey into art jewelry design, and I miss it.  I’ve become too dependent on designs that “sell” well.  I never wanted to create jewelry based on whether or not it was “sellable”.  I’ve always wanted to create a reflection of my view of the world—designs beyond “pretty”.  That may sound ridiculous or arrogant, but the word “art” before the word “jewelry” means something specific to me.  So, watch out.  There are going to be some new and intensely personal designs coming from my studio this year!!!!

A few older designs created around a short story or poem that I wrote for each.
These are some of my most favorites!  All incorporate antiques and unusual elements.

Bottom line, time will no longer run away from me.  I will strive to be in the moment, and appreciate every day as an individual opportunity to accomplish something positive in the world.  I wish the same to each and every one of you!!!

Now, GO MAKE SOMETHING BEAUTIFUL!