Sunday, March 31, 2013

Boot Camp Features....

Good Morning.... I'm sure that many of you are celebrating Easter. Happy Easter to you.

I would like to share some pictures that have been shared on our Flickr Boot Camp site. These two lovely selections were created by Lynda Carson from Fresh Baked Designs.

While checking out more of Lynda's work, I found a connection to her blog. Yesterday's post, I think, said it all. Please take a moment to learn more about Lynda by clicking HERE.

Thank-you, Lynda, for sharing what you created for LMAJ Boot Camp.

Chiseled Hoops

Textured pendant necklace

Please continue to share your textured metal creations. The blog hop sharing will happen on April 8th. Also, please remember that the Boot Camp Flickr account is for those of you who have created something specifically for boot camp. Although, it would be nice to share everyone's beautiful designs, we would like this to be specific to those creations created for this challenge only.

As for Lynda, you can find more about her here:

http://freshbakedjewelry.etsy.com

http://freshbakeddesigns.wordpress.com

As always, thank-you for supporting artists who create handmade with handmade.

MaryAnn

Saturday, March 30, 2013

The Bead Soup Blog Party

by staci louise smith

Every year, Lori Anderson of Pretty Things hosts the Bead Soup Blog party.  It is a creative and social whirlwind of beads, jewelry and artists.  Lori created the Bead Soup Blog Party for a few reason, one, to swap beads with someone who has a different style from you, so that you can be challenged to create with beads you may not normally choose for yourself.  Another reason, is to give artists a nudge to branch out socially, to try blogging, to meet new people, and of course, to plain old have a great time.  If you want to read more about it, here is a link to Lori's bead soup page.
 
So, the beads have been swapped, the jewelry has been made, and today is the first Reveal Date- blog hop.  Grab your tiara(cause this here is girl time) and a cup of coffee or tea, and enjoy the eye candy that is the Bead Soup Blog Hop.

photo by Lori Anderson- property of Lori Anderson

I participated in this round.  So you can get the list of links here www.stacilouiseoriginals.com .
 
Here is some of the "soup" I recieved this year from Emily Greer of Gaia Copia. 
 
 
She sent me lots of fun beads, but you only need to use the focal and clasp.  Again, hop over to my blog if you want to see what I created with these guys!
 
I am also offering a special discount in my shops this week in honor of the Bead Soup blog Party. 
 
Use code beadsouprocks13 in either shop to save:
 
give you a 25% discount in my jewlery shop
 
gives you a 10% discount in my bead shop
 
Have a great day, and have fun hopping !


Friday, March 29, 2013

Textured Earrings Tutorial

I wanted to put together a little tutorial using some metal chain that I had purchased from a garage sale last year.While looking around the house for something to use for texture, I came across it and wondered if the hoops would be hard enough to create texture with. It was. I probably should have annealed the 3/4" disc first, but didn't. As you can see, you can still texture without annealing; it just takes more work.

I hope you like them.....

Materials: 3/4" discs, 18 gauge wire (for jump rings), 24 gauge wire, ear wires, metal hoop (could be done without this), center punch, marker, hammer, bowl for water, torch, mandrel (disc could be held with pliers), hammering block, 1/4" tube, tube cutter (optional), 2 small beads.

1. Set your disc on the hammering block. Center the metal hoop.


2. Watching out for your fingers, gently hammer an indentation into the metal disc.


3. Punch one hole on the indentation.


4. Using the hole as your guide, make marks at 6 o'clock, 3 o'clock and 9 o'clock.


5. Continue to fill in the additional placements that you would see on an analog clock. Using your punch, lightly tap on each mark 4-5 times.


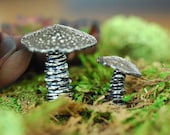
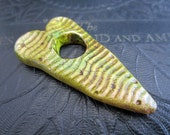
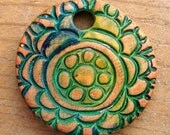
6. This is how it will look.


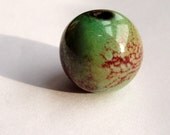
7. Turning punched side away, heat the disc with your torch.


8. Set orange hot disc in cold water. This step is personal preference. You can play around with how to get different colors. I'm not a pink kinda gal, so I kept experimenting until I got a color that I liked. As you can see, if you get it hot enough, adding the discs to cold water adds additional texture.


9. Having already cut your tube to 1/4" pieces (jump rings can be used instead), hammer them lightly until flattened.


10. Using premade 18 ga. jump rings, slide through disc and hammered tube.


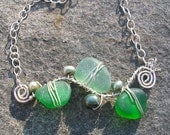
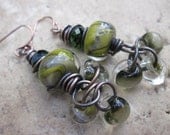
11. Using 18 ga wire, make small hoop, slide through hammered tube and slide small bead on. Create hoop on top of bead.


12. Using 24 ga, wire, wrap hoops made on top and bottom of bead.


13. For the last step, I chose to experiment with Stacie's tutorial on adding texture to ear wire. I discovered that I still need a little practice with this. Also, darkening is optional. I used liver of sulfur for my final step to patina.

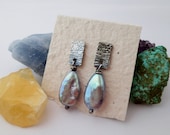
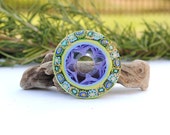
There you have it.... light weight and fun to wear.


As always, thank-you for supporting artists who create handmade with handmade.

MaryAnn

Thursday, March 28, 2013

Textured Wire Sprial Donut Connector

by Staci L. Smith

Here is just a little something you can make with your new textures- using the alphabet stamps again, combined with Stacie F's texturing wire post.
 
Take 6-8" of 12 gauge copper wire.  Spiral it into a coil, but leave a big open middle to create a sort of donut.
 
With a chasing hammer, hammer it to flatten the surface.
 
 
Then use the ball end of your chasing hammer to flatten the ends a little more.
 
 
Then I took my letter x, the period, and the letter I to make patterns on the wire.  I stamped them just like I would on sheet metal, it was just a little trickier to line them up.  Then I used my chasing hammer to flatten the wire again.
 
 
Add some liver of sulfur and polish off the high spots, and voila!  A wire textured spiral donut.


It is fun, and very sturdy, and it can be used as a pendant or a connector.
 
Hope to see what you have been playing with at our blog hop April 8th.

Wednesday, March 27, 2013

Metamorphosis

I don't think it's often that we can pinpoint the exact moment we decide something, change course or choose a path, but there's one time I can.  I saw this piece of cloisonné by Merry-Lee Rae in The Lapidary Journal, and fell absolutely in love with her art and her art form.  I knew I had to try it.  I love enameling, but I do not love metal working.  Being a member of Love My Art Jewelry has shown me that people with a passion for metal and jewelry can and do make inspired pieces of wearable art with copper, silver, polymer clay, fiber art and on and on with possibilities.

Lately, I am being pulled in other directions, and though I cannot pinpoint when it began to happen, my passion about my art has suffered.  I have begun to find the continual effort to build an online presence draining, and I do not like and am not good at self promotion.  The moment I decided to go back to being a fan of art jewelry instead of trying to be an art jeweler, I felt lighter...more free, and more myself.  So, knowing that it is what is right for me at this time in my life I am leaving my much loved group of Love my Art Jewelry ladies to return to being one of their biggest fans and cheering section leader.  I will be following their inspired progress without feeling the pressure to try to keep up with these artists whose growth and creativity continually astounds me.  As for me...well...some days I feel like making art, and some days I don't....so...some days I will...and some days I won't.  It's a good place for me to be.


Tuesday, March 26, 2013

Texturing Metal......NOW WHAT???

Sooooooo, is everyone getting out those hammers and metal and pounding away?!

Since our Art Jewelry Boot Camp is currently focused on texturing metal by hand, perhaps you've been hammering away and have a nice little sampler of metal pieces that you're not quite sure what to do with......

So today, I wanted to share a little tidbit for a simple way to turn that textured metal into a simple slide bail for another pendant. Slide bails/pendants!


Slide bails/pendants are a popular trend in higher end jewelry and you could add some of these to a table at your show as they can easily slide onto a heavy omega style necklace (so ladies can buy a pendant and simply swap them on their own omega for a new look) or be added to ready made leather necklaces. OR....you can incorporate them by adding punches of color by adding them to beautiful silks and fibers or a more involved pieces.


I started with a copper stamping that was very large (about 3+" across)  and probably wouldn't serve well as a pendant. But you could use squares, circles, ovals or any other symmetrical pieces you've been texturing to make a slightly different shape.  The original shape is above.

I snipped off the side rounded bits with a pair of french shears and filed the sides nice and straight and then annealed the piece to make it nice and soft so it would be ready to receive that nice texture we've been talking about..... Next, I textured the piece by using my grungy pitted hammer followed by a piece of bent steel wire that I mentioned at the intro to our challenge.

My piece was quite work hardened by this point so I annealed it again with my torch, cleaned it very well, then folded it around a 1/4" dowel rod to form the bail portion....(this was the point where I wish I owned a pair of bail pliers or wrap and tap pliers).....but a wooden dowel worked fine too! I then used a pair of chain nose pliers to bend the bottom rounded bits out a bit so it met in a friendlier manner.

At this point, I drilled my hole by using a center punch and drilling through both pieces at the same time so the holes would meet. I did all my finish work with my emery papers, cleaned, oxidized, distressed, and waxed and you have this:


A fun bail to add on a bit of silk or a slide pendant! Add your favorite Art Bead or pendant and you are set to go!


One word of caution: Don't forget to seal the INSIDE of the bail (I do this by  passing a Qtip coated in wax or a cuticle stick wrapped with some muslin or cotton ball and wax through the opening so it is finished inside and out) You don't want any oxidation to rub off on leathers or fibers....


Monday, March 25, 2013

Boot Camp: How to Texturize Earring Wires!

So how is it going with Texture Boot Camp? Are you learning a lot?

I was so happy when LMAJ decided to focus on texturing metal this month. I LOVE texture. My work is very texture heavy, and I am always looking for ways to texture as much metal on my jewelry as I can!

One area that sometimes gets ignored in the texture department in handmade jewelry is the ear wire. It is pretty easy to texture ear wires, you just have to be mindful about not tapping the metal wire too hard so you don't cause the wire to walk and lose your straight ear wire before you bend it into what you will be using.

One of my favorite tools on my bench is a roll of tape. I use strips of tape all of the time to hold metal down when I texture ear wires or stamp metal. Here's what I mean...


I usually texture about half-way up the wire....


I use the chisel end of my riveting hammer or a chisel-like tool in my chasing tool collection!

I just take the tape off about halfway, just enough to grab the wire and put another one in its place so that they will match! Pretty easy, and it adds just one more special touch your handmade earrings. You won't be able to really see the texture unless you oxidize the metal...which is why I oxidize all of my work! 


If you texture your ear wires, please leave a comment and tell us what tools you like to use to do it..or if you have any great ideas to add to the conversation!  Happy Texturing!


Sunday, March 24, 2013

Sharing your Etsy Treasuries.....


MaryAnn Carroll
So..... I happened to be on Facebook one evening and noticed that Marsha Neal from Marsha Neal Studio shared a way that you can share your Etsy treasury on Pinterest. It is called treasurypin.com. For those of you unfamiliar with Etsy treasuries, they are a way to share listings that you like. Some folks create a theme for certain seasons, colors, etc. Etsy randomly selects treasuries to be on their front page. I haven't investigated that part of this is a long time, but I'm pretty sure that their selections only stay on their main page for a short period of time.

Regardless, if you get your treasury on the front page of Etsy, it is sure to boost views in your shop. If you aren't so lucky, you can still get some extra views by post your treasury to Pinterest. It will look something like this:


Pinned Image


As you can see, it is a sampling of the complete treasury. There are eight additional listing that are not shown. So..... you've learned something new (if you didn't already know). Try out your own if you sell on Etsy and have Pinterest.

Here is what it looks like on Pinterest.

If you would like to see the actual treasury, you can find it on Etsy right HERE.

And.....

As always, thank-you for supporting those who create handmade with handmade.

MaryAnn

Saturday, March 23, 2013

What kind of Metal can I texture?

by Staci Smith

This was the first question I asked when buying my metal supplies.  I remember how shocking it was that you could use 24 gauge metal and it wasn't paper thin.  I was thinking in wire terms, and thought it would be frail and thin.  Now, the number gauges run in the same way wire does, smaller number, thicker gauge, but they certainly feel very different.
 
So I thought I'd give you a little information on metal sheet.
 
The most popular metals are sterling silver, copper and brass.  I highly recommend starting with copper.
 
Copper is softer then brass, and cheaper then sterling silver.  So it works easy, and if you make a mistake, it's not a devastating financial loss like it would be with sterling silver.


When you go to buy sheet metal, some places sell set cuts- like 3x6" or 6x12".  Others (like www.thunderbirdsupply.com) let you choose your own cut size.  This is handy to know depending on what you plan to do.
 
For example, at Thunderbird, you can order 10 pieces cut at 2x7.5" if you are planning to make cuffs (not sure what cuff standards is, I just picked that measurement at random)- they are pre-cut to the size you want.  They also have the option of set sizes.
 
Another thing to consider when ordering or buying sheet, is how you plan to cut it, and what you want to use it for.  26 gauge is very thin, very lightweight and easy to manipulate.  This is great for fold forming items that may be used in earrings.  I also use 24 gauge often for earring designs so they aren't too heavy. 
 
If you need something to be sturdy and unbendable under stress, you want to use a thicker gauge, 22-18 gauge.  Keep in mind how you plan to cut these sheets.  You can only use metal shears up to 22 gauge (usually).  So if you need thicker metal sheet, you will need to saw it.
 
I have ordered the standard large sheets of metal 6x12" and I found them too bulky to work with.  I don't have a quick way to cut them down, so it's been awkward to work with them, which I why I like to customize my sheet size.
 
I hope that helps with some questions you may have on buying sheet metal.  For a beginner, especially for our Metal texture Boot Camp, I highly recommend copper.  It cuts and stamps like butter!
 
We can't wait to see what you guys are working on.  Remember- the blog hop is April 8th.  On that day, you will be able to link up to our site.  Happy hammering.


Friday, March 22, 2013

Hammering to "destress"

                                                                                                                   by Kelli Pope

I'm currently preparing for an Open House this weekend.  With an extremely busy schedule, and an out of town wedding this past weekend, every spare minute has been spent making jewelry.
 (As you can see, I'm still WAY behind the curve.  Hoping for a really productive day today) 

Tonight as I was pounding on metal, I realized how therapeutic hammering can be.  Not only does it distress the metal, it's a GREAT way to de-stress yourself, especially when you're under the gun....deadline looming! :o)
Our current boot camp is on creating texture.  While below is a very simple example, it's still my favorite. Simply hammered metal, with a ball peen hammer. 
  I started with my pendant and a piece of round sterling silver wire.
 I hammered one end flat, with the flat side of the hammer head......
 then turned the silver over, and textured it with the balled end of the hammer head.  
 I put the pendant on the wire, and will continue with the other side.  (you can see some copper to the right that I have already textured, just waiting to be antiqued or patinated) 

I have purchased 2 texture hammers, that have different patterns on each side of the hammer head.  But I always seem to go back to my handy dandy old ball peen, to get the effect I prefer.   


                                            What's your favorite way to texture?  

Thursday, March 21, 2013

Oh Spring Where Art Thou

by Staci L. Smith

Well, it's the second day of spring, and it snowed again.  I want to start seeing some green when I look outside.  So, I made a treasury instead, enjoy!


Oh Spring Where Art Thou