Thursday, January 31, 2013

USA Postage Rate Increase

by Staci L. Smith

Whether you are a buyer or a seller, the international first class price hike is most likely going to effect you in some way.


The United States Postal Service has done some re-vamping.  They changed the name of some of their services, and increased prices.  The prices that were most effected were the international shipping, especially the first class small packages.  The prices have gone up from about 100% to 106% in some cases.  The new rates are currently in effect.

You can check out some of the information here on the Etsy blog or this blog really did a good job laying out the pricing as well.

I know that we are all shocked.  The prices are insane. I guess over time, we will start to accept it, like we did when silver jumped in price.  For now though, we are all still wide eyed and shaking our heads....wondering how this will effect business.  Paying $8-12 shipping for a few beads is most likely not going to happen, and some countries have customs fees to pay on top of that.

I changed my shipping last weekend in my shops. Its high, to cover myself, since some of them jump $3 if its over 3oz.  So I offer to refund the difference, so that my customers don't overpay.  Hopefully this won't scare anyone off.  

Any thoughts on what else we can do as sellers?  

Buyers, any concerns?

Wednesday, January 30, 2013

Waiting for the ball (not to drop)........

Since there wasn't much going on, I thought I would find myself a nice tree limb to rest on while I waited for my friend to join me.....

It's a semi-long story. My friend Lucy didn't make it through production quite as easily as I did. While the artist worked so hard at getting her just the right shoes, they kept falling off. I guess that is what happens when you are learning to do something that is new to you or even doing something that you have not done in a very long time.

The good news is that Lucy will not be given up on! Later this week, she will join me on someone's ears and we will be able to travel together forever.....


Here Lucy is before being disassembled.... Her legs (and arms) got a wee bit short in the balled headpin process.


And.... here are some attempts that failed.....

headpin attempt at the bottom of a bowl of water.....


Moral of the story: Well there's a few.....

If at first you don't succeed, try, try again.
Practice makes perfect.
Patience is a virtue.
Learn from your mistakes.....

I could go on and on, but I think you get my message. Have you been experimenting with balled headpins?

I was definitely inspired by Barbara's post on how to make rose colored headpins. I decided to break out the wire and bring back some little people that I have not made in a long time. What have you been making? Feel free to leave comments sharing your experience and you can also upload your pictures to share here.

As always, thank-you for supporting those who create handmade and those who create using handmade,

MaryAnn

Sunday, January 27, 2013

Valentine's approaches! Even if you're not one to indulge in the sticky sweet holiday, here are some pretty hearts and things that JUST might make your heart go pit-pat!

Love Marsha's shards, her glazes are all-around wonderful...These shards will make a cute St. Valentine's design, paired with a cute heart or paired with other earrings for sale at a show....super cute, right?

Ceramic Jewelry Components Porcelain Clay Grid Shards in Strawberry Pink Glaze by Marsha Neal Studio

Staci's hearts aren't sticky-sweet....a bit rustic and totally heart-felt...they are perfect for your next design.... great for a February design paired with some amethyst for a February birthday or just add them to your bead box to use all year long!

Hearts don't have to be only for February! What are your favorites ways to use red/pink and hearts during this time of year? 

Friday, January 25, 2013

Mass production

                                                                                                                                 by Kelli Pope

          Out of show season is the time to build up my stock of beads, pendants and findings.  I am very blessed to have studio space and a supportive husband at home, but am also blessed to have a FABULOUS sister, who supports my creative passion.  Sue lives about 2 hours from me on a wonderful spread in Kentucky.  Her place is a "retreat" for me.  I escaped to her place last weekend, and could feel stress start to melt away as I pulled up the long driveway to her house.   She and her husband Jim allow me a "studio" away from home.  I arrived with clay and tools, ready to play for 3 1/2 days.   I made beads, beads, charms, pendants  and more beads, while she delighted in making pendants.     I have no idea how many we made, but it's definitely a huge stash.  (We probably could have made more, but breaks HAD to be allowed to love, adore and hug her 4 dogs who hung out with and inspired us.  :o)
First bisque firing cooled in the kiln

pendants waiting to be glazed

                 left-very small sample of the hundreds of beads
  right- small charms and links 

36 oz bowls of pendants, beads 

Boy, do I have a lot of glazing to do!!!
Next blog, I'll show you how some of the finished product looks with some of Steve's enameled headpins***  

Thursday, January 24, 2013

My Go to Shops

by Staci L. Smith

I just thought I'd share my "Go to" shops with you guys today.  These are my favorite places to shop for supplies.  Some may not be the lowest price, but I will take an easier to navigate, or more all inclusive place to shop, over a few cents any day.  

For most of silver and copper wire, and silver and copper sheet I shop at Thunderbird Supply.  They have great everyday low prices on metal, the website is easy to find what you need, and they have GREAT Super Sales (you can find the dates and plan ahead- they have them all listed out for the year in their side bar) where you get the lowest bulk discount no matter how much you buy.  I also buy some of my tools and such here.


Rio Grande is the next place I go for wire and tools.  I don't think their site is as easy to navigate, but maybe that's because its so big.....I mean, the literally sell everything for jewelry making and selling. I buy a lot of my tools here.


Both of these sites also have a silver buy back program to earn cash or credit for your scrap silver.  You get more for your scrap if you choose credit, which I usually do.  

For my sterling silver chain I LOVE Artbeads.
I think  they have a lovely selection of chain.  They have free shipping for a very small order and really good prices on sterling chain.


My favorite place to shop for supplies is my local rock shop- Beys Rock Shop.  They have gemstone strands, cab and fossils.  What more could a girl want???


What are your favorite supply shops?

Wednesday, January 23, 2013

Funky headpins

Julie Holmes

I must confess, I have only attempted to make headpins once.  These were made by creating a spiral at the end of my wire with round nose pliers and then hammering the spiral flat on an anvil.  


Here are some more shapes that are taught at The Bead Fetish.
I have to say, I've been inspired by the posters before me to try making balled headpins and rosey headpins.  We'll see how that goes.  Hope you are all enjoying learning some techniques that are perhaps new to you.  I know I am!

Monday, January 21, 2013

Art Jewelry Boot Camp: Balled Headpins Week 2: Rosy Copper Headpins

by Barbara Bechtel

Welcome to Art Jewelry Boot Camp Week 2!!!

I hope Staci inspired you last week to dig out that torch and make your own headpins! Libby and Stacie added some wonderful posts to help fuel the fire beyond just wire-wrapping!

Today, I wanted to talk about making copper headpins and specifically, my favorite Rosy Red headpins!
by quenching your headpins immediately after they ball, you can achieve a beautiful rosy red color that I love to use in my work!


Important tips to remember when making these headpins:

*Dip your glowing red headpin IMMEDIATELY into the quench pot.
*DON'T pickle your headpins! You'll lose that beautiful color!
*Once the copper starts to ball, remove and reinsert into flame to control the size of the ball and it's shape.

As Staci mentioned last week, we do not cover torch safety or precautions, so please use caution and your own common sense.

Please feel free to ask questions and we will be sure to answer them for you, either in the comments or another post, or both.

Saturday, January 19, 2013

New Member Intro: Marsha of Marsha Neal Studio

I was honored to be asked to become a regular blog posting member here on  LMAJ.
I am formally Marsha Minutella, but most people know me as Marsha of Marsha Neal Studio (Neal being my maiden name).
Marsha of Marsha Neal Studio
I started to work with clay in college in 1997 as an elective class while perusing my BS degree in Entomology (Insects), concentrating in Wildlife Conservation. I ended up adding a minor in ceramics to that undergrad degree, then immediately continued my studies and received my MA in Ceramics at the University of Delaware in 2001. By 2002 I started making pendants, and by 2004, picked up a few shows and quit my day job to travel around the country to sell my work.

Marsha Neal Studio Bead Show Tray
 I stopped traveling to sell my items at shows back in 2007 because my husband and I wanted to focus on having kids: Chloe, now 5 and Riley, now 3 (you mean you have to be present to be pregnant. Oh!). 
And I was reaching a burn out stage with traveling to over 30 shows a year, traveling time, and making pendants production style when I was home.
I now sell directly through my shop on Etsy.com and my website.

My body of work for the last 10 years has been porcelain and stoneware pendants, beads, cabochons, buttons, and donuts.
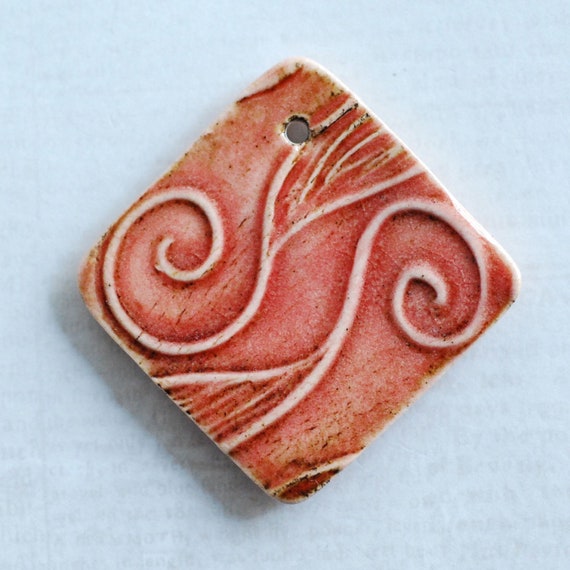
Marsha Neal Studio Spiral Waves Pendant
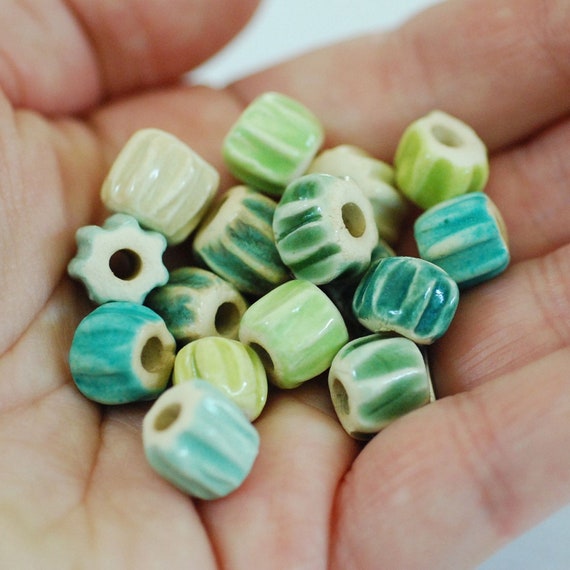
Marsha Neal Studio Handmade Chevron Inspired Beads
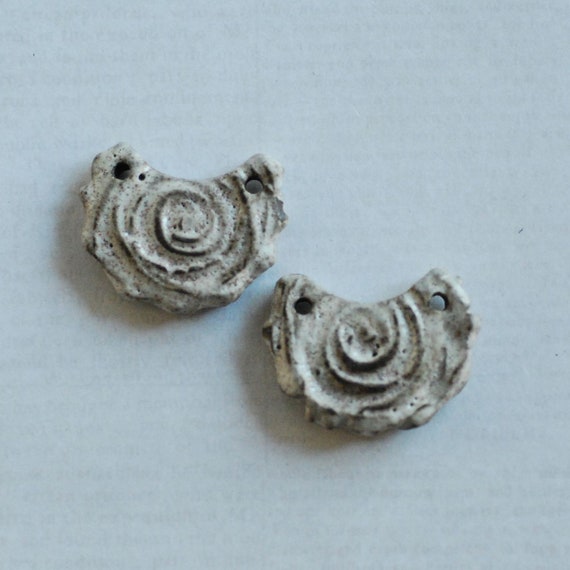
Marsha Neal Studio Chocolate Clay Crescent Pendants in Speckled White Glaze
Below are some of my pieces after the initial bisque firing, which is to harden the ceramic clay and make it more durable for the glaze firing (top left), and what the glaze firing looks like before (top right) and after (bottom left). I'm a bit obsessed with colors and textures - just so you know...
Marsha Neal Studio Handmade Ceramic Pendants and Beads
After I stopped traveling for bead shows, I sold all of my excess bead show inventory that was not my own work and these hand painted silks, to my friend Darlene (D7Studio) so she could continue to sell at shows here in the north east US - she does carry a line of my items with her.
Marsha Neal Studio offers Silk Painting Is Fun: Hand Painted Silks
I was just too attached to this line of hand painted silk ribbons (painted by Ute of Silk Painting Is Fun) that I picked up in January of 2005. They just are so much fun to design with, are of very high quality, and I love sitting and pulling different color palettes for people to buy and work with - as it can be overwhelming to pick out individual colors at times.

I definitely consider myself more of a bead maker than a jewelry designer.
But I also feel that it is extremely important to understand how your work may be used to create something that is easy for the jewelry designer to work with. I strive for interesting, high quality work.

As a child I would sit for hours and make macrame friendship bracelets, and later learned how to use tigers tail with crimps to make beaded bracelets and necklaces.
I still remember how exciting that was (and I still have all my materials from then!)
My little Chloe - age 3
As a mother, I love to spend time watching my kids figure out things and be creative and explore the world around them - even if it is watching my 3 year old figure out how to get those yummy snacks off that high pantry shelf by moving the kitchen chair over and then climbing... He is a high energy kid for sure!

My inspiration for my clay work comes from textures, designs, patterns, and colors from the world around me - both natural and man-made.
Marsha Neal Studio Zentangle Inspired Sketchbook Drawing
I love to draw and doodle with a gel roller pen on smooth sketch paper (amazed with Zentangle and quite fond of having a way to finally communicate verbally about doodling).
I carve my own designs into clay, which I bisque fire then use as a texture plate.
You could say that I print with clay.
Marsha Neal Studio Hibiscus Flower Texture Plate (Printing with clay)
I get colors by applying glaze (a glaze is glass: silica that is held in suspension with colorants, fluxes, binders, and such, by mixing dry materials in a specific formula with water to a brush-able state. Then after drying, firing it into a kiln to it's mature stage - which for my work is around 2230 degrees F).

So I guess that is a good intro about me for now.
If you want to see a bit more of what I am working on in my studio (like these small sculptures below), check out my Marsha Neal Studio Blog, and keep an eye out here for some posts of things that I'm going to be working on for LMAJ.
New Terrarium Sculptures from Marsha Neal Studio
PS ~ I post on my Marsha Neal Studio FaceBook page frequently as I keep my iPhone on me and usually have my Hipstamatic app at the ready to grab a studio shot, and post to FB when I take a break from working.

I look forward to expanding my jewelry making expertise here with you all!
Thanks for having me...

Thursday, January 17, 2013

A Peek into Production

Well, it's that time of year for me, the time of year when I crunch to have enough stock for the Berks Bead Bazaar in 6 weeks.  As of last weekend, I had nothing  to sell.  I still don't have anything sell ready, but my beads are underway.  So I thought I'd give you a peek into the madness, I mean, production.


I also have lots of new designs, including some toggle clasps!!!  I made my Moon Babies smaller this year, and shrank down some other designs as well, because sometimes they need to be the accent and not the focal.    So without further ado, here is the photo journey of bronze beads.


Bronze clay freshly molded, still damp


Then they go onto the hot plates....when I go into high production, two is not enough!  (I am not patient at all)


Next they get sanded with a soft sanding pad to smooth the edges, and holes get drilled at this point


Then they go onto a tray .
After that, they are fired in the kiln.


This is what they look like out of the kiln, with a light brass brushing under water to clean the carbon off.


You can see the finish is kinda matte- that's because the particles are not compressed yet.  The bronze is very porous at this stage.  To make it shiny and add strength, I put it into the tumbler with steel shot for anywhere from 10 minutes to an hour depending on the finish I want.


Looking into the tumbler when they are done polishing.


All shined up and ready for patina or a liver of sulfur bath.

The bunnies are new- and I plan to use ball head pins, balled on both sides, to rivet them to a backing.  I will hopefully have that to show one of these Mondays!

Here are some more of my new designs before they are cleaned up.  


I hope you enjoyed this peek into the process of bronze mass production. I really enjoy working this way- in batches!  I get into a nice groove and just go with it.

What about you?  Do like to work in big batches, or small / single projects?

Wednesday, January 16, 2013

Giveaway winner

The winner of the wood-fired and enameled beads is Rose! Congrats, Rose!


Thank-you to all of you who shared what you would like to learn. Hopefully, with our new challenge, we can make that happen.

As always, thank-you for following and for supporting those who create handmade with handmade.

MaryAnn

Tuesday, January 15, 2013

Head Pin Mania!

  I love the post yesterday on how to make headpins
If you missed it make sure you scroll down! I can't wait to see what everyone comes up with. 


 As you know to participate you need to either make or use handmade head pins, so I wanted to show you a new trend in beadmaking, glass head pins.
There are several shops on Etsy that have some great examples.

First is one of our favorite bead makers Genea Crivello-Knable 
These little buggers are so stinkin cute! Not only can I see them as parts or earrings but also incorporated into a necklace. The possibilities  are endlessBeautiful.
     Kalera Stratton of Beadwife has been making beads for a long, long, time. She also has been making these adorable leaf head pins for a while. I love the colors and the leaf shapes are great. I can see making a loop with the wire and simply hooking them onto a earwire. Simple but very elegant.

I met Liz about three years ago at the ISGB bead convention and have loved her work ever since. She not only makes great glass head pins put also enamel ones! Take a look at her Etsy shop. She is in Brisbane, Australia so lets hope her summer cools off soon!
And finally a great picture from one of my favorite artist Kristi Bowman. I thought I would show you how she used some glass head pins in this earring design. I love the colors.
                                                                   

So I hope I have stirred your creative juices. I can't wait to see what everyone comes up with. I myself am off to make my own glass headpins!