Wednesday, October 31, 2012

A Cauldron of Orange and Black

What is it about these two colors that makes us think “Halloween”? - pumpkins with flaming eyes and scary smiles, black cats with arched backs and spiky fur, autumn leaves rustling between our feet, the pale full moon with inky clouds scudding across it. Although my search of the interwebs produced numerous theories about orange symbolizing life energy and the harvest versus black representing death, the following information (from Colourlovers.com) seemed plausible:

”Halloween's origins date back to the ancient Celtic festival of Samhain (pronounced sow-in). The Celts, who lived 2,000 years ago in the area that is now Ireland, Britain, Scotland, Wales and northern France, celebrated their New Year on November 1. This day marked the end of summer and the harvest and the beginning of the dark, cold winter, a time of year that was often associated with human death. Celts believed that on the night before the New Year, the boundary between the worlds of the living and the dead became blurred. On the night of October 31, they celebrated Samhain, when it was believed that the ghosts of the dead returned to earth. In addition to causing trouble and damaging crops, Celts thought that the presence of the otherworldly spirits made it easier for the Druids, or Celtic priests, to make predictions about the future. For a people entirely dependent on the volatile natural world, these prophecies were an important source of comfort and direction during the long, dark winter.”  

For a few years now, I've celebrated the change of seasons from summer to autumn by making a special piece of jewelry at Halloween-- one year I collaborated with other artists on a project, last year I did a spooky little sculpture that keeps evil spirits (or at least horrible artistic mistakes) from my workbench.  


“Something Wicked This Way Comes” – polymer clay and wire
 

"All Hallows Eve" – October 2009

This year since I was invited to do a guest post for LMAJ, I decided to do a necklace with colors that reflect seasonal tones but that would be more wearable with the addition of other colors as well. I decided to incorporate an interesting find from a local antiques mall in my design-- a large snake of old mother of pearl 1” diameter buttons, all in different pearlescent colors. I could see them as the base for a large focal so I used a mold I made from a found object obtained from an Etsy seller from Lithuania, http://www.etsy.com/people/Alchemyshop. The original metal piece had a fabulous patina which went with my palette so I mixed up some gray-tinted ivory polymer clay, unmolded it and cut out the voids, cured the clay and then applied heat set oils (Genesis), acrylic paint, gilders wax and colored pencil. The centerpiece was a jet beaded Victorian button I found at another antiques store. I added some gorgeous agate drops with quartz rounds and Czech glass rice beads.  


Original metal object from Alchemyshop


Focal in polymer clay with beaded Victorian button center

Needing a kick of color, my stash produced some faux amber lucite beads that were a gift from my sis last Christmas, which added the pumpkin color to the neutral palette.  

 
I raided an unfinished necklace for some Tibetan dzi agate beads in blacks and oranges and added some andalusite rounds from Lima Beads.

 
Following the tribal theme from the MOP buttons, I found some bone beads bought at a neighborhood yard sale and included them. Since I had strung the heavy buttons on a length of annealed steel, I needed to cover the ends so I made a couple of polymer spacers and used the same technique as on the focal to blend them into the overall palette. No clasp was needed since the necklace was long enough to slip over my head. Now it just needed a name!

 
“Midnight in the Garden of Good and Evil”

Polymer clay, mother of pearl buttons, agate, Czech, dzi and bone beads, andalusite

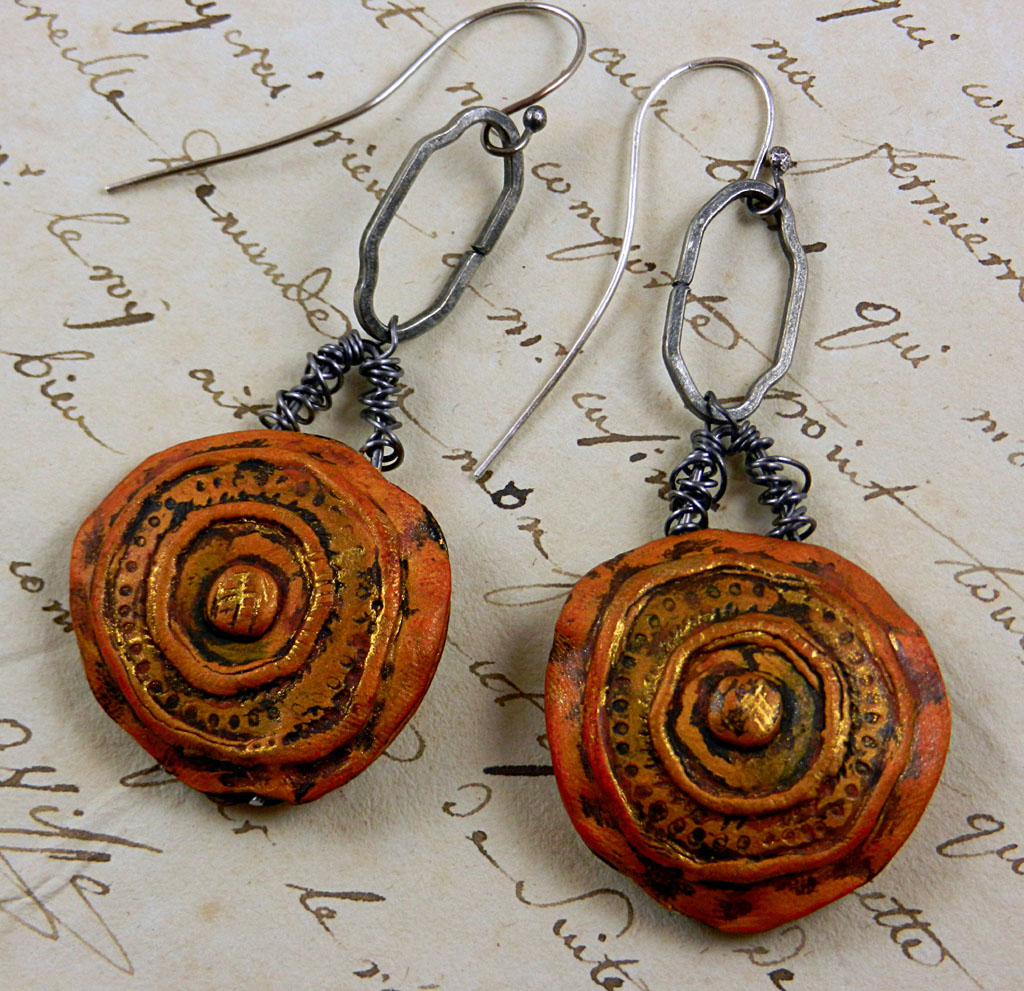
As for earrings, I remade a couple of antiqued polymer impressions I made a while ago, adding internal connections of annealed steel and some links from a Michaels find with sterling silver handmade wires.


“Pumpkinhead” earrings – polymer clay

From me, Christine Damm of Stories They Tell, everyone have a safe and fun Halloween! Hang in there all of you out there in the Hurricane Sandy disaster area – help is on the way! Our thoughts and prayers go out to you all.

Tuesday, October 30, 2012

Guest Post - Marsha's Halloween

Hi Everyone! I'm Marsha (of Marsha Neal Studio) and I am thrilled to be asked to do a special guest post here on LMAJ blog for Halloween themed post...
Marsha Neal Studio Halloween Ghost Pendant
I consider myself to be more of a bead maker than a jewelry designer,
although I do dabble a bit.
Marsha Neal Studio Bat Necklace
I find that as a bead maker, it is important to understand how your pieces can be used for creating finished jewelry and also to listen to feedback so you can make your work that much better.
Marsha Neal Studio Porcelain Bat Pendant
For Halloween, I walk that line of in-between.
In between kinda cute and the slightly not so normal.
I am a color and texture person.
Throw in a shape to give it a bit of definition, but other than that I like to see how the clay and glaze react with the textures.
Marsha Neal Studio Porcelain Bat and Silk Ribbon Necklace
I love quick wire wrapping.
I need to sit and figure out some cool handmade closures, but time has not allowed for that.
(And that is something I have to be ok with for the time being).
Fall Gords and Pumpkin
We have a preference in my house for the fun things.
Not the scary things of Halloween.
Marsha's End of Season Garden
I love the end of season garden for gathering bits of decaying plants and seed heads to press into ceramic clay (which gets fired to become a texture plate) and then rolled over with fresh porcelain to get reverse images printing like this pendant:
Marsha Neal Studio Porcelain Nature Pressed Pendant
I have a little family of 4 (me, my husband, and two young children).
So for Halloween, we start decorating in early October.
We read fun Halloween books. We watch fun Halloween movies.
Marsha Neal Studio Halloween House Decoration
I know that as they grow older, they will be wanting to watch horror flicks.
For right now, we avoid watching them when they are present.

I'm the type of girl that watches those movies through the cracks in my fingers covering my face.
The kind of girl, that when the kids are asleep and my husband and I sit up and catch up with The Walking Dead (AMC) - he often has to ask through laughter: "Marsha. Does your running in place in bed help them get away faster? Do you think they can hear you telling them that one is over there and to Run Now! Get Outta There!?"

Oh, man. My kids are going to have fun with me when they get older...

So with that...
My house usually shows off Halloween more than I do.
I prefer the simple design with a hint of that not so pretty (but usually quite pretty to me) texture and color.
What about you?
How do you wear Halloween?

Please stay safe if you are in the path of Hurricane Franken-Storm Sandy.
I hope you and your loved ones make it through this safe and sound and get to have a little fun with Halloween this year.

Monday, October 29, 2012

sys monday -

hidden druzy pendent by pennee

Hidden Druzy, peek a boo pendant, Sterling metal clay, 10mm druzy set in sterling prongs

tracy kruse  of goldkisses art

Textured visual inspiration from the lamp work beads and the tactical feel of the enameled beads led me to created textured bead caps and clasp so that in every element is a complimentary, yet different quality.

copper ammonite bead by kristi bowman

kristi certainly deserves a mention here - she provides a tutorial on how to make this wonderful bead on the art jewelry elements blog...

wishing all who are experiencing hurricane sandy the best - be careful and listen to the advisories - stay safe!

here is what it looks like by me in nj with the storm still over 270 miles away-

this is an inlet - you can usually see the jetties on either side


Sunday, October 28, 2012

Becoming a teacher and a student.....

This week marked the beginning of my 34th year on this planet. As a gift to myself, I decided to take a class given by new friends and fellow teachers at Bali Studios. For a long time, I think at least the last year, I've felt in a constant state of flux, a feeling of transition that I haven't been able to put my finger on exactly. This class was a celebratory act in moving towards that direction, this direction I've been feeling pulled towards but couldn't quite see yet...sort of like trying to orientate one's self to a compass.

One of those steps is teaching and in terms of magnetic poles, and compasses, an aspect of that is also learning...learning in a broad sense, both teaching and learning. Learning about myself, about teaching, and of course, learning from others.

Now, I don't think it's a secret that teachers learn as much from their students as they teach them, right? It's sort of one of the basic philosophies of teaching....This part is the part that has me most curious. This two way avenue of learning....this teaching and being taught.

I haven't taken a class in years....maybe since college. I'm a very visual, hands-on learner....and I'm quite content to teach myself....so I think this class for me was a very important step in this journey to becoming a teacher....to also learn and to UN-learn. To learn from other artists, their own approach, how it differed from my own approach and to do it by another method.

final gathering photo by Deb Taylor


Our class was about creating a personal soul passport, a handmade book. In this case, it was already something I was familiar with, art journal-ing and bookmaking....There was much emphasis on creating a finished mostly blank book in a very safe, welcoming environment in which we were able to create.

I put it in my mind before I even went that I would push myself into this with my whole heart and create something very different than what I was accustomed to....

As I was learning and as I begin to teach new classes, there is this thread I feel between students and teachers....

Students are often reluctant to take a class because they either feel:

A) They WON'T be able to learn what's being taught.

or....

B) They won't be able to learn anything new.

and teachers often similarly feel the same anxieties about teaching....they won't be able to teach anything right and students may not "get" it or their students won't learn it.

So, as I sit here with my heart full of teaching and of learning, I've been asking myself, "what is this common thread?"

For me, it becomes creating this safe, loving, sharing, environment.....This place, where as a teacher, I can enable my students to feel safe and confident learning....but also a sharing environment, where we'll all be able to receive and bring our collective experiences together as a community of learners and makers.

snippets from my soul passport and beauty of a day of learning....


If you are (mostly) a teacher, what has been your greatest learning experience?

If you  are (mostly) a student, what has been the best learning environment?

If you've never done either, what types of experiences would make you feel the most comfortable?


Friday, October 26, 2012

Stepping in for Kelli.


Kelli is off on an adventure so I am stepping in for her.
I saw Staci's great post about trends in jewelry and thought of something new that I saw at the ISGB conference this summer.
They are Regaliz Leather bracelets and they are super fun!


 You can buy the supplies on several websites like Artbeads
and Antelope BeadsWhat is really nice is Antelope Beads
has a great video on how to make one.

So not only are these cool looking but as a glass bead artist they are now making mandrels in sizes which will fit over the leather! So now I can make them unique with my own beads.


Which got me thinking that many of the polymer clay artist could also make some pretty cool beads that could slip over the leather. 
I also though some of our metal artist could also make some pretty cool components to accent the bracelets. 

You can also add some bright rubber o rings to spice them up even more. Whats even better is I made one of these in black with simple silver accents for my daughters boyfriend. It has always been so hard to make anything for a guy but I do think these do seem to fill the bill. 

So I am hoping to make some of these and post some pictures later in the month. I would love to see some pictures and ideas from our readers!


Thursday, October 25, 2012

Gallery Preparation

I have been asked to put my jewlery in an Art Gallery.  Up until this point, I have been very hesitant to take this step, but I think I am ready!  (and this gallery is amazing and cool, and I'd love to be a part of it!!)
 
So now I am making a mental checklist of things I need to ask, and things I need to do.
 
I have the contract, so I know the rules, agreement, and how the money is split. 
 
Here are some good quesitons to ask before going into something like this:
 
1.  What is the space like, what kind of displays will my jewelry be on?  (so you know how to package it)
 
2.  What is the inventory system, and do I do it, or do you?
 
3.  What price range are they looking for?  And what is target price range, or range that sells the best?
 
4.  Does stock need to be rotated?
 
Then there is my jewelry.  Should I have fancier packaging? 
 
I know that hand written price needs to go away!
 
 
What kind of variety should I offer? 
 
I think I am leaning towards a lot of earrings and tribal pendants, with hints of my traditional chunky pieces. 


Anyhow- its all very very exciting, and I can't wait to get started preparing for this new journey!
 
Here is a link to the Gallery's website, The Copper Frog- I am so in love with it, and can't wait to get there in person and check out all this amazing art.


So, any suggestions guys?  What did I miss? 

Wednesday, October 24, 2012

Make me happy BLOGS

Julie Holmes
I remember reading about blogs being a new trend among the trendy years ago.  I thought it was a funny word, I didn't understand the concept, and I thought....well...don't worry about what those youngsters are doing, it's got nothing to do with you.  Sometimes I think we're at our most "Old-fogey" in our 30's....and we get younger from there.  Anyhoo...I know what a blog is now, and I think they're fabulous for all ages and I'm sharing a couple of my favorites here with you today.

What I wore 2day.  This young recently engaged former United States Marine is a genius and an artist with clothing.  I find it mind boggling to watch her consistently look better on her (self proclaimed) worst days than I'll ever look on my best...and all while spending a fraction of the money.  I pretty much lurk on her blog because when it comes to fashion and style...well...let's just say I don't have anything intelligent to add to the conversation.  I like hearing about her life...seeing her grow as an athlete, in her career and plan for her future.  Did I mention that she wears fabulous jewelry?  Her name is Kasmira Kit and she inspires me.

EB Bead and Metal Works  This is a mother daughter team that creates unique and beautiful enameled copper pieces.  "Mom" (Evie) does the sawing...and sawing...and sawing...my goodness that woman can pierce! Daughter Beth enamels and more.  Together these two have created a thriving business, gorgeous artwork and a strong family bond.  It's neat to see.

Blogs are fun, educational, sometimes heart wrenching but almost always entertaining.  I hope you are enjoying ours!

Tuesday, October 23, 2012

Halloween is around the corner...........


by Staci L. Smith

I have always loved Halloween.  I think its the creative side of me that always loved dressing up and pretending to be something else for a whole day / night. 
 
I wanted to make some Halloween beads, but couldn't bring myself to make anything that wouldn't last past the season.  So, my solution, sugar skulls and spider webs!  I made molds in polymer first, and then used them with my Bronze clay.  I am really happy with how they turned out, and plan to make more sugar skull molds too.


I made these into necklaces right away to list in my shop.
 
I will hopefully be listing them this week, and will try to have more beads made by weeks end. 
 
Here are some Fall and Halloween favorites I found on etsy.  I just thought I'd share, I love eye candy!!


I love Lisa Peters Art Fall Fantasy line

http://www.etsy.com/listing/112619004/fall-fantasy-flower-handmade-ceramic

If anyone in the bead world knows how to pull off holiday beads, its Joan Miller.  She always pulls it off with such creativity and class.  Here are a few of my favorites in her shop.

Sugar Skull and Roses


http://www.etsy.com/listing/112248658/rose-skull-box-bead-handmade-colored?ref=v1_other_2

How adorable are these purple shrunken heads??


 http://www.etsy.com/listing/110946868/shrunken-head-charm

and of course, love these spiders too!!!

http://www.etsy.com/listing/110860856/spider-bead-matched-pair-of-handmade

I fell in love with this Raven Mask while looking for raven beads.  It's by Grin Grimace and Squeak on etsy.  Gorgeous!!!


This full moon lampwork bead by Veradacraft makes me think of crisp fall nights- running around the woods scaring each other as kids. 


I hope you enjoyed the eye candy! 

I will be sad when all the themes change from crisp fall, and spooky halloween to snow and christmas.  Fall is my favorite season by far, there is a magic in the air!  AND it has halloween in it, which gives us a chance to play dress up again, even as adults!

What's your favorite season, and why? 


Monday, October 22, 2012

sys monday - nature (and a great coupon you can use on the riveting system)

mary jane dodd

nature inspires 

in beautiful ways -


This piece was commissioned by my sister. The to oak leaves represent her and her husband, the acorns represent their three children. It was cut from 24g copper sheet, hammered for some shape and then enameled. The acorn headpins and lampork beads are also made by me.


by Pennee Parker of All Wired Up

pile of rocks ring - 
pmc with patterning


thank you all so much for the beautiful submissions to strut your stuff  -
i look forward to seeing what i can feature next week!

you can link here to enter - or use the button on the sidebar - 

*** also, i wanted to share a promotion from fusion beads with you - i used a similar one to get my riveting system... the code gets you 25% off... 


Saturday, October 20, 2012

guest post - karen mcgovern


It’s ALIVE!! My Journey Creating a “FrankenBench”

Recently, my husband and I embarked on a journey to renovate my studio/garage workspace. I like to use the word “studio” with “garage” because it sounds so much nicer (and more professional) than “the corner of the garage where I work”. Ah, vanity…

I have been creating art jewelry for about six years now, and my workspace has evolved from a card table in the spare bedroom to a pretty cool, dedicated space in our large garage (under a WINDOW, no less). Over the years, I have slowly but surely developed my skills and my need for a more usable, comfortable place to work. Luckily my husband is a handy-man extraordinaire, a MacGyver of repurposed materials. Give
him a wad of gum and a few tongue depressors and he’ll make you a serviceable bookshelf…seriously.


So, as I cruised the Internet, drooling on my keyboard over $3,000 artisan jewelry benches that I will NEVER BE ABLE TO AFFORD, I found a blog about the “FrankenBench”. JACKPOT! Posted by Maureen, of Release Me Creations (http://releasemecreate.blogspot.com/2012/01/diy-wednesday-jewelers-bench.html), the FrankenBench is created from an old, wooden desk. The directions are fairly simple, and
the result is a pretty darned cool jeweler’s bench for very, very little cost. The original FrankenBench design sprang from the brilliant mad-scientist mind of jeweler Brian Meek (http://www.alberic.net/Toolbox_Index/FrankenBench/FrankenBench.html). This DIY dream appealed to me for so many reasons. I love to salvage stuff and turn it into other stuff. I hate wasting time and money, and I love to torture my husband with crazy projects. The FrankenBench fulfilled all of this and more.

I am a firm believer in doing my own thing. My workspace is a constantly changing evolution depending on my creative direction at any given moment. With the FrankenBench idea firmly implanted in my brain, my husband and I took a look at my space and devised a version that suits ME, my needs, my space. I love it!


First, a bit of back story about my workspace. Before this renovation, I was working on a 7 x 4 foot solid wood door screwed to a weird wood office table salvaged from a local thrift store. The office table is rectangular, smaller than the door. This has served me well for a few years, but is actually too low for the work I do--jeweler’s benches should be tall enough so that when you sit comfortably in front of your bench pin, the pin hits you right in the middle of your breast bone. I was also working from a rickety folding chair (totally stupid and basically torture for my back). I found myself working more and more out of my LAP for crying out loud, because while the door is large, I had storage issues, and the top became covered with tools, tool boxes, and all manner of project parts, creating the look of a floating land fill. It was TIME FOR A CHANGE!


After referring to the FrankenBench post, my Tool Time hubby devised a simple way to create a similar design, but with much more space than an average desk could ever provide. We (and by that I mean HE) unscrewed the wood door from the table (after I cleared it off, WHAT A TRIP THAT WAS, I found stuff I had no idea I even had. It was  like an archeological dig of jewelry treasure!) and raised it six inches with two lengths of 4 x 6 wood post from good old Home Depot. This brought my work surface to 34 inches from the floor. The wood posts were cut to the width of the table and screwed in place on either end with 2 “L” brackets apiece. We then set the door back on top, centered over the supports (it weighs a ton, so I decided to leave it floating in case I ever want to move it, etc). Finally, we cut a shallow half-circle in the door for my bench pin and VIOLA! A new FrankenBench was born (sorry, no electric shock or stormy night, but that would have been cool…). In raising the top I created a ton of storage space below (now my tools are right at hand, but not cluttering the top!!!!) and my bench pin is actually serviceable and easier to use. I even added a hose clamp fitting right next to the bench pin so I slide my ring mandrel in—no more wedging it between my boobs to use!!!! Happy Day all around, accomplished in a couple hours one afternoon.


The finale (and what took the longest) was the quest for a perfect chair. I referred to jewelry supply websites and chat rooms researching what was recommended and why, and found a HUGE disparity amongst jewelers and artists. Again, the bottom line is to find a chair that works FOR YOU, not necessarily the uber-ergonomic, specially designed $485 jewelers stool offered online (for that money the chair better be gold- plated). We spent a day traveling from office supply store to furniture store sitting in dozens of chairs, adjusting lifts, playing with backs. Arms or no arms? Back or no back? The chair matters, folks, it really does. The three most precious tools you have are your hands and back, so don’t take this lightly! Good posture has always been a problem for me, and I can’t tell you how many times I and my husband have caught me slumped over my table like the Hunchback of Notre Dame. A couple hours like that and my back sounds like a bowl of Rice Krispies in milk when I finally stand up (NOT GOOD).

In the end we found a really great, supportive mesh chair from Office Depot, adjustable gas lift, with arms (that are removable if I want). The selling point for me was how the back is designed. It curves perfectly to fit your lower back, and gives firm, yet yielding support (sort of springy) with out being sloppy. The seat also has a great curve, and fits the back of my knees well, giving me good posture and comfort. The mesh was also important, because I live in South Florida, and no matter how I try to keep the garage (I MEAN STUDIO) cool (I have a portable, free standing air conditioner), it still gets steamy in the summer. Leather or cloth would have been really awful.


All in all, I am so pleased with the results (finished YESTERDAY) and can’t wait to get to work. I feel like a weight has been lifted off my shoulders, I no longer cringe when I look at my space and I feel the creativity flowing….AND, I put the chair together myself—so that gives me the right to say this project was ALL MY IDEA, right????

If you are thinking about creating a new workspace, or renovating your existing space, I definitely recommend researching the FrankenBench. It’s easy, and fun, and you end up with a custom space built just for you. So, hit those furniture thrift stores and bring your own FrankenBench to life!


Karen McGovern is a conservation biologist/mixed media jewelry designer living in South Florida on 30-acres filled with endangered parrots, primates and African antelope. Her work is inspired by nature, and created to raise funds and awareness for wildlife conservation through the Rare Species Conservatory Foundation. To see more of her work and learn about her passion for wildlife visit www.beadkeepers.com and www.rarespecies.org.