Showing posts with label #maryanncarroll. Show all posts

Wednesday, November 18, 2015

Less is More

by MaryAnn Carroll

I stole that slogan from somewhere, but I am pretty sure it isn't owned by one particular person. Anyhow, it is something I have made myself remember for many years now. I tend to have a habit of overdoing sometimes. After years of practice I have gotten much better about recognizing when I am heading down a busy road the wrong way.... Put on the brakes, turn around and head back to some tranquil spot that existed before you took that path.

I have had such crazy stuff happen to me in life. Not unlike some others, but it often seems like I am in the minority with the things that other people fear will happen has happened. Sometimes people wonder how I can do it and how I haven't dropped dead yet. I guess the answer is acceptance of what I cannot control and also to simplify what I can. Seems deep, right.

Well, lucky for you I am not going to get too deep right now (that usually comes after a glass of wine or two). I will stay focused on what I do outside of the chaos. That is beadmaking and jewelry. I say try because I always seem to have roadblocks thrown in the way, but when I find myself truly back into it, it is so enjoyable.

Just recently, I have gently removed those roadblocks that were piling and quietly tip toed back down the road of tranquility. Maybe I will be able to hang out there for awhile if all goes well.

LESS IS MORE...

I decided to redo my website that has been hurting for a couple of years. In the past, I used GoDaddy. It was a great experience for me because it was not too easy to learn. I had to teach myself many things about codes, javascript, etc. It all seemed so darn overwhelming at the time.


This time around, I wanted to keep it simple. I don't know if it is as complicated as it was a few years back, but I needed a change. I decided to check out other website builder services. I looked up reviews knowing that those may not always be accurate, but went for web.com since it had a high ranking. I fiddled away and entire day with it to discover that the cheap price was going to be ridiculously I found web.com. Given the name, I rationalized that it would be easy. It was, but when I went to publish I learned that my $4.95 a month was going to become $24.95 a month. I chalked that one up to more experience.


I cannot remember why I tried wix.com, but I an assure you that I am so happy that I did. The website builder is incredibly user friendly, For $8.95 a month (paid in full), I got everything I needed and more. I think one of the biggest things that I like is that there are free apps. Etsy is one of those. Yay!! You can literally add your Etsy shop to make it look like part of the website. If you read this blog often, you might remember the post about returning to Etsy.


It might not be the prettiest way to sell online, but it sure as heck is convenient.

So, for those of you who are hoping to simplify your own life, but you would also like to promote your shops, etc. I am going to give a confident recommendation for wix.com.


My site still needs some work, but for what it is worth, here it is.


My link was done using the jewelry template. Also, you can fix the site to work with mobile phones. I haven't gotten that far yet, but that looks pretty simple too!

Good luck!

WORD OF CAUTION: Once you choose your template, you are "kind of" stuck with it.


Friday, September 18, 2015

Gotta love Hoops

by MaryAnn Carroll

I have been using copper tubing for a couple of years now, so I have learned a bit about it and want to pass on that knowledge to you.

Copper tubing comes in different sizes. You can go as low as 1/4" (maybe lower) in diameter to about 1 1/2" in diameter at most local plumbing stores. I am sure you can get it a bigger, but I am talking about local sales unless you live near a place that specializes in copper.

Tubes are measured by OD (outside diameter) or ID (inside diameter). You can have a variety of sizes for different jewelry design. One of the biggest things that I have learned, however is that copper comes in a variety of thicknesses (K, L or M generally), The thicker the tube is the heavier it will be, so planning on which kind to use for jewelry making is a good idea.

What else do you need to know? Some copper can be coiled (soft) and other tubes cannot (hard). This piece is a hard temper tube which is not bendable without LOTS of annealing. Soft tubing bends easily and cleaning it is a little tricky.

Let me apologize for some of these pictures. I took them while I was hustling to get ready for last weekend's show, so there is a mess in the background.


The colors on the pipes also indicate thickness and type. I cannot remember what color represents what. When I go to the HEPP Building Supply (a plumbing supply store) I go into their warehouse and look inside the tube. If you bring your burr cleaner you could clean out the end to get a better idea. The bottom line for making hoops to hang from your ears is to look for a hard temper thin walled tube. You can then choose from a variety of diameters.
.
So, once you have the copper that you want, you need to cut it. There are different sizes of tube cutters. These can also be purchased at your local hardware stores. Although some will cut multiple sizes, if they are too small cutting larger tube can do a number on your hand. I suggest having a few different sizes on hand. Here are my main go to cutters.


To speed up the tube cleaning process, I like to use a dremel. You can use different attachments depending on what you like or, in my case, depending on what I have on hand. Make sure when you are doing this you hold the tube VERY TIGHT. Also, wear glasses or goggles AND you might want to wear a dust mask as well.


After using the dremel, you can do some final cleaning with a burr cleaner. This part is a pain in the neck, but important. I clean them until they are smooth to the touch. That little gray burr tool can be purchased for under $10. You will need to change the blade occasionally.


The cutting can get a little tricky when cutting narrow pieces. It is important to put the tube in just snug and turn the tube in the cutter rather than trying to turn the cutter around the tube. The reason being is that you need to get enough of a cut so that the tube doesn't go lopsided. Once you have a beginning cut, you can tighten up the cutter and rotate the cutter around the tube.


Once cut, the other side needs to be cleaned. If you use copper that is soft, this is almost impossible because the tube will bend. This is why I use a hard temper tube and you do not anneal before this time as it will soften the tube.


Once it is completely cleaned you can then anneal. This will soften up the copper. You might need to anneal a few times between hammering.


Now, it's time to hammer. I happened to find this chasing hammer in an antique store with a very large head. Looking for tools in antique stores is one of my favorite things to do. It's heavy, but I don't have to swing it as many times and it covers the entire tube. These are my two hammers. One is modern, They are both a little beat up, but they work fine for this kind of hammering.


And there you have it.... I typically tumble them to clean them up and use liver of sulfur to darken them. They are then ready to make some basic hoops from or you could get a little more creative and include beads, discs or anything else your heart desires!


Have fun!!

MaryAnn


Tuesday, August 25, 2015

Happiness is......

a returning customer.

by MaryAnn Carroll

Today I just want to share a little bit about what my friend and LMAJ associate, Karen McGovern, does with discs that I create specifically for her two or three times a year. What I love about working with Karen is that she gives me lots of freedom and doesn't put limits, directions, expectations, etc. on the custom order. I am not one for custom orders because I am a little obsessive and worry that things will not turn out okay. They tend to take me twice as long.  I prefer to create freely without the unpleased customer's fictitious voice echoing in my head, "that's not what I envisioned, wrong color,  I don't really like that... etc."

Karen simply let me know that she didn't need any reds or yellows. I forgot about the yellow part between the message I read upstairs in my house and the walk to the basement where my very messy studio is! Whoops! It's the old being in your 50's thing. You'll see a couple yellows below. I am not a fan of yellow, so it isn't something I tend to favor, unless it has earthy tones to it.

She did tell me the she gravitated toward the discs that are the light caribbean blue, so I decided to make lots for this order in various sizes. The discs range from eensy weensy (1/4") to large (1 3/8"). It is actually those two sizes that are the toughest to enamel. The larger take longer and many coats to achieve a rich color and with the smalls, you have to be careful to be fast, so that the copper doesn't melt in the flame. The color can disappear from that size in a couple of seconds as well as the disc itself!

Here is what I finished up last night.


What I find amazing is how Karen uses these in so many different ways. I think anyone that see her work would agree that she is incredibly talented.


And some of my favorites.....


Karen also offers a tutorial about one way to use discs.

You can find that HERE. You can also find more from Karen on Facebook


Friday, June 26, 2015

Maybe tomorrow....

Yesterday was my last day of school for 2014/2015. I have been a special education resource teacher for 31 years, 25 of those at Fabius-Pompey, a nice little rural district south of Syracuse, NY. It never fails.... I am working on paperwork (I HATE PAPERWORK) up until and including the last day. The problem.... well, it is the same problem that I have with everything that seems like a chore... procrastination.

I always get everything done that I need to and I tend to do my best under pressure. At 55, I am pretty sure that won't be changing anytime soon.  Procrastination MADE ME wait until this am to think about today's post. The truth is as I type this sentence, I still have no clue.

ughhh......

.......pressure is building

I think I have this.....

Yup - there is an "I'll do that later" list at home......

........I told the group was that I think it would be a good idea to have links to our individual FB pages. That was at least two weeks ago. In my defense, life has been a little on the crazy side (friends often look forward to my morning news reports on the latest family drama), so that has been put a few sticky notes down in the pile of things to do.

I do have a procrastination system. Notes to self (usually sticky), have notes all over desk, throw notes away as the work gets done, more new notes added, still have notes that have wrinkled edges and maybe some coffee stains on them (those are the ones that I try not to wish away), maybe rewrite those notes on a clean sticky note (maybe a new color will make me get it done), hold onto notes because I can do it tomorrow, time is running out, pressure, gather the dreaded notes with the most important on top and then.... finally, if it all goes as unplanned, things work out!

I haven't dreaded this task..... just haven't gotten it done.

In no particular order (If all went right, you should be able to click each picture- If not, give me a few minutes and I will have it fixed!!) -

Staci


Sherri


Mary Jane


Karen


Patti


Carol


Marsha


Barbara


And then there is ours. Yup.... this task of updating got somewhere lost in the fire of the year...... maybe this summer I will get on top of it!

We'll see.

MaryAnn (and Bill)


Of course I don't want to forget what we share as a group.

Love My Art Jewelry


I am now one step away from completing the task of making this a page. 

Maybe I will get on that tomorrow.

MaryAnn

Friday, June 12, 2015

BIG Displays.... small Spaces

by MaryAnn Carroll

So, the idea for this post came from my most recent request for my very talented husband Bill to make me a necklace display. We do shows together, but the space I have compared to his is very small. It works out since I teach full time, have work in galleries and am usually unable to make a ton of jewelry. The problem with a small space, however, is that .... well.... it's small.

As you can see in the first picture (not the best quality), that I have a small space in comparison to all of the pottery. My spot is next to Bill in the back. 


Here a a view that is a little better. As you see I have a small table and use the ends on the long tables. After many experimental displays (not that he's thrilled that my ideas are always evolving), I decided that the best use of space is to build up not out. 


Here is a necklace/bracelets display from the past. My original idea with the one on the left was to dangle necklaces and then put bracelets on the bottom. This design is much too big and also much too wide. It does not make the most of the space that I have. It is also too busy. On the right is my most recent. It is simple, tall, and a pretty good width. I get lots more out of it.


Then I have a had a few different earring displays. This one was designed to offer a rustic look. I guess the idea was okay, but the size was way too big. The paint for the colors came from colors that were in an issue of Belle Armoire magazine.


These next two are what I have used recently. The one on the right is okay, but I really don't like the space down the middle and it needs a different color paint. I'll keep it, but need to fix it up. The one on the left is what I typically use today. The earrings pop out more (which was the idea) and they slide off to the sides for easy storage when tearing down. I just slip this into a pillow case and wrap some rubber bands around it. It could probably use a better back drop, but I am not going to worry about that anytime too soon.


Here is a close up of how the earrings display and bracelets look together.


These little guys are for end spots. The sit up on the 2nd shelf so they are at eye level. I put a pair of earrings on there for scale.


Next is the issue with necklaces. Ughh..... I don't have any easy answers for that. I read that having pieces dangle always attracts people. There is truth to that. I do have a spot for my pieces to dangle from a piece of wood that juts out from one of the pottery shelves. I didn't, however, have a nice little display for how they might look when worn. Once again, after researching a little (I've gotten smarter about doing my homework first), I found some ideas that I liked. Bill assured me that he would take care of it.

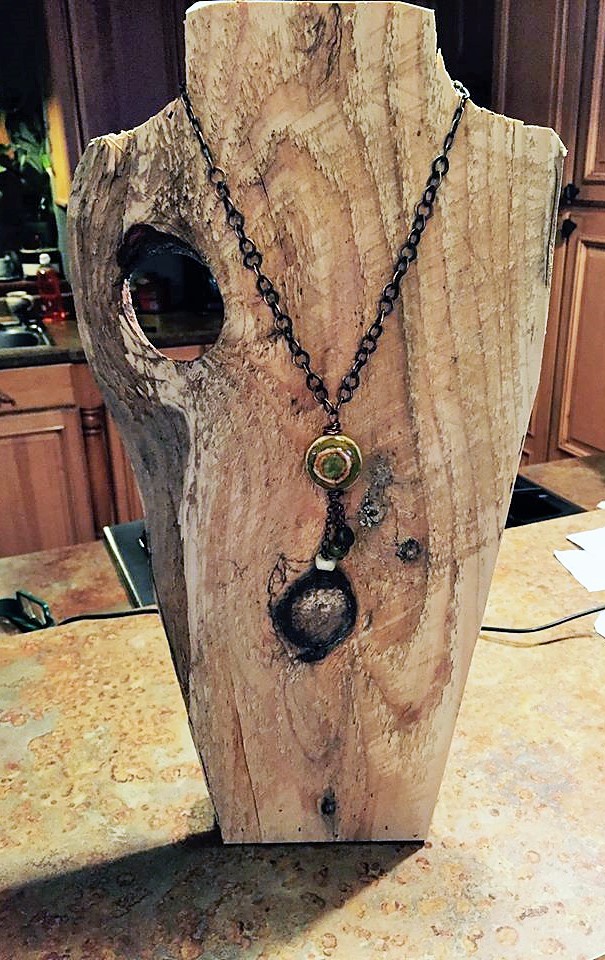
My request to him: Will you please make me a couple of tall necklace displays? I would like them made with wood with the least amount of grain that you can find so the jewelry pops out! I don't want anything that is too busy. He's retired so he told me he would make it while I was at work. I got home and this lovely display was sitting on the counter. I was a little taken aback!!


I did ask for a smooth piece of wood with little to no grain, didn't I? Now, this is a lovely piece of wood loaded with LOTS of character AND a big hole, but it wasn't quite what I envisioned. 

How do I approach this when he walks in the house?

"Thanks for making that for me, Bill. It's really nice. It has lots of character. Did you remember that I wanted one with little to no grain? 

Of course, he was put out and told me that he is constantly making and remaking displays for me! That was a dilemma because he DOES always make and remake when I come up with different design ideas. I really didn't want to say that it was not going to work.

so......................................................................................................................................................................................................................................................................................................................................................................................................................................................................................................................................................................................................


he headed down to the other room and...

SURPRISE!

He really did know what I wanted! I love him and them!!!

Now, THAT is more like it!!


My displays have evolved like my jewelry making has evolved.  It will probably continue to and maybe three years from now when I retire from teaching I will need a bigger space!

In terms of displays, this my favorite. People are drawn to it as it is tall and almost to eye level. This is built from the largest dowel I could find at Lowes.


And I still like this. It is going on the second summer of shows. I can bend the tubing to fit the earring length.


 And here is one necklace display.I have one for each table end. This show was in the backyard of a home at Westcott Art Trail in Syracuse. 


The other along with my piece of wood to dangle necklaces off of. I probably should have hidden my jacket and plastic work box for the picture!


So, that is a sampling of what I have used. It is not a complete list since I have used pieces of logs for bracelets and some other experimental ideas that didn't work out.

How do you handle your display area? What works best and what have you tossed to the curb?