Showing posts with label Mamacita Beadworks. Show all posts

Thursday, July 14, 2011

Inspired by Nature- My Backyard

by D'Arsie Manzella of Mamacita Beadworks


This month's Art Spark got me thinking about the beauty of my backyard. Living in the Grape Belt of Western New York is nothing short of magical. Each day I look out on the grapes that my husband and I were married in. In addition to the vineyard views, we are right next to Lake Erie and that gives us some of the most stunning sunsets you've ever seen.

Two nights ago as I was doing my After-Kids-in-Bed Web Work and I noticed an orange pink glow outside. I stopped what I was doing, ran downstairs and snagged my hardworking husband from his own computer screen.
I was surprised at how willing he was to drop everything and go walking in the grapes. That's how vivid the sunset was. It was a super natural event. Right there in our backyard.

As we held hands beaming at the color in front of us and the dusky moon rise behind us, I was overwhelmed with joy and hope for our future. When life is spinning me, I always find peace in Mother Nature.

Here is my contribution to this month's Art Spark. I have the moon, (my hand cast pewter
Midnight bead caps). I have the grapevines and the deep orange and pink sunset colors (Batik cotton cord from OhSoFabu). Together they capture a moment I will not soon forget.


Thanks Izzy for this challenge!

Thursday, June 9, 2011

It's all About Presentation : How to Make a Paper Box

Today I'm going to show you how to make a simple handmade box. It's the box that inspired last month's Art Spark challenge. I first encountered this box pattern when I received a beautiful piece of jewelry from the lovely and talented Lorelei Eurto which was packaged lovingly in a box just like this.


For my boxes I purchased a couple of packages of scrapbooking card stock.

It is perfect because it is both beautiful and square.
Square is where we start with this project. You need two pieces of paper the same size, and perfectly square. The size of the paper determines the size of the box. I am illustrating with 12 x12 inch paper but if you quarter it, you end up with four boxes of petite size. (my favorite)


This is all you need. Scissors and paper. Make sure the paper is stiff like card stock. It makes your box strong and your folds crisp.


Choose two pieces of complementing paper. One will be the top and one will be the bottom of the box. Begin by removing any extra tabs that have been attached to the paper by the manufacturer.


**Please note -I have chosen two pieces of paper that are identical as one side of them is decorated and the other printed red.


Choose the paper/color that you'd like to be the bottom.
If you are using 12 x12" size paper, trim 1/2" from two perpendicular sides.

The bottom of the box needs to be a bit smaller to fit inside the top when folded. I usually eyeball this but if you are making smaller boxes, trim a smaller amount proportionally.


Next, with your chosen color for the bottom facing the table, fold the square into a triangle meeting opposite corners. Open the paper flat and fold the two other corners together. Make soft creases when you do this. You are making a guideline for the next step. Open your paper flat once more.


Above you will see the next step illustrated. Bring your four corners together into the middle using the nice 'X' you made in the center of the square.


Once every one is in, turn each one out to look like this:


Beautiful. You're doing great!


Now the edges of the square get folded to the center 'X' point. Fold them in and flatten them back out again.


My finger is pointing to the crease you will make.


Showing two sides up. All four sides will come in to meet the center point, get creased and then fold out again.


Once you have folded all sides in and then back out you will see a small crease-square in each corner of the arrangement.

What you will do now is carefully cut two places on parallel sides of the work. You know when to stop cutting when you reach the crease-square's point. The point of the scissors above are in just the right place to stop.


Now after four beautifully precise cuts, you have made this (above)


Open out the "short" sides like the unfolding wings of a bird ( I know, but it's late and it's a good visual)


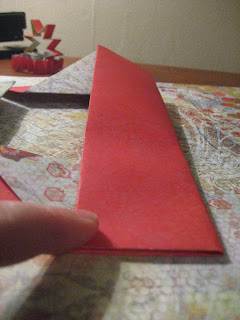
With the open wings flat on the table, lift the two "long" sides up and have their corners meet and overlap. (How do-you-do corner? Just fine, corner.)


Uh oh!

The outside corner is too long and too pointy.

So we trim it. Just a bit, to make it even.


You can see both parts of the next steps above.


#1. while holding the newly acquainted corners together, let that bird wing that we opened up earlier reach up and wrap around and over them to hold them together.

( hey, this metaphor's not too bad).

When you lay the corner in the box bottom, it will hold with friction. If you wanted a more permanent bond try a bit of glue or double sticky tape.


#2. Do the same with the other side.

TA DA!
You have just completed the bottom of the box.

Nice one.


Now for the top.


The pattern I would like on the top is now facing the table as I start folding. Repeat all steps the same as with the bottom.


Your top half will be a tiny bit bigger and should be able to slide down easily but with some resistance. If you think it's too loose or too tight, don't fret.

That ill-fitted box bottom is a great drawer organizer and you can make a new one by adjusting the width of the 1/2" strips that we trimmed from two sides of the bottom paper in the beginning.


The top taking shape. Here we go again with the bird wings...


They enfold the two sides and..... BAM! A boxtop.


Pefecto.

Thursday, June 2, 2011

What a Girl Wants

by D'Arsie Manzella


A little peek into my favorites on Etsy.

You gotta check these out.

Swinging summer love,

pop of color,

handmade honey-bead bliss.


~Cut from tin, ancient and fresh, Egyptian queen~


~Circle dance, opulent beauty, sugar maker~


~Tribal secrets, pulling weeds, framing grace~


~Wildflower, holding hands, flash dance~


~Nightfall, cha cha, vineyard walk~


and the best part about each feature?


handmade, baby.


xoxo


Mamacita


Thursday, May 12, 2011

Studio Solutions

by D'Arsie Manzella


Good Morning!


Patty's post got me thinking of studio solutions. Her gorgeous glass case is a marvel of beauty and function born of necessity. Many of us have created just the right tool or studio accessory to make our creative lives unique. Often those hidden gems go unnoticed, today I would like to share one of mine!


I often use letter stamps to make impressions in the clay that I use to sculpt my original designs. These letter stamps are tiny, rubber and generally unruly. Especially if the box of them gets shaken or stirred and heaven forbid- dropped!


In the search to keep my little stamps safe and sound, I was inspired by what generally surrounds them... Beads! I would "string" them on some wire, in alphabetical order and they would be by the ready and beautifully contained in a tiny bracelet configuration.


In order to do this, I used a very tiny hole punch to get a hole in each part of the non-usable black side of the stamp. Once they were on I connected the wire ends and voila!


My favorite part about this solution is that each letter can be twisted so that the one I am using to stamp with is separated from the rest.


What solutions have you created? Please share your favorite idea!


Monday, May 9, 2011

Art Spark Designer of the Week

by D'Arsie Manzella


I hope your creativity is on overdrive and you are engrossed with your Art Spark challenge project! I am excited to see your interpretations.


This week I am sharing the work and inspiration of MaryAnn Carroll. Her soulful creation illustrates a beautiful truth. Read on...

You Just Need to Look...

One thing that I am excited about with our new challenge called "Art Spark", which will be replacing the former "Call-to-Create" is that we (the blog authors) are invited to join in. We won't be eligible, of course, for all of the fabulous prizes, but we will benefit from thinking creatively in different ways each month. The other part that I like, which is different, is that the submitted piece can be finished jewelry or a handmade bead/component created by you that you feel fits the theme of the month.


When I saw that our challenge was the word "CONTAIN" it made me think of the troubles that I have been experiencing over the past couple of months. Right away I thought of my favorite bead which I have kept for myself. My family and I have recently been faced with a crisis that I'm quite sure will not be common in the lives of most people. At least I hope not. It was a tragedy that brought me to my knees. Someday I will be able to talk about it, but for now I will talk about it through this bead.


It was a phone call that left me almost unable to move....frozen...... but I knew that I had to be there for my son and his family. I didn't even remember how I left work that day until I was recently told by a friend that it was she who drove me home. After many sleepless nights, daily trips to Syracuse, etc. we had to bring some sanity and stability to what we were going through.
That is where this bead comes in. When I look at it, it reminds me of feeling so lost inside of a darkened tunnel, but then.....slowly....I started to see the openings. They were there already, I just had to see them myself. When life seems so overwhelmingly hopeless, there are always those openings that you will find if only you look. Although, we are still experiencing the pain that this tragedy brought, there were so many people out there willing to guide us and support us...... we just had to find them. Like sitting inside of this carved out black bead surrounded by holes, things just seemed to fall in place. I started to look through those little openings and began moving my way out from what felt like my own little desperate lonely world.


My son Ben made this bead months ago and I glazed it. I didn't make it specifically for this challenge since my bead making has come to a halt for now but thought it worthy of sharing. I think now I will add this to a chain and remember to take it out during those times when I just can't see a way out...... There is always light somewhere when you are feeling lost in the dark; you just need to remember that it's your job to find it.


MaryAnn :O)


*************************************************************************************


And here is a glimpse into my (D'Arsie of Mamacita Beadworks) sketchbook for this month's challenge. My next step will be the clay sculpt. Because I am in the middle of a move, I will need to wait to mold the pendant and cast the finished work in pewter until I am settled in NY.


Hope is a Seed,


to cultivate, to protect and to give tenderly to others. It is a great gift contained inside every moment. Be a steadfast gardener and hope will nourish you through the sparse moments in life.


Hope is a Seed.


Have a wonderful week!