Thursday, November 15, 2012

Prong Setting Tutorial


by staci smith


So, I wrote a tutorial for the new Artisan Whimsy blog. It's a great site, and you should hop on over there. There are teams for everything from polymer to metal, desingers to bead hoarders. There are tutorials and challenges, and lots and lots of people to meet. It's a great place for resources and information.

My tutorial is just an easy, beginners way to prong set.  Here it is....
~~~~~~~~~~~~~~~~~~~~~~~~~~~~~~~~~~~~~~~~~~~~~~~~~~

Easy Prong Setting

by Staci Louise Smith

Materials: 

cab
sheet metal
rivets
hole punch or drill
metal shears
sharpie marker
rivet hammer
file
sanding pad or steel wool
raw hide mallet
silver solder paste
butane torch
pickle
liver of sulphur
prong setting tool or wood dowel
burnisher
flush cutters

1.  Select your cab


2.  Place it on your sheet metal and trace it with a sharpie


3.  Cut out your backplate with the metal shears


4.  trace your cab and mark where you want your holes to be- make sure your holes are close to you cab line, but not ON it, or too far from it


5.  file and sand the edges


6.  texture as desired, I used the back of a rivet hammer to add texture- you must texture before punching holes or the holes will distort


7.  Flatten back plate with your raw hide mallet


8.  punch or drill your holes - you must match your rivet wire gauge with the correct size drill bit or hole punch.  This can be a guessing game, since drill bits and hole punches aren't sized by wire gauge.  A chart like this one from Rio Grande can be very helpful.  Make sure your rivet fits snugly into the hole.


9.  Place rivets into the holes
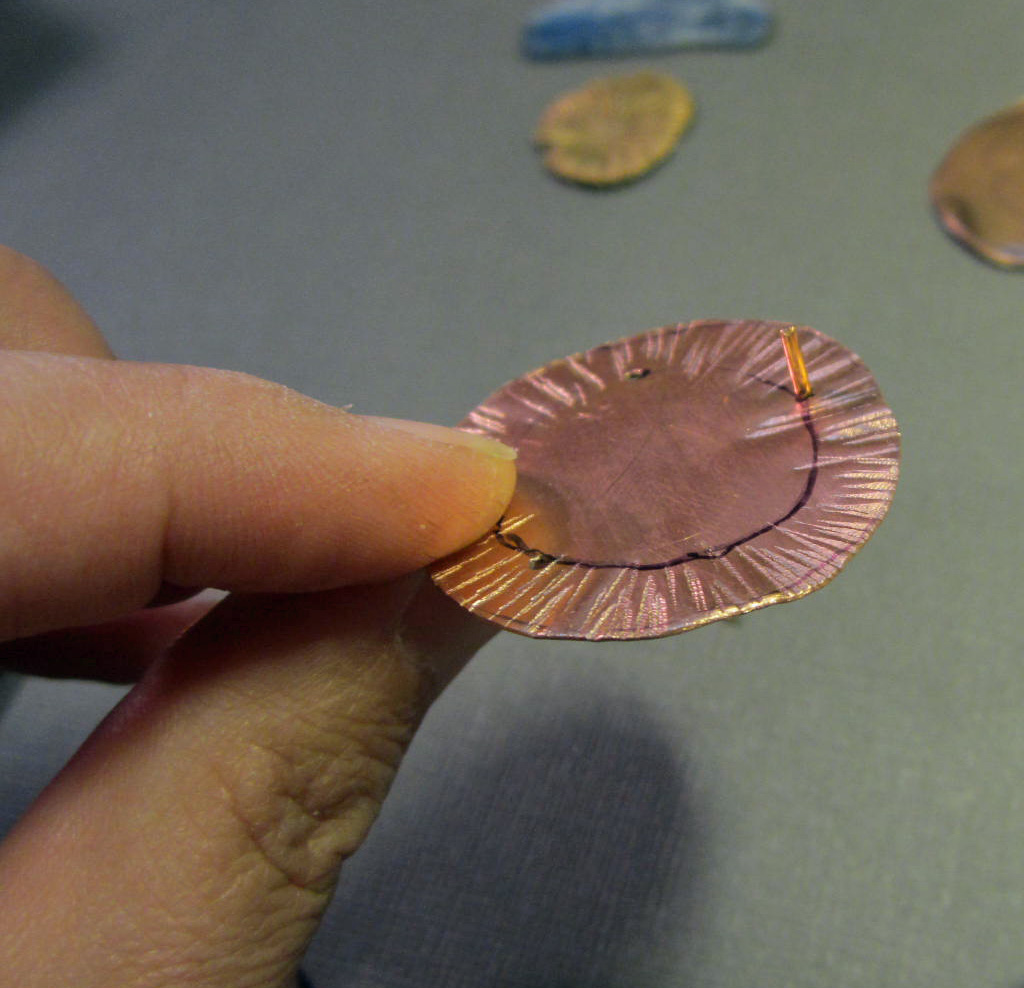

10.  Add solder paste to the flat bottom part of the rivets, then push the down flush onto the back


11.  place on your soldering block and heat until solder flows (or until its red hot, easy solder paste should surely flow by then)


12.  Quench, pickle, clean


13.  add your cab


14.  Now its time to set your cab- fold the prongs over using one of these tools. 


I used the prong setting tool with the groove, but you can use a wood dowel or something similar if you don't have that particular tool. 


15.  Burnish the prongs to strengthen them


16.  Cut them down with flush cutters- make sure to leave enough prong to just come over the curve of your cab and hold it secure


17.  File edges of prongs- careful not to damage your cab
18.  Add liver of sulphur and polish it back when its done


19.  You now have a prong set cab. 


 I am also part of a blog hop taking part today, where everyone gets to show off what they made for the prong setting challenge.  If you want to check it out, you can go to my blog www.stacilouiseoriginals.com
 
I went big for this one.....................................
 
 
Lavender Mica and black fossil ammonite prong set
 
Enjoy the tutorial, and let me know if you have any questions.
 
PS- the Art Bead Love Tour is at Genea Beads- and not only can you win a chance to host the chain, but there are also two additional people who will get to win little charm packages.  So this time there are three chances to win!

Tuesday, November 13, 2012

Taking a Glass Beadmaking Class

I have taught a ton of glass beadmaking classes. I started teaching classes three years after I started making beads. By that time I had taken more classes and spent numerous hours working on my torch. I had a friend that had been teaching classes and so I assisted her from several classes till I felt comfortable enough to start teaching on my own. I felt I was ready.

So if you have wanted to take a class here are somethings I suggest. To find a class in your area you can do a google search or check out the ISGB (International Society of Glass Beadmakers) for a list of studios in your area.

I would make a trip to the studio and check out the space.  Does it have a good ventilation system. This is very important. How does the space seem? 


Here are some things you should ask before you take a class.
- how long has the teacher been teaching?
-  where did they receive their training?
- is everything supplied? Glass, tools, Didymium Glasses (these are special filtered glasses that you must have to be able to see the flame and protect your eyes. Make sure they have these. Safety glass are not sufficient, they HAVE to be Didymium Glasses. 


The class should run at least for 6 hours (this is the just the basics like how to make a bead, makes easy shapes, pull stringers and add dots. Not much else can be accomplished in this short of a time frame.


I recommend a two day class (total of 12 hours) or a 6-8 week class (total of 18-24 hours). This will give you enough time master your skills and see if you really like it. 

Hopefully the studio rents torch time so you can see if you like it enough to make the investment in your own equipment.
Here are some great books you might want to get:
Making Glass Beads by Cindy Jenkins
The Complete Book of Glass Beadmaking by Kimberly Adams

My parting wisdom, don't expect that your first beads are going to be perfect. They won't be. Remember that this is a course to learn, not to make a sellable product. As with any art form it takes time! 
Have a good time. Oh and a warning, glass can be very addictive!

Monday, November 12, 2012

Look Who's Strutting their Stuff!

I love this shuttle-tatted piece by Spritzyfitzy in our Flickr pool this week....Another beautiful way and skill to add fibers to your work.....A few years ago, I went to pioneer village where among the old fashioned arts they were demonstrating, some women were shuttle tatting lace....such an interesting and dying art!


White Pearl Lace Necklace

Here's what she says about this design:Inspired by snowflakes and turn-of-the-century motifs, this bib necklace was shuttle-tatted with pearl accents. The 3 motifs placed together creates a dramatic necklace. Shuttle-tatted bib necklace, handmade with white thread (100% mercerized cotton) and finished with silver plated jump rings and chain. Small pearl beads are set within the pattern. All jewelry is treated to help protect the thread and add stiffness to the design.

Are you ready to Strut your Stuff?? Please head on over to our Flickr group and check out the specifics! You could win some awesome prizes from this month's sponsors!

Sunday, November 11, 2012

Earrings Winner

Happy Sunday :o)

These gorgeous earrings were donated last week by Laura Jane Bouton of LjBJewelry. The lucky winner this giveawey is Sandra! Congratulations!

Please keep reading......

Yesterday, I posted a place for all of us to get together on Cyber Monday for a sale that will bring recognition to creating handmade with handmade. Please click HERE to find out how you can be a part of this fun filled day!

As always, thank-you for supporting those who create handmade with handmade,

MaryAnn


Friday, November 9, 2012

Got a Shop? - CYBER MONDAY SALE - Join in.....

by MaryAnn Carroll

If you can say "yes" to one of the two questions below, we would love for you to join in to promote the love of creating handmade with handmade.

1. Do you create handmade beads/components?
2. Do you create jewelry using all or mostly all handmade components (whether it is your own or from other artists)?


If you are interested in joining us for our 1 day CYBER MONDAY SALE, to not only create traffic to your shop, but also bring continued recognition to the concept of ~creating handmade with handmade~ please continue reading.

How?

1. Use the inlinkz link below and type in the necessary information.

2. On the day of the actual sale and any days up to the sale, advertise this sale on Facebook, Twitter, your shop, blog, etc.

3. Your shop must include items that are mostly created with handmade. It does not have to be handmade that you create, but make sure that the artists are recognized in the item description.

4. If you do create items other than~handmade with handmade, please renew the items that meet the requirement on the sale day so that they appear first in your shop order.

5. If you are going to do what is listed in #4 above, please make note of that in your shop announcement since this is a sale promoting independent artists.

6. Use coupon codes ARTJEWELRY or ARTBEADS in the beginning of whatever percentage you want to take off. For example, I want to run a 20% off sale. I will use coupon code ARTBEADS20.

7. If you are selling from a site that does not have the coupon code option, please be creative when offering your discount.

8. On CYBER MONDAY provide a link back to this blog: http://lovemyartjewelry.blogspot.com on your blog or shop announcement, so that people can easily find their way back here to access other shops.

9. JUST ADDED: If you have a blog and want to add the inlinkz photo list for this sale to your post, click HERE to get the code.

Sound like fun?

How about adding even more fun?

If you would like an advertisement button on our blog for one month beginning Cyber Monday, please contact us (see sidebar for contact) with a picture and a description of your donation. I will need the shop you want the ad to link to as well as a description of the donation. This will be open to the first 10 people who would like to contact us. Ads will be listed in the order received.

This GIGANTIC giveaway that will begin on Cyber Monday (November 26th) at 7 am EST and end on the same day at 9 pm EST.

If you have any questions, please leave a comment and I will do my best to clarify.

As always..... Thank-you for supporting those who create handmade with handmade,

MaryAnn


Tool Talk: The 3rd Hand Tool

Happy Friday everyone!

This week I want to talk about why I have a 3rd hand tool in my studio and what I use it for.

The video above is a great illustration of what a 3rd hand tool is and how you can manipulate the tweezers to hold the piece of jewelry you are working on.

I use my 3rd hand tool for two things primarily.  When I need to solder on posts to the backs of earrings, I use my charcoal block to place the earring back on, then I place the earring post in the tweezers and place the post where I need to solder it onto the earring.  The tweezers hold the post steady while I heat up the metal and drop a ball of solder where the post and the metal meet. Easy-peasy way to make post earrings.

The second thing I use this tool for is to hold my stirrup connectors when I ball up the other end of the connector pin.  I write about how to do this in more detail in the October issue of Belle Armoire Jewelry Magazine. 

This tool has been a wonderful edition to my studio, enabling me to stretch my creative muscles with the aid of an extra hand.

What other uses have you discovered for this tool? Please share in the comments!


Thursday, November 8, 2012

The thrill of the hunt......

I realized the other day I haven't shared much of my own little makings around here lately.....Mostly, I've been concentrating on some other creative pursuits like painting and teaching locally, but I have been playing with copper!

It's one of my "professional secrets" where I get lots of my metal working equipment and even jewelry supplies....but since I love you guys so much I thought I would share :)

Most of my equipment, metal supplies, studio furniture, and even my copper elements are second hand. One of my other pursuits is spending lots of time combing estate sales, garage sales, and thrift stores. Quite often, and MORE often than you think, I find boxes full of copper stampings, tools, equipment, and studio furniture for a fraction of what it would cost new! Not only the savings, but also the quality of many of the tools and copper I've picked up are superior to what is currently available. The copper is often of thicker gauges than are normally sold and the tools are sturdier and time-tested.

There are tons of hobbyists out there who decide they no longer need/want their equipment!

snapshot of my dental drawers where I store many tools and beads


raw copper stampings in my dental drawers!


The secret is attending the same estate sales and getting there early. Most estate sale companies have email lists where if you're a regular, you can be invited to the "preview". The preview is the sale that takes place before the sale opens to the general public. This is where you get the chance to scoop up the good stuff before everyone else. Many estate sale companies also advertise their sales on EstateSales.net and many posts will have pictures and a description of what will be in the sale....

A few of the things I have scored have been:

Dental cabinets (complete with compartmentalized trays excellent for holding beads and tiny things)

Boxes full of copper stampings, wire, sheet metal, even silver!

entire box of copper I scored....


Jewelry saws, files, pliers, etc. (usually tucked away in tool boxes)

Enamel (I once paid $1 for an entire box of various colors of enameling powders)

Dapping Blocks

Gemstone strands

.....and lots more!

Another key is not to be shy about asking and or telling them what you are looking for. Estate sale people will even seek you out or give you hints or first dibs if they know what you're looking for and are willing to pay a fair price up front.

Not everyone will want to dedicate themselves to hunting down the sales, but if you're a frugal artist, like myself, give it a try! You never know what you'll find!