Showing posts with label art jewelry boot camp. Show all posts

Monday, March 18, 2013

Boot Camp: Alpha-Texture

by Staci L. Smith

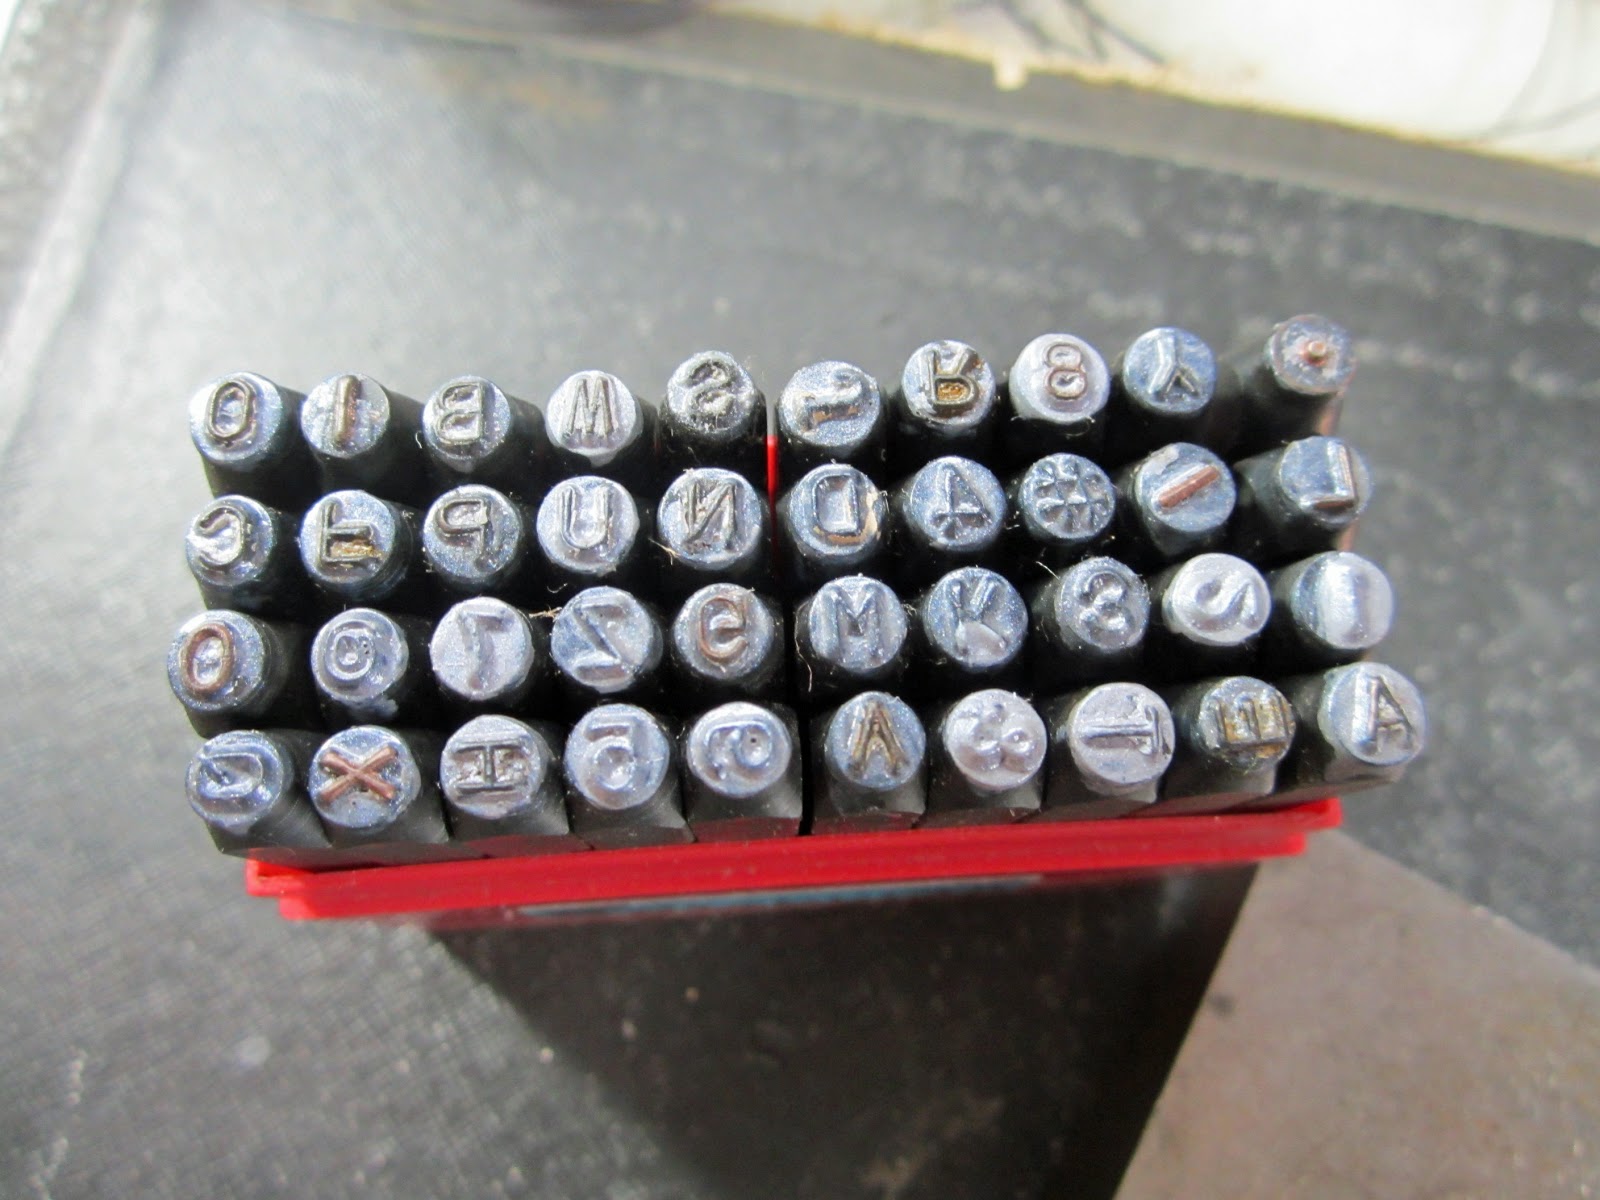
I think that when people decide to try out metal stamping, the first thing they buy is a set of letters.  I know I did.   I got this very basic set ages ago. It's capital letters, and numbers and a few symbols.  I didn't use it very much for letters though.  I'd like to share with you some of my favorite ways to use my letter to make patterns and textures on metal.  Remember- using letters as letters is NOT part of this challenge.

Here are my stamps, very basic.  I think I got these at Cool Tools many years ago.

 
Here is the hammer I like to use for stamping.  It's shorter, which gives me good control, (I hit my finger a lot less) its heavy, and its cheap, so I don't care if it gets marred from striking the steel stamps.  I got this one from Melinda Orr of Orrtec.


I took some discs I had lying around, they are made from about 24 gauge copper sheet.  Then I took my capital letter I.  In this simple set, it is just a straight line, and I use it a lot!


I hammered it over and over in some random patterns to create a sort of trail across my disc.


Then I took my letter O.


And I filled in the gaps, randomly changing the direction of the O so it gave it more natural look.


So using two letters, I created a kinda modern organic pattern on my metal.
 
Now we will get fancy. You can use a whole bunch of letters to make a really cool Boho like pattern.
 
I started with the period. I love using this as a dot texture.  I stamped it around the entire outside of my disc.
 

Then I did the same thing using my S going side-ways.  For the next inner ring I used the letter W.


After the W's were done, I took my letter X and stamped it, turned it on its side, and stamped it again in the same spot, to create these little star bursts in the center of the disc.


I thought I would show you one more thing I love to use as texture.  It's not an alphabet stamp, its my awl.  It's just a steel awl from the hardware store, sharp point on one end.  I use it with a rubber block, ILO a steel block to get the effect I want.
 
 
I hammer it hard into the metal (a brass strip this time).  It will curl as you do this, and that is fine. 
 
 
Then you can take your rawhide or rubber mallet and hammer it gently flat on a steel block.
 
 
I like it for the reverse side texture, with the bumps sticking up.  Sometimes I even break through the metal on purpose to create a rustic torn up effect.
 
Here they are, all done, I used Liver of Sulfur to antique the copper discs and then cleaned it off the high points.  It really brings out the textures that way.


If you didn't get to see Barb's post and video from last week you can view it here.
 
The blog hop will be on April 8th- so get those creative juices flowing.  Remember, we hope you will not only try to hand texture metal, but then, use it in a design, be creative with it.  Let's inspire each other!
 

Monday, February 25, 2013

Art Jewelry Boot Camp: Balled Head Pin Alternatives

So how have you been enjoying our first challenge? Today I wanted to share with you a fabulous resource on youTube, the wonderful videos of Nancy LT Hamilton!

If you haven't checked out her videos, I highly encourage you to do so. On a variety of metalsmithing topics, Nancy walks you through step by step in a relaxed, funny, and highly skilled way. If you've been browsing our challenge topics, you'll notice that there are quite a few who used the balled headpin as a cold connection and/or rivet, so I thought you would enjoy seeing this video!


Nancy posts new videos on all different techniques often, so be sure to subscribe to her youTube channel and visit her website for a variety of resources and to see her magnificent work!

Monday, February 18, 2013

Art Jewelry Boot Camp: Balled Headpin Blog Recap

by Barbara Bechtel

WOW! We're all so excited about the response to our very first Art Jewelry Boot Camp! Staci & I have worked really hard along with the other members here at LMAJ to come up with this new concept and there is always a little trepidation with putting your new idea out there in the Universe to see if it will take root!

Just in case you missed it, last week was our first blog hop, and we invited you to share what you have learned or challenged yourself to based on our current challenge, the balled headpin.

Not just for wire wrapping dangles, we challenged you to innovate with the balled headpin: begin making your own, double balling them, trying different metals, and using them in other ways!

Let's take a look over some of my personal favorites from the blogs and see what neat solutions and challenges were made and conquered!


Romantic Headpins with Balled Headpin WrapsGaia Copia made these stunning organic and sparkly combination polymer heapins with balled headpin embellishments!


Sterling Silver Balled Headpin Chandelier EarringsLove the subtle and sweet complexity of these handmade chandelier earrings by Libellula Jewelry!


Swirl EarringsI think turning balled wire into its own element and giving a bit of texture is a wonderful and creative solution! by silverniknats

If you missed participating, stay tuned! We'll be revealing our next new challenge in a few short weeks, followed by lots of tips and tutorials to inspire!

Sunday, February 10, 2013

Art Jewelry Boot Camp: Balled Headpin Blog Hop

Welcome to our first Art Jewelry Boot Camp Blog Hop for the Balled Headpin Challenge!

Balled Headpin Trilobite pendant by Staci Smith


If you've been following along on our blog each Monday and throughout the month, we hope that you will join us by posting your pieces on your own blog! Don't worry if you don't have a finished piece! Perhaps you're just trying to hone your skills or conquer a new technique! We would love to see what you have accomplished with the posts and inspiration we have provided!

If you would like to show your work, please post on your personal blog and add the link below to Inlinkz. Check our our rules here.  This is a hop for learning and sharing, not flagrant self-promotion. We're hungry for the INSPIRATION and INNOVATION behind your design! 

Remember, your post should be on topic, but DOES NOT have to be a finished project. For example, this month was a BALLED HEADPIN challenge, but perhaps you are just getting up the courage to make balled headpins! THAT'S OKAY! That's what we want to see! If you're more advanced, perhaps you took balled headpins to the next level! WE WANT TO SEE THAT TOO! If you don't have a blog, consider adding your photos to our Flickr group, or on other social media using the hashtag #AJbootcamp.

In the event you have trouble linking your blog post with Inlinkz, feel free to add it in the comments and Barbara will add as many as possible.

Monday, February 4, 2013

Art Jewelry Boot Camp: Great Headpins & Blog Hop Instructions

by Staci L. Smith


Well, we are finally getting some things worked out here at LMAJ for our new Art Jewelry Boot Camp.  Thank you for your patience as we work out the details.  Next week, Monday February 11th, we will hold our first blog hop, and we hope you can all hop along with us. If you blog your designs, be sure to add your blog URL on next Monday's POST! 

In the meantime, you can add your designs and creations using handmade headpins in our Flickr group.  Please read all the instructions and rules before joining.  

Add a description about whether you made the headpins, or, if using another artists work, please give them credit (don't link to their shop in Flickr though), and add your blog URL if you plan to participate in the hop.  

~~~~~~~~~~~~~~~~~~~~~~~~~~

We are really hoping that doing these blog hops will help us to build a community, get to know some other artists out there, and be inspired by what others are doing.  So here are some basic blog hop Good Manner Rules:  leave encouraging comments for each other.  If you don't have anything nice to say, don't say anything.  But please, lets try to make some friends on here, and let our hoppers know we stopped by.  

Don't be discouraged if you don't get lots of comments.  Many people are silent followers and just don't know what to say, or don't like to comment.  

That's it really, be nice, don't get upset, this is supposed to be fun!  And I am sure it will be.  

Next Monday, February 11th, you will be able to add your blog link directly to the blog post.  Please use the direct URL to the blog about your creation.  

Feel free to promote the hop on your current blog that day, by linking to us, so your followers can hop along too.  

~~~~~~~~~~~~~~~~~~~~~~~~~~~~~~~~~

~~~~~~~~~~~~~~~~~~~~~~~~~~~~~~~~~~

I just thought I'd show off some really great head pins that are handmade.  If you aren't ready to attempt to make your own, you can still enter our blog hop using artisan handmade headpins in your designs!!!

Here are some great polymer head pins- lightweight!!

Humblebeads

Not only are these lmapwork headpins handmade, but they are made from recycled wine and cider bottles.


Genea Beads

These headpins are made from bronze clay


TheaToo

Here are some spiral and hammered headpins


 I really like the style of the lampwork headpins


And it just doesn't get fancier then these, love them


So, have any of you been trying your hand at making your own?

Do you have any questions?  Let us know!

If you're participating, please add our badge to your blog!!!!


Grab button for Art Jewelry Boot Camp

Monday, January 7, 2013

Art Jewelry Boot Camp

Art Jewelry Boot Camp is a series created to inspire all jewelry artists to learn, to reach, and to expand their talents. Bi-monthly, we will introduce a new topic to encourage you to start expanding your talent toolbox. For four weeks, each Monday, we will post in depth tutorials based on a theme. We invite you to give them a try and keep playing and working!

During week five, We will invite you to post your progress, your trials, your tribulations, your successes, and of course, your jewelry on your own blog! There will be a link tool at the bottom of week five’s post to add your blog post. If you’re not a blogger, we also have a Flickr group set up for you to add your pieces to....If you’re a Tweeter, Instagram-er, or Pinteret-er, please join us by tagging your progress or photos with the hashtag #AJBootcamp.

We’ll spend weeks 6-8 sharing our favorite designs, sharing tutorials from well-known designers and wrapping up our discoveries!

If you’re new to making jewelry or not a seasoned metalsmith, DO NOT FEAR! This series of challenges is for seasoned makers and newbies alike! If you’re still intimidated by the techniques, consider joining in the challenge by purchasing or using elements from other handmade artisan makers!

The only rules for each challenge are:

1) Use the techniques of each challenge to make NEW, ORIGINAL jewelry.

2) The components MUST be handmade. If you didn’t make them yourself, they need to be purchased from someone who did.

And a small disclaimer: This is an opportunity to share and grow among like artists. This is not an appropriate venue for self-promotion. Please do not include sale links (to Etsy, to your personal website for sale etc.) You are welcome to blog and include links, but our goal is sharing and education, not flagrant self-promotion. Those who do not adhere to this will be removed at Love My Art Jewelry’s discretion.


TO LEARN MORE ABOUT BOOT CAMP, Please check the sidebar for the latest jewelry designing experience!


If you're participating, please add our badge to your blog!!!!


Grab button for Art Jewelry Boot Camp