Wednesday, April 15, 2015

Sawing and piercing metal tutorial and tips

Carol Dekle-Foss
Does sawing metal seem like a daunting and difficult task? Or have you tried it and decided it wasn't for you for some reason? I hear ya! I used to hate it, the blade would drag on the metal and I would constantly break them. But, I was determined to get better at it and now its one of my favorite things to do in the studio. There are tons of tutorials and videos out there on how its done, but its one of those things you just have to do yourself and practice to master. So for this post, I'm going to share some basic techniques as well as a few things that have helped me along the way.  I hope this motivates you to pick up that jewelers saw for the first time or give it a try again!

What you will need


Jewelers saw
Blades
Metal of choice
Artwork
Adhesive
Lubricant
Bench pin
Music and beverage of choice
My bench pin is a simple pre-notched one from Rio. I use a rusty clamp stolen from my hubby's toolbox to hold it in place. You can also customize your bench pin by cutting out special grooves for different sawing techniques. Here are some modifications I like and will probably do to my next bench pin. Michael David Sturlin's bench pin modifications. One of the most important tips is to have your bench pin placed at eye level so when you are sawing you are comfortable and not straining your back. You're gonna be here awhile, so play some of your favorite tunes and have your drink of choice nearby.

Here are the steps.

Step one
 Print out your artwork and then glue to the front of your metal. I use a very sticky glue made for sandblasting, but I've seen some use Elmer's glue or Rubber cement. You can experiment here and see what works best for you. TIP: If are using a metal that has been work hardened, anneal it first. This will soften the metal and make your sawing much easier.
Sometimes you will have to reapply the glue if the paper starts to lift.

Step Two
Drill holes where you want to pierce. Here's a handy chart courtesy of Rio on blade sizes and how big your drill bit should be for each blade. Be safe and wear your goggles!

Step Three
Select your blade and load it into your saw frame. If you look at the above chart, it shows the different blades and thicknesses. So the 8/0 is the thinnest. For very fine work, you want a thinner blade. I use a 4/0 blade for my detailed designs. The only problem with thinner blades is you run the risk of breakage. This is where practice makes perfect comes in. You will want to start with thicker blades while you are learning and then graduate to thinner. It's also recommended to start with a cheaper metal for practicing. Although, just so you know, it's a dream to saw sterling silver because it cuts like butter.

For loading your blade into your frame, you want the blade teeth facing up and angled down, so when you cut out the metal, it cuts on the downward stroke. First, load the blade in the top and tighten the wing screw. Then thread blade through your pierced piece, keeping the design face up. Now place the frame into the v of your bench pin and press to apply tension. Place blade into bottom of frame and tighten wing screw. The blade should have a nice ping sound.

Step Four

Apply lubricant to the backside of your blade and begin to saw! For the lubricant, you can use a synthetic like Rio's popular Bur Life or bee's wax. I am using Thunderbird's synthetic beeswax block. It's easy for me to apply by just running the back of the blade along the block. The reason I only apply lubricant to the back is I don't want to gum up the teeth.


For sawing, hold the frame in your dominant hand, making sure the blade is straight up and down, or at a 45 degree angle to your piece. Hold the piece with your non-dominant hand. Keep your grip relaxed and your shoulders down while you saw. Try not to push the blade, it will do the cutting on the down stroke. When turning corners, move the piece slowly, keeping the blade moving up and down. You will notice when you need more lubricant because it starts to get harder to saw and the blade noise sounds a bit different.
 Try not to twist the metal because it could break your blade. Also, keep blowing away all the metal dust so you can watch the blade closely.

Step Five
 Remove your design and clean your piece!  Next, you will want to use needle files to file away all the saw marks. Okay, now go saw some metal!
I have yet to complete this piece because my husband and I have been obsessed with ceramics!

In fact, he wants to share these beads and offer them for half off! He thinks because it's his first time that they aren't that good. I think they are gorgeous! So, if you see any sets you like feel free to check them out here for a great price! UPDATE: All beads have already sold. WOW! My husband is really excited! Thank you everyone!

Thank you for reading!

Tuesday, April 14, 2015

Dyeing Silks for Custom Colors and Patterns

by Barbara Bechtel


Earlier this year, I took a eucalyptus dying class with Kim Mailhot at my favorite local studio, Art More Place. It turns out, that the green eucalyptus we see in floral arrangements and the favorite food of koala bears, when heated and steamed in dye bath turns a beautiful rusty color.

Here, you can see the beautiful rusty leaves and the impressions they left on the silk bags.


Another useful technique that Kim shared with us is that sari silk and other dyed silks can often used to add pops of color as well. When heated in a boiling steam bath, the dye transfers away leaving a beautiful watercolor effect to the formerly solid silks!

See those little lines? Those are made using tiny threads pulled from sari silk! On the left, you can see some faint lime green lines left from a piece of dyed green silk from Marsha Neal Studio.

I can see so many possibilities with this to customizing and dying your own silks for use, can't you?

Here are just a few of the silks that I dyed in my class!

In the same vein, recently I saw this tutorial floating around Pinterest and Facebook for dyeing easter eggs with old silk ties and that really got the wheels turning in my head because it essentially follows the same method that I learned with the sari silks!

These follow a similar approach! I can't wait to try this method with a silk to silk dye transfer!

Have you ever tried to dye your own fibers for your jewelry? I'd love to hear about your experience in the comments below!


Friday, April 10, 2015

Facebook, what gives?

by MaryAnn Carroll

Well, I must confess, I have been hearing many complaints about Facebook over the past few months, but had no clue what people were talking about. It wasn't until I was replacing some items in a local gallery, Cinch Art Space, that the owner and I got into a discussion about it.

I decided since I really wanted our first show to be successful, I decided I was going to take some time out to learn about it and run a few trial ads.


I think my initial reaction to the change is that it is not a good thing. As I researched it more, I started to change that opinion. Yes, it is true, Facebook is going to profit from this, but why not? Any of us would want to do the same. They are a business also.

I haven't done much in terms of my business Artisan Beads Plus, but keep telling myself I am going to.  It's like starting a diet..... you know.... I'll start tomorrow!

I have, however, taken an interest in how Facebook can work for Potters for Pets, our upcoming art event to benefit the CNY SPCA. I am, by no means, an expert. Quite the opposite, as I am still in the learning phase.

I have been paying for some ads. I think I have spent about $30 over the course of two months while I experiment. I am hoping that what I learn while doing this will not only bring in more traffic to our actual event at the CNY SPCA, but will also carry over to our Love My Art Jewelry business page when we decide whether or not promoting the page is financially smart.

I have been obsessing about how our page is performing. The more I obsess, the more I learn. There are tutorials online with some short videos that I also found helpful.

Here is a good link to get started - https://www.facebook.com/business/learn

Below are examples of what I use to see how things are going. My current campaign is a post campaign (vs. a campaign to promote the page itself). I have done both page promotions and post promotions. Also, if you don't like how your campaign is going, you can stop it at any time. I have done that a few times.


This graph shows the average performance of people that posts have reached since the page was started on February 10, 2015. You can see those that were reached organically vs. paid.


This graph shows a comparison of likes, comments and shares over two months. From what I have researched, your main goal should be to increase engagement with your fans, the more they are engaged, the more your page might show up in their pages, etc. 


This shows the total reached for all activity over the past two months.


And, most recently, I started to compare how Potters for Pets performs against some other pages that are of interest to me and have some similarities to my page.


I hope this helps you give you an idea of Facebook can work for you.

MaryAnn


what we share with child's play

mary jane dodd


i wanted to follow up on marsha's post from yesterday. while i will be showing you something called pin weaving for part of my contribution to this month's boot camp, i have done the kind of weaving marsha is doing. 

like marsha, when i started i did not want to invest a lot of money into looms. ok, it's not that i didn't want to - who doesn't like to go all in for a new technique? - but i couldn't. when my children were little i used to like to order from stores that had really basic, nicely made wooden toys. so i started searching.

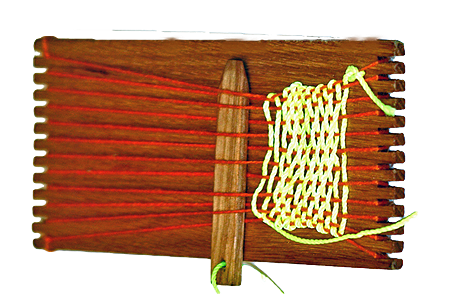
i found a shop that offered a number of ways to weave. with the card above and the one like marsha showed you, you want to make sure your warp threads (the fixed ones) are taut, but not too tight. you have to be able to get under them and also add your weft threads. 

for my hands' comfort, i found using a darning needle to be ideal - it doesn't have a very sharp end and usually accommodates thicker threads. also, for your sanity, get a needle long enough that you can get from one side of the other in one pass. 


this loom is nice because you can get under the warp easily. i own and get use out of both of them. they are different enough that they each inspire you to try different types of projects. 

the card i use for my sacred space mats

mjd - sacred spaces 2014

the little card is $4.50 and the loom is $27 (we can spend that on a bead order with our eyes closed). i have gotten so much use out of them both.

also - notice that marsha used a thinner stronger thread for her warp, then the weft can be the more textured yarns. it keeps your projects from looking like the pot holders we all made on those square looms as kids!

i'm sure there are other places to buy these, but the owner was accommodating and helpful at explorations early learning

what i hope you will do is play. i know i can very strict with how i spend my time. but truly, play is essential. and you never know what you are going to take away from it. 

so many wise people call to use from the past and urge this - 
but i'll pick a contemporary, steve maraboli

'how would your life be different if... 
you decided to give freely, love fully and play feverously?
let today be the day...
you free yourself from the conditioned rules that limit your happiness and dilute the beautiful life experience.
have fun.
give - love - play!'

----------------

happy friday!


Thursday, April 9, 2015

Room for Discovery in Fibers and Weaving

Do you ever put so much pressure on yourself to work on a project, that it becomes a burden?
I tend to do that, and the project gets pushed to the side and forgotten.

Here is a quick pic of a stash of various silks and fibers I have been collecting over the years (I'm not about to throw that stuff out - it's good for "something" - that project in the back of my head).


 And these stringing materials - LOVE them and have lots!
Picking up some Tapestry needles at the sewing store - done that a couple of times...


So as a kid - I loved knotting, braiding, twisting, tying, weaving natural things...
I grew up in the 80's and my mom was big into cross-stitch (oh embroidery thread - how I adore you! Especially the Magenta and Peacock blue colors...)

So as a "grown up" I wanted to try some weaving.
While on a very restricted budget, and refusing to go out and spend any money unless I really knew this is something I want to do, I went to Pinterest to look up some weaving practices.

It's been a while, but I think I searched things like: loom weaving, handmade loom, weaving for kids, nature weaving, and such (you get sucked in and hours later - there are ideas everywhere).

So this cardboard loom - made with an old cereal box and masking tape worked for me and my allowance for self discovery.

First I Wrapped hemp around in the long direction 8 times (I think an even number is what you need to make it come out right) - the ends are just temporarily taped with masking tape on the back - nothing special.
I left a tail - just incase I need that for when I figure out what I will be doing with these (bracelets???)
Then over, under, over, under...
Back and forth.
Add on more - hide the ends in there.
Tie a knot on the last string at the end.


For me - this was completely experimental.
I wanted to see what happened with different fibers in the warp and weave positions.
And how are pattens made.
This just barely touches the iceberg - seriously...


And always - if you think you are going to work towards making something wearable, you should make sure to do a skin test to see if any of the materials will poke or scratch, and avoid using them if your weaving is to be wearable.


So now that I have fiddled with my small, cheap looms, I can see about getting something a bit more sturdy. And I get to see about finishing these - so check back for that post.

PS - I watched Jill Wiseman's DVD on Kumihimo with Beads - and the finishing the ends part has my brain thinking in terms of how to finish something like these. It also makes my bead making brain think - what kind of ceramic component can I make? But that is a whole other issue...

Monday, April 6, 2015

Recycling

Let's talk about recycling....jewelry. 

When Spring hits, I start feeling antsy - I clean things...a closet, a cupboard, etc.  I have a need to at least "feel" organized (whether or not I am actually organized is another story)!  My creativity level has also been at an all-time-low.With these feelings comes the urge to purge, specifically, jewelry. Now I am speaking of jewelry that I have made that for one reason or another did not sell, or I did not even attempt to sell because the design just did not "feel right".  

So, I took a look around my shop and my studio, and some of my jewelry has been gathering dust (figuratively speaking of course) and sitting for ages.  Instead of cutting it apart and putting the beads (most of which are art beads) back in their bin "waiting" to be used again, I made a challenge for myself to redesign each piece.  Now, I have a pile of at least 25 designs (I stopped counting at 25 - there is more) that fall into this category.  I have just begun to scratch the surface!

First up is this pair of earrings with lampwork beads and headpins from two different glass artists.  I originally added some tiny copper rings which I soldered and textured.  While I still love the design, they are long earrings.  And, it's a lot of yellow.
.  

I just could not cut off the head pin - once cut that wire is shot...and I like the look of the tiny copper ring. So, I took off the top bead set, and added tiny copper charms to the bottom half of the earring. The end result is a much smaller and lighter earring - and I was able to reuse the artisan headpin. Plus, the emphasis is only on ONE beautiful bead.  I think in the first design, the two beads competed for attention.

Glass Head Pins by Susan Kennedy of SueBeads
When I first laid eyes on these stoneware heart charms below, the cornflower blue sent me right to my kitchen cupboards, which are full of my mother's Pfaltzgraff bakeware.  I love these dishes, and instantly fell in love with the charms.  I originally did not want to compete with the design on the heart shaped charms by adding an additional bead, so I hung them quite simply from a jump ring.

Stoneware Charms by SuburbanGirlBeads)

See the resemblance to the dishes?

Pfaltzgraff - Yorktowne pattern
Anyway, I added a tiny freshwater pearl, in a deep blue - to carry the blue theme throughout the earring.


This next earring pair was in a category of "what the heck was I thinking?"  Gorgeous copper baubles that I had topped with some recycled African Beads.  But the shine of those copper baubles was lost by the amount of beads on the top of the earring.  Although not heavy, they look like they would tear a hole in my ear from the shear weight of all the beads.


This time around, I am letting the copper do the talking. The copper-glazed stoneware now has a chance to shine and not compete with any other bead.

Copper Baubles by Scorched Earth
Next up was a design I made many, many times - I love this look.  A beautiful artisan lampwork bead suspended on nice thick gauge of wire .


For these beads, I went to the color wheel in my head and chose these sweet little purple wood beads and I nixed the copper entirely.  Lime Green and Purple is a favorite color combination that my mother wears often.  Plus, COLOR! 

Gorgeous lime green "sugar" lampwork beads by Havana Beads
The last piece I redesigned represented tons of time spent wrapping, including the soldered rings-wrapped in wire, sprinkled within the chain.  I used a set of "orphan" beads - all green, but each one different.


I made the mixed metal pendant by stamping a pattern on a sterling disc, domed the disc, then soldered it to larger copper disc.  I added an eyelet to the top and bottom of the pendant.  And, the bottom bead has a bead cap that I had etched and domed.  It had great drape when worn.  But as I look back on this, it is just "too much" on the eye.


I could not bear to cut up the pendant - I really liked it!  But, the "new" necklace is much simpler. My eye actually has a stopping point now when I look at the necklace.


I used a copper ball chain which I wrapped directly onto the pendant.  


Lampwork Beads by Susan Kennedy of SueBeads

While I still have a huge pile of "old designs" to go through, this has sparked my creativity, which after this intensely long winter, has been on hiatus.  BONUS:  I did not purchase a single bead - my wallet said "thank you".

So tell me, does the change of season's affect you and your creativity?  If so, what do you do to get your spark going again?

Thursday, April 2, 2015

Silk and Fabric Care

by Staci Louise Smith

As we move forward with our Fiber in Jewelry Boot Camp, I wanted to touch on the care of fibers.  

A reader had commented about being hesitant to use fabrics and such because they get dirty, and was concerned about longevity.  I had forgotten that I had those same concerns myself when I first started using silks in my work.
 These are some beautiful Marsha Neal silks on my table just begging to be made into something!

Because I work mostly with sari silk and other hand dyed silks, like Marsha Neal's, I can really only talk of the care they require.  

Longevity:  When making jewelry, I am really pretty strict about making sure it is made well and will last.  I guarantee my work, so I want it to last forever!  Of course, things happen, and I fix them when needed.  So using fiber was a bit scary to me.  I will share my tricks in a tutorial later for making sure your necklace is secure, and is  not going to break easily.  

these are batik fabrics from Starry Road Studio, still on my desk, also waiting to become something!  I cannot wait to dive in.

After I got that down, there was the care and cleaning of it.  I personally love to wear my sari silk necklaces in the summer.  They are much more comfortable and light on a sweaty neck then chain.  However......there is the sweaty neck thing.

The nice thing is, that they are fabric, and you can gently hand wash it in the sink.  I use a little warm water, along with some hand soap.  I wet the fabric, rub in some soap for a bit and rinse, rinse, rinse.  Allow it to air dry, and its all clean! 

I hope this little post will help to ease your concerns as we move forward and find new ways to use fiber in jewelry.  

There really are times when I tear a piece apart, and replace beading or chain with silks, because it either needed that pop of color they can offer, or it needed something soft for contrast.  Once I started using it, I have not looked back!  


If you have any other concerns or questions about using fabric in jewelry before we start up the boot camp, please feel free to ask!