Wednesday, September 16, 2015

Redneck Air Conditioner for Craft Fairs and Festivals

Carol Dekle-Foss
Hello everyone! For my very first post back in June of 2014 I promised I would share our crazy but fabulous handmade air conditioner, and here it is! I had scoured the internet looking for ways to keep cool during craft fairs and ran into the idea of making your own air conditioner. 
 My husband and I built it together using these genius instructions. There are TONS of tutorials out there on how to make them, but this guy beats them all with a built-in radiator!

Craft fairs and festivals can be challenging because you never know what the weather will bring. Torrential downpours, gusty winds, snowstorms, and even hot weather will clear out even the best of events. We try to combat the weather by using propane heaters for the cold and this air conditioner for the heat. It gets the customers attention and is a nice ice breaker. Also, it makes our tent cooler, so customers want to stay and shop longer! It also keeps my husband and I from passing out of heat stroke.

We just plug in the bilge pump and fan, add tons of ice and it lasts for a good couple of hours. Down the road we plan on investing in a heavy duty battery so we will be able to run all our gadgets and doohickeys without having to buy electricity.

So there you have it, our redneck air conditioner. I love it! So how do you combat the elements during outdoor craft fairs and festivals? I would love to hear your ideas!

Friday, September 11, 2015

Why DO We Sell Our Art?

by Sherri Stokey
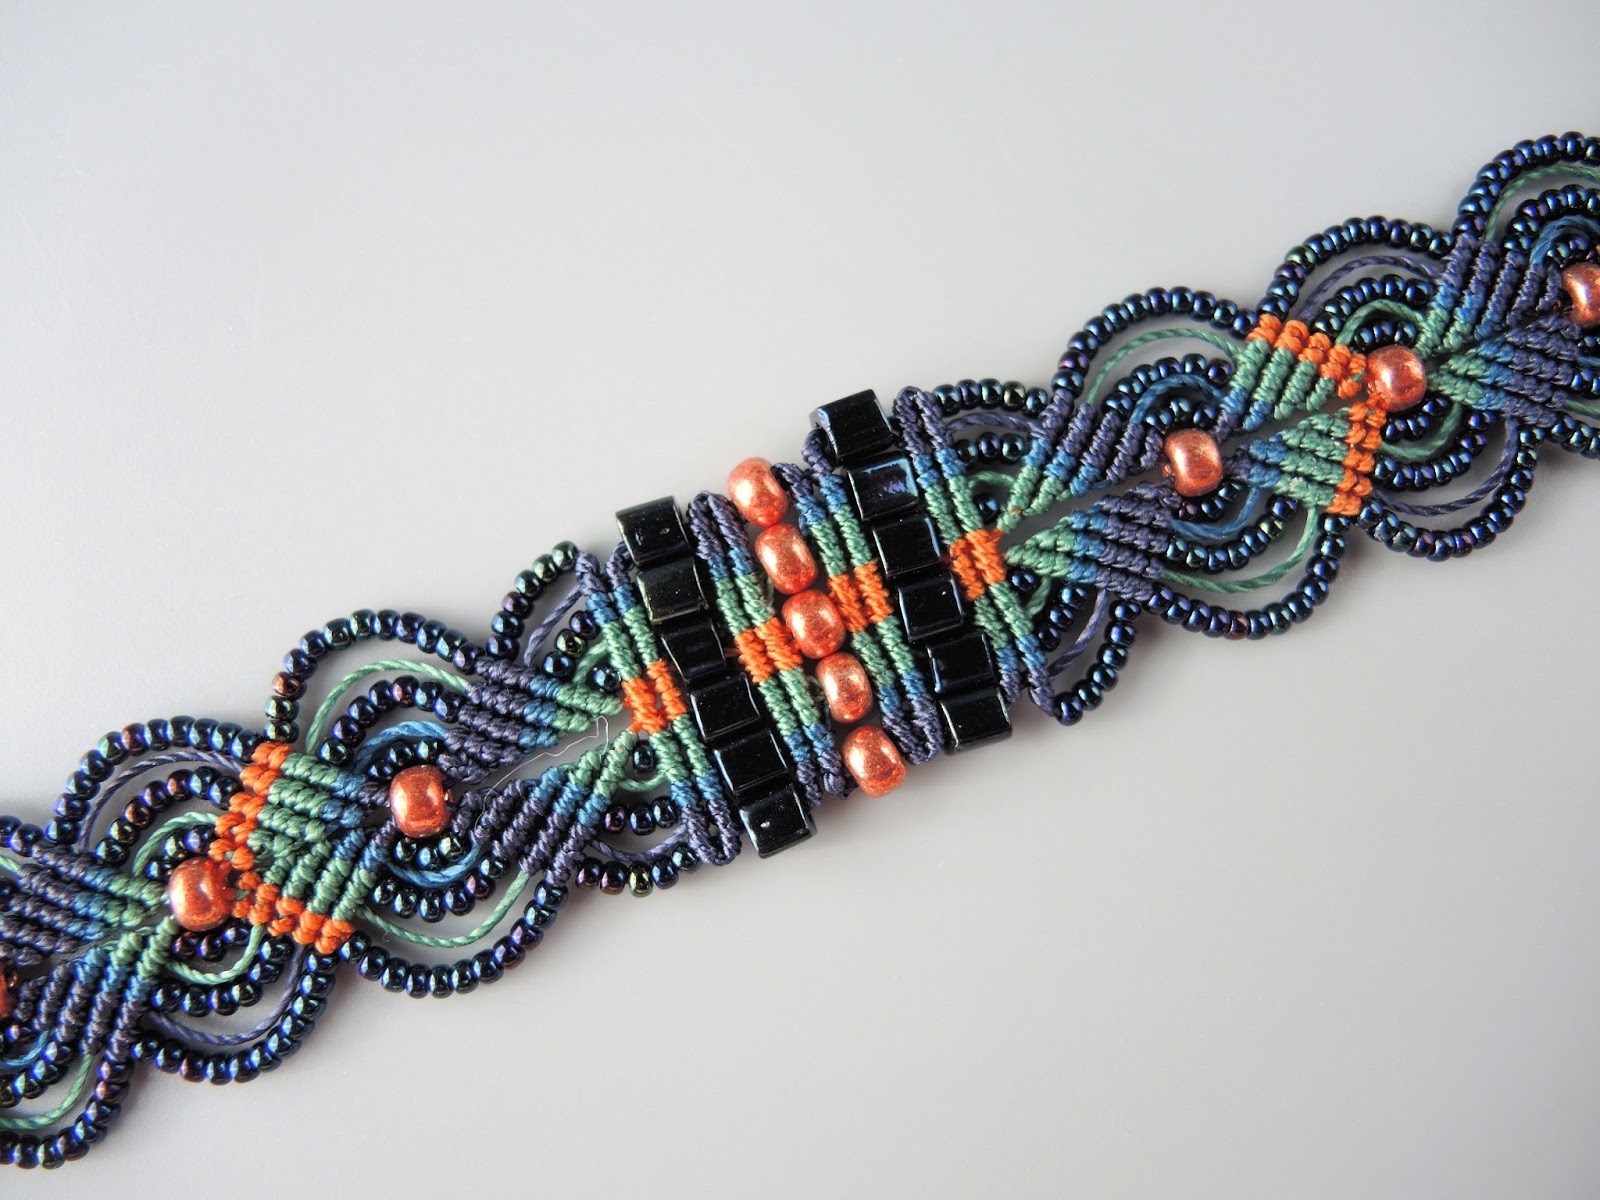
Micro macrame bracelet by Sherri Stokey.

"Why is selling your finished product important?"  This question was tossed my way recently by a student working on an economics project and it stumped me for a bit.  Why do I feel the need to sell my handmade pieces?  Why do any of us want to sell our art?  I think I speak for the majority of jewelry and jewelry component makers when I say it isn't for the money.  The reality for most of us is that a full-time minimum wage job would likely be more profitable.  What, then, could persuade us to put the results of our blood, sweat and tears out there for the world to judge (and hopefully buy)?

There are things which obviously contribute to the decision to sell.  I really love macrame and I practice my craft almost every day.  It's how I relax and I thoroughly enjoy experimenting with color and texture and pattern.  I'm curious and one thing leads to another.  Before I know it, I have three or four new pieces in the space of a week.  Even culling out the ones I deem unworthy of sale, I am still left with a steadily building inventory of micro macrame jewelry pieces - more than I can possibly wear.  Selling some pieces not only frees up space, but the resulting income allows me to purchase more beads and more colors of cord and do more experimenting.  That's a definite win-win for someone like me who wants to have all the beads and all the cord!

Practicality aside, further soul-searching revealed something that surprised me.  My answer to the student was "It gives me a feeling of "success" to think someone else thought enough of my work to purchase it."  If you take that a bit further, my reason for selling actually boils down to fulfilling an emotional need for approval.  Go figure!  

Micro macrame bracelet by Sherri Stokey of Knot Just Macrame.

I pride myself on not caring what people think of every little thing I do or say or how I look.  It's taken me years to get to the point in my life where I can say that with some degree of honesty.  I won't claim to be 100% there, but I'm certainly closer to it than I was when I was younger.  The trite saying "with age comes wisdom" isn't far off the mark.  Maybe it's just a matter of having seen more and having been through more that lets you start to prioritize better and figure out what really matters in the overall scheme of things.

Why, then, this need for validation when it comes to my art?  Why is there such an emotional connection to selling my "finished product"?  I did a little research and I found this: on a deep emotional level, feeling approval makes us feel more secure with who we are.  Hmm.  This is starting to make some sense to me.  I have a real problem with confidence.  I don't call what I do "art" (unless I go back and correct it for the purposes of this article) and I don't think of myself as an "artist".  I can apply those labels to others, but not myself.  But I can recognize the beauty of the pieces I make and take credit for the creation. So while I admit that for now I am still seeking validation, I will continue to work toward my goal of feeling good about who I am apart from my craft. And when I do reach that point, I will continue to sell just to share my joy with the world!

What about  you?  Care to share why you decided to sell (or not to sell) your art?

Colors of Autumn micro macrame bracelets by Sherri Stokey.


Thursday, September 10, 2015

The In Between

by Staci L. Smith

Well, I really really really wanted to have some sort of "how to" post for you today.  But it did not happen.  We were away for the holiday weekend for one last holiday hoorah- beach time with family and friends.

I will tell you this though, the weekend was beautiful, and we took some of Marsha Neal's kits (and some of her loose silks and disc beads so we could make even more) to the shore.  


find them here:
https://www.etsy.com/listing/234097073/beaded-silk-wrap-bracelet-kit-for-five?ref=shop_home_feat_4

My daughter is 11 and my friends daughter is a year older then her.  I thought they might enjoy making them in their down time.


Not only did they have a great time making them (I ordered another kit- yep- they had that much fun) but my friends daughter decided they can also be worn in her hair, as a removable hair wrap using a bobby pin through the loop hole.  How cute is that?  


So very creative of her!

Not to mention, while we were in Ocean City NJ we had to hit the Potomac Bead Company- and of course we all shopped there too!  
Fun times!!!


So that is where I am right now, in between.  I have a ton of things coming up though, so I will have much more to write about in the near future!!!!  I am making polymer this week and jotting notes for possible videos and classes.  
Then I need to make a bunch (ton, massive amounts) of jewelry for my upcoming fall shows.

The list is longer then that, but that is all I can mentally prepare for at this time !!  LOL!

I hope you had a nice holiday weekend to end the summer and I cannot wait for all the fall colors, cooler weather and great new fall bead designs to start showing up.

 Like Marsha's cool little pumpkins
https://www.etsy.com/listing/208018383/miniature-ceramic-pumpkin-handmade-fall?ref=shop_home_feat_3


Monday, September 7, 2015

Intimidation???

by Patti Vanderbloemen for Love My Art Jewelry


Intimidate - to frighten or overawe (someone), especially in order to make them do what one wants.

Are you easily intimated?  I am speaking in the "jewelry making" sense of the word, of course.  I used to be. With all of the social media plastering images - Face Book, Pinterest, Etsy, heck, Google Images - it's hard not to be. I used to wonder, "how I could I live up to that?"  I would swoon over images of jewelry that quite frankly, scared me into thinking "how in the world did they make that"; or, "I could never do that!"; and the worst one, "My designs never look as good as that, why do I continue to do this?" . It would actually depress me.   Bottom line is, I don't need to live up to any one's standards, except my own - and most importantly, I don't want to.  It took me years to say this last statement.

Don't get me wrong - I still ooh and awe over images of pure art.  But nowadays, I am admiring the art instead of downgrading my own and berating myself into trying to unsuccessfully emulate it. Why would anyone want to copy someone else's designs in the first place?  I will never understand that, and it actually infuriates me! I simply appreciate its beauty, but I will admit that sometimes, my mind wanders into the techniques used to create this fine art.

By doing this, I have realized that my repertoire of techniques needs tweaking - some a lot more than others.  Like bezel setting...and using that least favorite tool in my arsenal - the jeweler's saw.  So, a couple of week's ago, I made a challenge for myself - use only sheet metal and wire - and create a piece of jewelry that is 100% handmade - and in the process, tweak those two techniques.  I have lots of cabochons that need setting - but, bezel setting is very frustrating for me.  So, I decided to practice using copper instead of those precious gemstones that will one day make a gorgeous focal/earrings/bracelet, or ring, I hope.

I have recently acquired a few handmade stamps from Danny Wade.  So, I cut out a copper disc from a very old piece of copper where my etching did not quite etch deep enough, and domed the metal to resemble a cabochon.  I then stamped some pretty designs on a back plate, held my breath, and used that jeweler's saw that I absolutely despised.


I added some handmade chain that took way too long to make (that is an understatement)...


...and added a copper tube bead from my stash that has a bit of PMC fired on for texture and color.


I have not taken this bracelet off since the day I made it. Feeling successful with that saw and bezel setting, I made a few more pieces.  With each back plate sawed, it got a little bit easier.  The bracelet below features a handmade bead - in the shape of a drum, if you will, with matching stamping along its sides. 


Infinity link soldered chain on this bracelet.


Tiny little post earrings - I FORCED myself to saw around that excess back plate, instead of grabbing my shears. 


Then came the necklace - and this focal truly almost killed me - my spirit, at least!


It was not the sawing that almost did me in (though it is not perfect)...it was the bail!  That is the third bail I soldered onto that back plate.  I just did not like the first two, I was getting tired of soldering on a bail...hating it and soldering it off...solder on another one...solder it off.  So, it is what it is!  Each link in the chain is soldered - even those itsty bitsy jump rings.


The last piece is a ring.  I even stamped the bezel wire - a first for me.


I truly feel like this "challenge" was an accomplishment for me - practice, practice, practice.  And that jeweler's saw...I am now a huge fan!

While I am still on the subject of emulating other's work, last week, Carol had introduced a new tool on Love My Art Jewelry (see her post here).  Her bracelets made with the techniques used with this tool (bending brake) were simply gorgeous.  She was kind enough to include a link as to where she purchased this marvelous little tool.  There is a Harbor Freight Tool store located not too far from my house, though I have never even stepped foot inside.  What a mistake to wait that long!  I picked up the tool, and started to play.

Not the best pictures, but Carol suggested "slipping something decorative" into the channel created inside the border edges of the folded over metal .  So, I did a bit of fold forming on some 30 gauge sheet, and made this cuff.


This is possibly the biggest cuff I have ever made, though it is only 1 3/4" wide, it seems thicker!


I had time to make one more little design using this cool technique.  This pendant is actually 2 pieces of metal - the base, with the folded over edges, and the inside piece of metal.


If you look closely, the inside design features a piece of brass and copper (I used 24 gauge) that  were soldered together into one flat sheet, and independently textured.  Carol demonstrated this technique last year in this post post (click here) and it has been on my "to try" list ever since first reading it.


So, while I did have to wipe the drool off my keyboard when seeing Carol's designs, I did not feel the need to copy them - rather, make them my own. (Thank you, Carol!) :)

I am continually inspired by the art created by the contributors of Love My Art Jewelry, as well as the myriad of artists that surround my "online" world, and for that, I am truly grateful.  Inspiration instead of intimidation - that's my motto these days.

Inspiration something that makes someone want to do something or gives someone an idea about what to do or create

Thanks for hanging in there for another long post - now go create something wonderful!

xo
Patti

Friday, September 4, 2015

Micro Macrame Successes

by Sherri Stokey

Susan hadn't ever tried micro macrame before, but she tried the KnotAlong tutorial I shared in this post a couple weeks ago and shared her piece with us.  Didn't she do a great job on her first try?  

Donna's done quite a lot of micro macrame, so she decided to add a little twist on her pendant by using multiple colors:


This one was from Hilary:


And Susan:


I learned a couple of things from the feedback and comments of folks who participated, too.  Valerie shared how she dips her cords in Fray Check - did you know you could pop the top out and then you have the whole bottle opening to dip in?  Who knew!!   I can't believe I've been fighting that all these years and it's as simple as popping that piece out when you want.  It goes right back in, too, so it's back to the little applicator tip for use in coating knots when ending projects.  Thanks for sharing, Valerie!!

Georgette also shared that Super New Glue will darken at least some cords.  I've used the hypo cement for years and haven't had that issue, so I think I'll continue recommending it.  Aren't Georgette's colors gorgeous?


Many thanks to those of you who took time to share your successes with the rest of us.  If you haven't tried micro macrame knotting yet, I'm here to tell you that you can do it and the KnotAlong video will show you how, step by step.

If you did try it and you're ready for more projects, I have tutorials in my Etsy shop and a special coupon code just for you.  Use code "TENOFF" to save 10% in my shop.  The code is good on finished jewelry pieces and kits as well as the tutorials and is valid through 9/8/15.  Have fun!!

Thursday, September 3, 2015

Artist Beads and Earrings - Learning the Jewelry Basics

Sometimes in life, things work out in ways that you feel pretty fortunate.
Like having the opportunity to spend a good portion of my 30's making beads and traveling around the U.S. to sell them (before the internet took over).
Marsha Neal Studio and Thornburg Bead Studio Artist Bead Earrings
While traveling, meeting SO many wonderful bead makers, jewelry designers, jewelry hobbyists (which a lot of those people had serious jobs, and dabbling with jewelry making was their relaxation and they did not want it to be another job).

 Growing up I never dreamed of making beads or jewelry, but I always dabbled.
Here is a bad photo of a back shelf where I have all of my beads purchased at big craft stores, as I grew up. There are also some beads in there from when I first discovered the bead shows in my area. I quite remember getting sold "silver" beads, but the silver plating coming off over time, then the vendor - the next time the show came around - denied that they were his beads (he had more of the exact bead strand on the table - what a jerk taking advantage of a new beader!)


We all have to start dabbling somewhere. Sometimes the easy and cheap is the way we go.
And that is great when you are experimenting, or can use the product in ways that are very creative.
But your work goes to the next level (in my opinion) when you start to really understand your materials, and can start to design with them to have a great look, a good wearable feel - if that is your goal, and will hold up over time with intended wear.


I work part time at a wool shop and art house in Elkton, MD called Sarafina Art House.
It has been a blessing for me to have a job outside of the house around inspiring people and creative energy. We all bring a little something extra to the table creatively, and when it comes to classes, I tend to lean to the basic jewelry side of things.

The above photo is a quick shot of some of the materials I am going to bring with me to a series of classes I am going to teach in October "Earrings in an Hour". I am going to go over some of the basics of jewelry making: tools, supplies, techniques, design and inspirations. Each person is going to be able to make up to two pairs of earrings that night to take home, and I am going to be doing this for three weeks straight - with two different designs each week!


I really wanted to help people understand some different things about materials so they can start to find their creative way with jewelry making.

What are some fun tips you would share if you were teaching a beginners wire working class?
I may print some of these off with your name of course and let them read them in their take home.

PS - I have a ton of things in my head already, so asking for "tips" is just to make sure I don't forget anything important - which can happen frequently once you get comfortable with your wire work.

Tuesday, September 1, 2015

Sheet Metal Bending Brake

Carol Dekle-Foss
Hello everyone! For today's post I am going to share a cool technique I picked up in one of my metalmith classes. It's a fun and easy way to create unique borders in your designs. I use the 18" bending brake from Harbor Freight. There is also this one available from Northern Tools, or if you are feeling extra crafty, you could make your own. You can find tons of tutorials online.

This is a bracelet I made for myself. It represents the Polar and Subtropical jet streams. I know, weird right?  I live here in California, and I have been watching our rivers and lakes over the last couple of months become the lowest I have ever seen them. So now I'm constantly looking up, hoping to see a storm front coming in or even a few reassuring clouds. I even did a little weather research and then became fascinated by our jet streams, and how they affect our weather worldwide.

So there you have it, a jet stream bracelet! Yep, I'm pretty much inspired by anything.

Let me share with you how to use the bending brake to create a border.
Parts list
Bending brake
Four clamps
Sheet metal
Hammer

Here is my bending brake clamped down to my workbench. I like it clamped down instead of bolted because when I'm done, I just store it away in a cupboard.

First, mark the metal where you want it bent. Then align perfectly along the edge where the brake will be lifted. 

Then place the metal bar on top of your piece and clamp it down tightly. 

Now lift! Duh, I realized I should have placed the clamps closer to the piece for a better lift. I also realized having the piece closer to an edge helps too. 

Also, be sure to anneal your piece first, to get a nice crisp line.

Now, lay your piece perpendicular to a solid surface (I used the bending brake) and lightly hammer down the border. You can use the channel to place something into it and then hammer down. Fabric? An etched piece? Lot's of design possibilities here.

Then, place on a metal surface and hammer the border down. Looking at this picture I realize my steel block is quite pathetic. Maybe I should have purchased a bigger one instead of a bending brake!

After hammering, you can then add a unique texture to your border.

Here is the cuff bracelet I made in class.

The bending brake is just another tool that you can add to your studio arsenal. I've only used it a couple of times but it's nice to have. I'm sure there are a ton of design possibilities. Let me know if you decide to get one and what you are going to use it for.

I hope this post inspires you to create something!